13
IVC US Commercial Installation Guide –
Laminate PXP & DXP
Installation
Installation Option A: Starting in the corner of a room
x mm
x inch
x inch = 3/8 inch
x mm = 8 mm
option
A
1 2 3 4a
4b 5
7b 8 9 10
11
14b
17b 18 19 20
27b 28 29 30
37b 38 39 40
47b
48
49 50
15 16 17a
24b 25 26 27a
34b 35 36 37a
44b 45 46 47a
12 13 14a
21 22 23 24a
31 32 33 34a
41 42 43 44a
6 7a
option
A
44b 45b
42
37b 38
48
47b
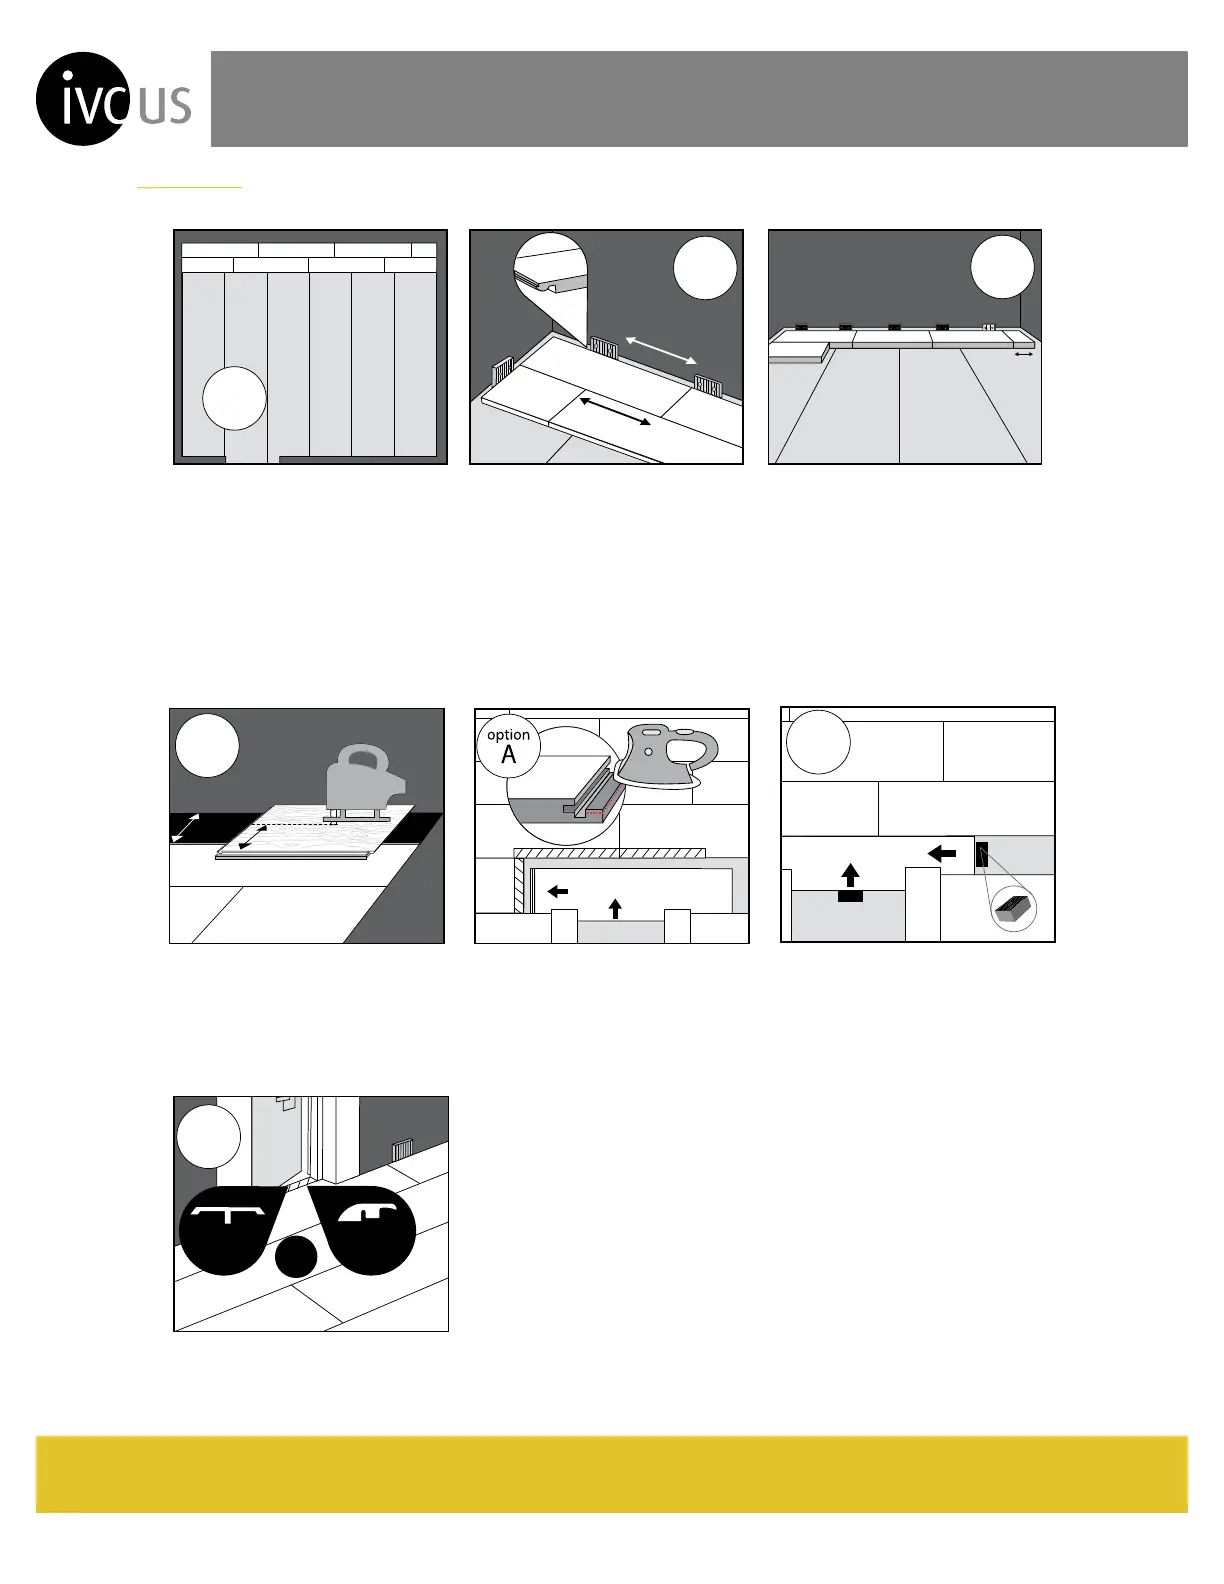
Last row: cut the plank along the length,
leaving room for the expansion gap, which
is 3/8 inch (8 mm)
How to install along the doorway of the
last row (see plank 48)
How to install along the doorway of the
last row: Sand down the grooves of the
surrounding planks as indicated by the
dotted line (about 50% of the lip) with a
sander (short end plank 47b, along the
length for plank 44b and 45b).
Tap the piece being installed under the
doorway (plank 48) in to place with a
tapping block or a scrap piece. Tap along
the width and length as indicated with the
arrows.
*Only use tapping block under doorways.
Use end cap or connection SlimTrim to
finish off. It is recommended to
provide an expansion joint between
different rooms (i.e. under doorways)
End Cap
SlimTrim
(T-molding)
x mm
x inch
x inch = 3/8 inch
x mm = 8 mm
option
A
1 2 3 4a
4b 5
7b 8 9 10
11
14b
17b 18 19 20
27b 28 29 30
37b 38 39 40
47b
48
49 50
15 16 17a
24b 25 26 27a
34b 35 36 37a
44b 45 46 47a
12 13 14a
21 22 23 24a
31 32 33 34a
41 42 43 44a
6 7a
option
A
44b 45b
42
37b 38
48
47b
or
option
A
1
Last row: cut the plank along the length,
leaving room for the expansion gap, which
is 3/8 inch (8 mm)
How to install along the doorway of the
last row (see plank 48)
How to install along the doorway of the
last row: Sand down the grooves of the
surrounding planks as indicated by the
dotted line (about 50% of the lip) with a
sander (short end plank 47b, along the
length for plank 44b and 45b).
Tap the piece being installed under the
doorway (plank 48) in to place with a
tapping block or a scrap piece. Tap along
the width and length as indicated with the
arrows.
*Only use tapping block under doorways.
Use end cap or connection SlimTrim to
finish off. It is recommended to
provide an expansion joint between
different rooms (i.e. under doorways)
End Cap
SlimTrim
(T-molding)
x mm
x inch
x inch = 3/8 inch
x mm = 8 mm
option
A
1 2 3 4a
4b 5
7b 8 9 10
11
14b
17b 18 19 20
27b 28 29 30
37b 38 39 40
47b
48
49 50
15 16 17a
24b 25 26 27a
34b 35 36 37a
44b 45 46 47a
12 13 14a
21 22 23 24a
31 32 33 34a
41 42 43 44a
6 7a
option
A
44b 45b
42
37b 38
48
47b
45b
4241
48
option
A
1
Last row: cut the plank along the length,
leaving room for the expansion gap, which
is 3/8 inch (8 mm)
How to install along the doorway of the
last row (see plank 48)
How to install along the doorway of the
last row: Sand down the grooves of the
surrounding planks as indicated by the
dotted line (about 50% of the lip) with a
sander (short end plank 47b, along the
length for plank 44b and 45b).
Tap the piece being installed under the
doorway (plank 48) in to place with a
tapping block or a scrap piece. Tap along
the width and length as indicated with the
arrows.
*Only use tapping block under doorways.
Use end cap or connection SlimTrim to
finish off. It is recommended to
provide an expansion joint between
different rooms (i.e. under doorways)
End Cap
SlimTrim
(T-molding)
1
4b 5
38
6 7a
2 3 4a
31
option
A
max 20 inches / 50 cm
Tongue Side
option
A
1
min 10 inches / 25 cm
2
4b
1 2
3
4a
option
A
min
25 cm
10 inch
4b
Installation Option A: Starting in the
corner of a room
Expansion gaps along the perimeter and
xed objects: min 3/8 inch (8 mm)
You can go both directions but we
recommend to go from left to right.
Tongue facing the wall. Start installing
the rst row by clicking the end joints
together (follow your specic click system
guidelines). Spacers must be placed at
least every 20“ (50 cm).
Adjoining rows: joint separation must be
at least 10” (25 cm).
Cut last laminate plank at the end of the
row (4a): min 10 inches (25 cm).
Use the remaining cut piece (4b) or a
random cut piece so as not to show a
repeating pattern to start the adjoining
row.
To click the planks together: angle the
adjoining row along the length. Then
angle the tongue of plank you are
installing into the groove of the adjoining
row. Tongue must face the previously
installed row. Black plastic insert must sit
in place. Then rotate downwards as
indicated with the arrow.
Click the end joints together by pushing
the end joint downwards on the left edge
of plank you are installing until you hear a
click or snap. Do not tap.
Repeat step for the rest of the room.
PXP PXP
x mm
x inch
x inch = 3/8 inch
x mm = 8 mm
option
A
1 2 3 4a
4b 5
7b 8 9 10
11
14b
17b 18 19 20
27b 28 29 30
37b 38 39 40
47b
48
49 50
15 16 17a
24b 25 26 27a
34b 35 36 37a
44b 45 46 47a
12 13 14a
21 22 23 24a
31 32 33 34a
41 42 43 44a
6 7a
44b 45b
42
37b 38
48
47b
48
option
A
or
option
A
1
Last row: cut the plank along the length,
leaving room for the expansion gap, which
is 3/8 inch (8 mm)
How to install along the doorway of the
last row (see plank 48)
How to install along the doorway of the
last row: Sand down the grooves of the
surrounding planks as indicated by the
dotted line (about 50% of the lip) with a
sander (short end plank 47b, along the
length for plank 44b and 45b).
Tap the piece being installed under the
doorway (plank 48) in to place with a
tapping block or a scrap piece. Tap along
the width and length as indicated with the
arrows.
*Only use tapping block under doorways.
Use end cap or connection SlimTrim to
finish off. It is recommended to
provide an expansion joint between
different rooms (i.e. under doorways)
End Cap
SlimTrim
(T-molding)
This document is reviewed on an ongoing basis.
MKF_0029_2 10/28/15
 Loading...