EasyManua.ls Logo

jablotron JA-15P - User Manual

jablotron JA-15P
2 pages
Print Icon
To Next Page IconTo Next Page
Loading...
JABLOTRON ALARMS a.s.
Pod Skalkou 4567/33 46601 Jablonec n. Nisou
Czech Republic www.jablotron.com
||
|
JA-15P Wireless PIR motion detector
JA-15P Wireless PIR motion detector 1 / 2 MMB55101
The JA-15P is a component of the JA-10 system. It detects of human
movement in building interiors. Its detection characteristics can be
modified by using an alternative lens. False alarm immunity is available
in two levels. The detector has a pulse reaction (only reports its
triggering), uses wireless communication and is powered with two
alkaline batteries.
Installation
The detector can be installed onto a wall or in the corner of the room.
There should be no objects which quickly change temperature (electric
heaters, gas appliances, etc.) or which move (e.g. curtains hanging
above a radiator) or pets in the detector’s field of sight. It is not
recommended to install the detector opposite windows or floodlights or
in places with over-intense air circulation (close to ventilators, heat
sources, air conditioning outlets, non-airtight doors, etc.). There should
be no obstacles in front of the detector which might obstruct its view.
I.
II.
1
2
4
5
3
Figure: 1 holes for installing on a flat wall; 2, 4 holes for installing
at an angle (in a corner); 3 PCB tab; 5 cover tab
1. Open the detector cover (by pushing the tab 5). Avoid touching
the PIR sensor inside (11) you could damage it.
2. Take out the PCB it is held by a tab (3).
3. Punch through the holes for the screws in the plastic base and
attach it on the wall. The recommended detector installation height
is 2.5 m above the floor.
4. Set the Immunity jumper as required see the detector settings.
5. Insert the PCB back and proceed further according to the control
panel installation manual. Basic procedure:
a. There must be a JA-111R radio module installed in the control
panel.
b. Go to the N-Link program, select the required position
in the Devices window and launch the enrollment mode by
clicking on the Enroll option.
c. Insert the batteries (mind the correct polarity). When the
second battery has been inserted into the detector,
an enrollment signal is transmitted to the control panel and the
detector is enrolled to the selected position. This is followed by
up to three minute detector stabilization phase indicated with
LED indicator flashing.
6. Close the detector cover and test its functioning.
1400- 00- 0000- 0001
7
6
10
8
11
9
Figure: 6 red detector activation indicator; 7 battery; 8 immunity setting
jumper; 9 production code; 10 tamper contact; 11 PIR sensor;
Note:
If you want to enrol a detector in which batteries have already been
inserted, you must remove them first, then press and release the
tamper contact in the cover (10) in order to release the remaining
charge and then you can proceed with the enrolment.
The detector can also be enrolled into the system by entering its
production code (9) in the N-Link program (or using a bar code
scanner).
Detector settings
Immunity level can be set with a jumper on a PCB inside the
detector and it determines false alarm immunity. The NORM level
(default setting) combines basic immunity with a rapid reaction. The
HIGH level provides increased immunity but the detector reaction is
slower.
Detector function modes
The detector can work in two modes:
Smartwatch is a default setting intended for the permanent
monitoring of movement in the guarded area. If permanent movement
is detected, three reports are sent every 20 s. The next report is then
sent after 2 minutes. If the detector does not detect any movement for
10 minutes, the mode with three reports every 20 s is used again.
The other available detector mode is one-minute interval. When
the detector detects movement, it sends a report and goes into standby
mode for 1 minute. When the time is over, the detector wakes-up and
remains active until the next detection of movement.
To change the mode, press and hold the tamper contact in the cover,
insert the battery and release the tamper contact 3-5 seconds after
the battery insertion. The detector then flashes either once (smartwatch)
or twice (one-minute interval) to indicate the currently selected mode.
Smartwatch is activated by default.
Detector testing
When you close the detector cover, its LED indicates all movement
for a period of 15 minutes and reports it to the control panel. After this
time the detector switches to the mode which was selected during the
battery insertion. Detector function can also be checked via the
Diagnostics window in the N-Link program.
Battery replacement
The system sends a report automatically when the battery is low.
Batteries should be replaced within one week. Remember to switch the
system to Service mode before changing the batteries (otherwise a
tamper alarm will be triggered).
Detection characteristics
The standard lens that
is supplied with the JA-15P detector
covers an area of 110 degrees / 12
m. The area is covered by 3 beams
see the following figure.
This detection characteristic is valid for standard PIR immunity.
The characteristic can be changed by using an alternative lens:
JS-7904
Coridor lens Designed for long corridors – with
a working range of up to 20 m
Increased analysis cannot be used with such a lens!
JS-7910
Pet lens Equipped only with the upper beam covering
120 degrees/12 m and not covering the floor
(can eliminate the movement of small pets on the floor)
JS-7902
Vertical curtain lens It does not cover an area but
creates a detection wall (can be used to create a barrier
and report its breach)
Note: when a lens is replaced with a different type, test whether the
detector covers the area correctly (a wrongly installed lens can cause
detection errors).
Question and Answer IconNeed help?

Do you have a question about the jablotron JA-15P and is the answer not in the manual?

Summary

Installation

Detector Settings and Immunity

Configuration of immunity levels for false alarm immunity and detector response.

Detector Function Modes

Selection between Smartwatch and one-minute interval operation modes.

Detector Testing Procedure

Method for testing detector movement detection and reporting after installation.

Battery Replacement and Enrollment

Procedure for replacing batteries and enrolling the detector into the system.

Detection Characteristics and Lenses

Description of detection range, angle, and available alternative lens options.

Technical Specifications

Overview

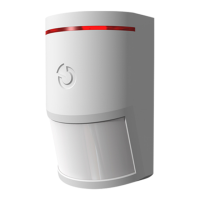
The JA-15P is a wireless PIR (Passive Infrared) motion detector designed for use with the JA-10 security system. Its primary function is to detect human movement within building interiors, providing an essential layer of security. The detector communicates wirelessly and is powered by two alkaline batteries.

Function Description

The JA-15P operates by sensing infrared radiation emitted by moving bodies, specifically humans. It can be installed on a flat wall or in the corner of a room, with a recommended installation height of 2.5 meters above the floor. To ensure optimal performance and avoid false alarms, it's crucial to consider the installation environment. The detector should not be placed near objects that rapidly change temperature (e.g., electric heaters, gas appliances) or move (e.g., curtains above a radiator). It should also be kept away from pets within its field of sight. Installing it opposite windows or floodlights, or in areas with excessive air circulation (e.g., near ventilators, heat sources, air conditioning outlets, non-airtight doors), is not recommended. Furthermore, there should be no obstacles obstructing its view.

The detector offers two levels of false alarm immunity, selectable via a jumper on the PCB:

  • NORM (default setting): This level provides basic immunity with a rapid reaction time.
  • HIGH: This level offers increased immunity, making it less prone to false alarms, but results in a slower detection reaction.

The JA-15P can operate in two distinct function modes:

  • Smartwatch (default setting): This mode is designed for continuous monitoring of movement. If persistent movement is detected, the detector sends three reports every 20 seconds. Subsequent reports are then sent after 2 minutes. If no movement is detected for 10 minutes, the detector reverts to the three-reports-every-20-seconds pattern.
  • One-minute interval: In this mode, upon detecting movement, the detector sends a report and then enters a standby state for 1 minute. After this minute, it reactivates and remains active until the next detection of movement.

The standard lens provided with the JA-15P covers an area of 110 degrees horizontally and up to 12 meters in depth, utilizing three beams. This detection characteristic is optimized for standard PIR immunity. The detector's characteristics can be modified by using alternative lenses, each designed for specific applications:

  • JS-7904 Corridor lens: Designed for long corridors, with a working range of up to 20 meters. Note that increased analysis cannot be used with this lens.
  • JS-7910 Pet lens: This lens uses only the upper beam, covering 120 degrees horizontally and up to 12 meters, without covering the floor. This design helps eliminate false alarms caused by small pets.
  • JS-7902 Vertical curtain lens: This lens does not cover an area but creates a narrow "detection wall," which can be used to establish a barrier and report its breach.

Usage Features

Installation and enrollment into the JA-10 system are straightforward. First, the detector cover is opened by pushing a tab, and the PCB is removed. Holes for screws are punched through the plastic base, and the detector is attached to the wall at the recommended height. The immunity jumper is set as desired.

To enroll the detector:

  1. Ensure a JA-111R radio module is installed in the control panel.
  2. In the N-Link program, select the desired position in the Devices window and initiate the enrollment mode.
  3. Insert the batteries (observing correct polarity). Upon inserting the second battery, an enrollment signal is transmitted to the control panel, and the detector is enrolled. This is followed by a stabilization phase of up to three minutes, indicated by the LED indicator flashing.
  4. Alternatively, if batteries are already inserted, they must be removed first. Then, press and release the tamper contact to discharge any remaining power before re-inserting the batteries and proceeding with enrollment.
  5. The detector can also be enrolled by manually entering its production code into the N-Link program or by using a bar code scanner.

To change the detector's function mode (Smartwatch or One-minute interval):

  1. Press and hold the tamper contact located in the cover.
  2. Insert the battery.
  3. Release the tamper contact 3-5 seconds after battery insertion.
  4. The detector will flash once for Smartwatch mode or twice for One-minute interval mode, indicating the currently selected mode. Smartwatch is the default.

After closing the detector cover, the LED indicates all movement for 15 minutes, and reports are sent to the control panel. After this initial period, the detector switches to the selected function mode. Detector functionality can also be verified using the Diagnostics window in the N-Link program.

Maintenance Features

Battery Replacement: The system automatically sends a report when the battery level is low, indicating that replacement is needed within one week. It is crucial to switch the system to Service mode before changing the batteries to prevent a tamper alarm from being triggered.

Lens Replacement: If an alternative lens is used, it is essential to test whether the detector covers the intended area correctly. Incorrectly installed lenses can lead to detection errors and compromise the security system's effectiveness.

jablotron JA-15P Specifications

General IconGeneral
TypePIR motion detector
Battery TypeCR123A
Typical Battery Lifetimeup to 5 years
Wireless Frequency868 MHz
Operating Temperature Range-10 °C to +40 °C
Security GradeGrade 2
Tamper ProtectionYes
Power SupplyBattery
Environment SecurityIndoor
MountingWall
Detection Angle90 degrees

Related product manuals