- 0218 - Jaga N.V.
Installatiehandleiding / Instructions d’installation / Installationsanleitung / Installation instructions
DBEC.11
3
DBEC 11
G
Aansluiten op netspanning / Raccordement à l’électricité / Anschluss an elektrischen Strom / Connecting to electricity
Aanbeveling / recommendation
Empfehlung / recommendation
• voer de 12V DC via de opening in de con-
sole. Sluit de the 12V DC voeding aan op
de DBEC.11 control-unit : zie
F
V
• insérez le câble à travers l’ouverture
de la console. Branchez l’alimentation
12V
DC à l’Unité de contrôle de
DBEC.11: voir
F
V
• führen Sie das Kabel durch die Öffn-
ung in der Konsole. Schließen Sie die
12V
DC Stromversorgung an das Mo-
dul DBEC.11: siehe
F
V
• enter the cable through the opening in
the console. Connect the 12V
DC po-
wer supply to the
DBEC.11 control unit
:
see
F
V
F
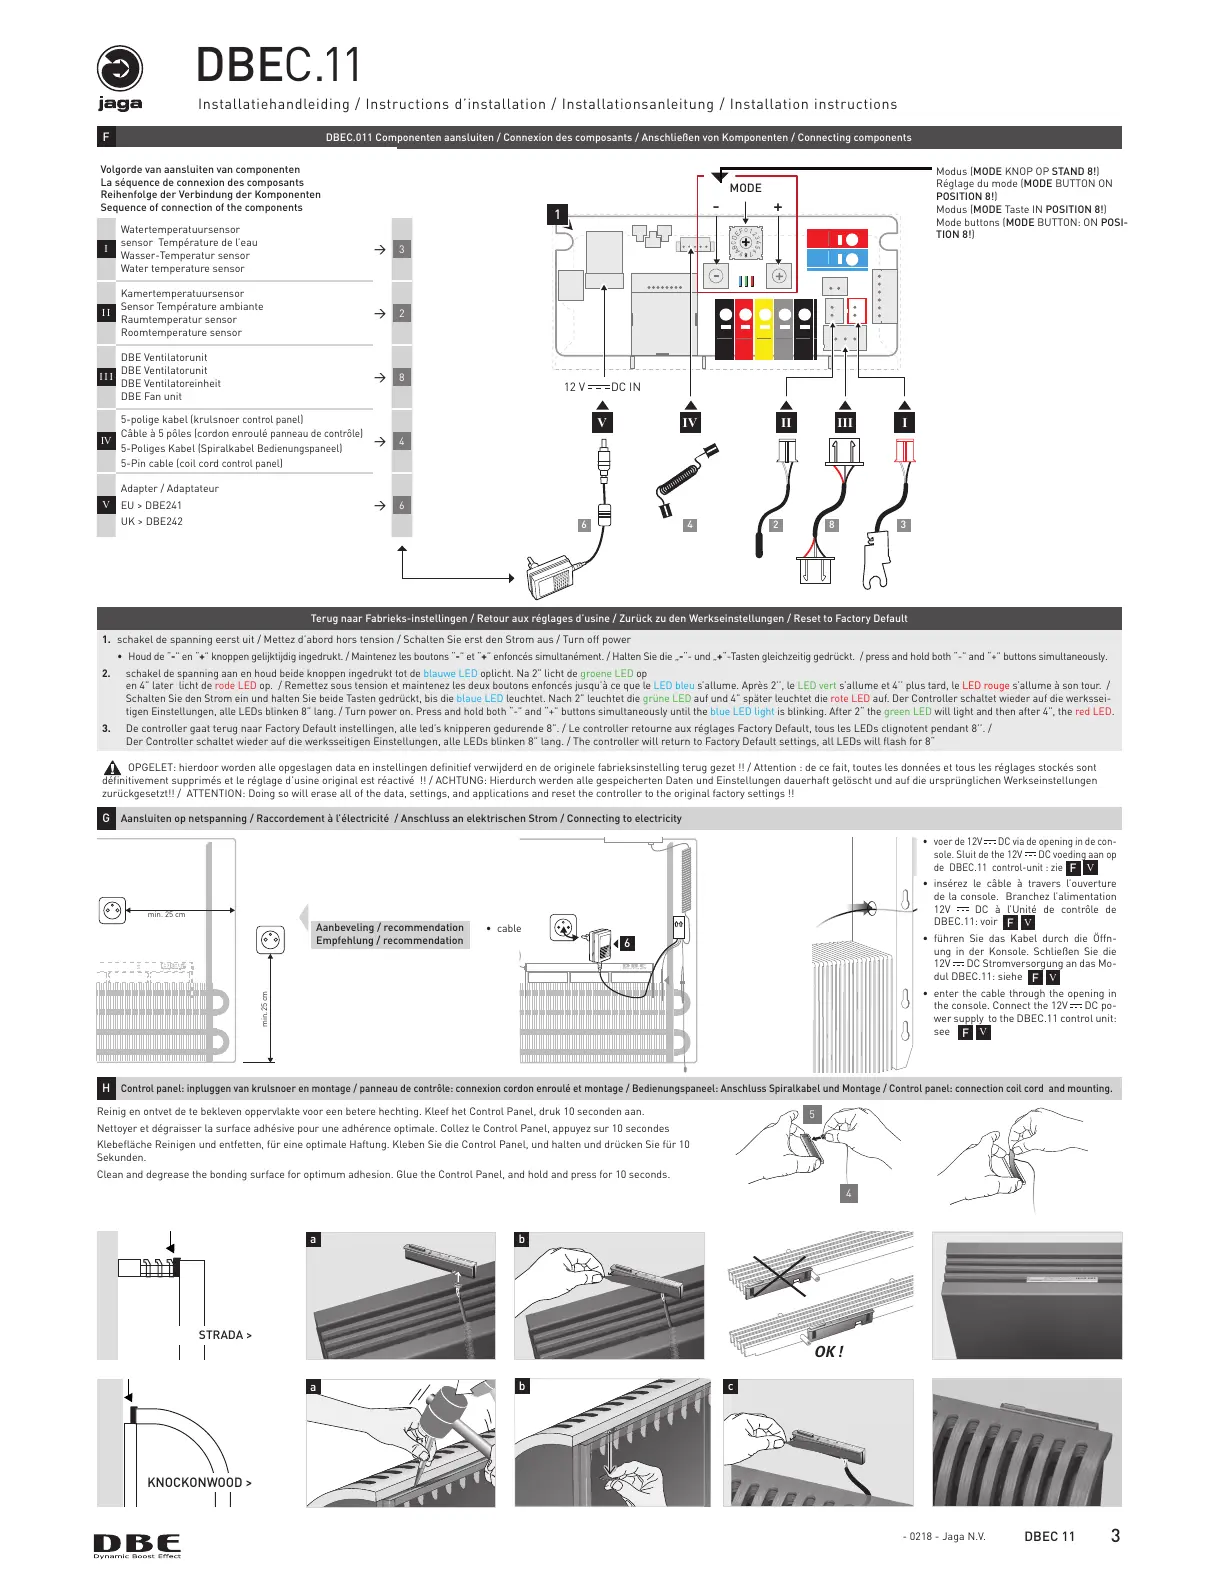
DBEC.011 Componenten aansluiten / Connexion des composants / Anschließen von Komponenten / Connecting components
H
Control panel: inpluggen van krulsnoer en montage / panneau de contrôle: connexion cordon enroulé et montage / Bedienungspaneel: Anschluss Spiralkabel und Montage / Control panel: connection coil cord and mounting.
Reinig en ontvet de te bekleven oppervlakte voor een betere hechting. Kleef het Control Panel, druk 10 seconden aan.
Nettoyer et dégraisser la surface adhésive pour une adhérence optimale. Collez le Control Panel, appuyez sur 10 secondes
Klebefläche Reinigen und entfetten, für eine optimale Haftung. Kleben Sie die Control Panel, und halten und drücken Sie für 10
Sekunden.
Clean and degrease the bonding surface for optimum adhesion. Glue the Control Panel, and hold and press for 10 seconds.
STRADA >
BOOST
C
OMFORT
PUSH F
OR
B
OOST
JAGA
DB
E
a
BOOST
COMFORT
PUSH FOR BOOST
JAGA DBE
b
KNOCKONWOOD >
a
b
BOOST
COMFORT
PUSH FOR BOOST
JAGA DBE
c
5
4
Volgorde van aansluiten van componenten
La séquence de connexion des composants
Reihenfolge der Verbindung der Komponenten
Sequence of connection of the components
I
Watertemperatuursensor
sensor Température de l’eau
Wasser-Temperatur sensor
Water temperature sensor
→
3
I I
Kamertemperatuursensor
Sensor Température ambiante
Raumtemperatur sensor
Roomtemperature sensor
→
2
I I I
DBE Ventilatorunit
DBE Ventilatorunit
DBE Ventilatoreinheit
DBE Fan unit
→
8
IV
5-polige kabel
(krulsnoer
control panel
)
Câble à 5 pôles
(cordon enroulé
panneau de contrôle
)
5-Poliges Kabel (Spiralkabel
Bedienungspaneel
)
5-Pin cable (coil cord
control panel
)
→
4
V
Adapter / Adaptateur
EU > DBE241
UK > DBE242
→
6
• cable
DBE
12 V DC IN
MODE
+-
IVV
46 2 8 3
1
II III I
Modus (MODE KNOP OP STAND 8!)
Réglage du mode (MODE BUTTON ON
POSITION 8!)
Modus (MODE Taste IN POSITION 8!)
Mode buttons (MODE BUTTON: ON POSI-
TION 8!)
Terug naar Fabrieks-instellingen / Retour aux réglages d’usine / Zurück zu den Werkseinstellungen / Reset to Factory Default
1. schakel de spanning eerst uit / Mettez d’abord hors tension / Schalten Sie erst den Strom aus / Turn off power
• Houd de “-” en “+” knoppen gelijktijdig ingedrukt. / Maintenez les boutons “-” et “+” enfoncés simultanément. / Halten Sie die „-“- und „+“-Tasten gleichzeitig gedrückt. / press and hold both “-” and “+” buttons simultaneously.
2. schakel de spanning aan en houd beide knoppen ingedrukt tot de blauwe LED oplicht. Na 2” licht de groene LED op
en 4” later licht de rode LED op. / Remettez sous tension et maintenez les deux boutons enfoncés jusqu’à ce que le LED bleu s’allume. Après 2’’, le LED vert s’allume et 4’’ plus tard, le LED rouge s’allume à son tour. /
Schalten Sie den Strom ein und halten Sie beide Tasten gedrückt, bis die blaue LED leuchtet. Nach 2” leuchtet die grüne LED auf und 4” später leuchtet die rote LED auf. Der Controller schaltet wieder auf die werkssei-
tigen Einstellungen, alle LEDs blinken 8” lang. / Turn power on. Press and hold both “-” and “+” buttons simultaneously until the blue LED light is blinking. After 2“ the green LED will light and then after 4”, the red LED.
3. De controller gaat terug naar Factory Default instellingen, alle led’s knipperen gedurende 8”. / Le controller retourne aux réglages Factory Default, tous les LEDs clignotent pendant 8’’. /
Der Controller schaltet wieder auf die werksseitigen Einstellungen, alle LEDs blinken 8” lang. / The controller will return to Factory Default settings, all LEDs will flash for 8“
OPGELET: hierdoor worden alle opgeslagen data en instellingen definitief verwijderd en de originele fabrieksinstelling terug gezet !! / Attention : de ce fait, toutes les données et tous les réglages stockés sont
définitivement supprimés et le réglage d’usine original est réactivé !! / ACHTUNG: Hierdurch werden alle gespeicherten Daten und Einstellungen dauerhaft gelöscht und auf die ursprünglichen Werkseinstellungen
zurückgesetzt!! / ATTENTION: Doing so will erase all of the data, settings, and applications and reset the controller to the original factory settings !!
All manuals and user guides at all-guides.com
 Loading...