3
2,4 GHz Procedura
1. Binding
Il trasmittente e la ricevente fornito sono già legati tra loro, in modo che Lei non deve fare più niente.
Se si desidera utilizzare un altro trasmittente o ricevente (dello stesso tipo), è necessario prima un
binding tra loro.
Per fare ciò, proseguite come descritto di seguito, prima dell‘uso:
1. Inserire le batterie nel trasmittente durante che è spento.
2. Inserire il ponticello (Bindepin) sul connettore della batteria del ricevente.
3. Collegare la batteria del ricevente su qualsiasi canale. Il LED rosso sul ricevente inizia a
lampeggiare e cosi segnala che la ricevente è in modalità di binding.
4. Premere il pulsante binding sul retro del trasmittente, tenere premuto e accendere adesso il
trasmittente.
5. Se il LED rosso alla ricevente lampeggia più lento, il processo di binding é stato completato.
Quando ora si tira il ponticello, il LED rosso si illumina in modo permanente.
6. Ora scollegare la ricevente dalla rete di alimentazione.
7. Adesso potete accendere il trasmittente.
8. Collegare tutti i servi alla ricevente e collegarlo alla rete di alimentazione.
9. Vericare che tutti i servi funzionano correttamente.
10. Se questo non è il caso, ripetere la procedura nuovamente dall‘inizio.
11. Se avete programmato e impostato il vostro modello, si dovrebbe ripetere il processo di binding
in modo tale che l´impostazione é parametri sono completamente trasmessi dal trasmittente/
ricevente.
2,4 GHz Operation notes
1. Binding
The supplied transmitter and receiver are already bound at production time so you don‘t need to
do it. If you are using another transmitter or receiver, you have to rst bind them before use as
described below:
1. Install batteries in the transmitter and turn it o.
2. Connect the binding jumper to the battery port of the receiver.
3. Connect the battery of the receiver to any channel power supply. The red LED with blink
indicating that it is in binding mode.
4. Press and hold the bind key of the transmitter and turn it on.
5. The binding process is nished when the red indicator on receiver ashes more slowly than
before. Pull out the binding wire and the red indicator stays on.
6. Disconnect the receiver battery.
7. Turn o then back on the transmitter.
8. Connect all the servos to the receiver then connect its battery.
9. Check if all servos are working as expected.
10. If anything is wrong, restart this procedure from the beginning.
11. Once you have programmed and set-up your model, you should bind once again so that the set
parameters are assigned tot he Transmitter/ Receiver.
Aereo
Aircraft
Elicotteror
Helicopter
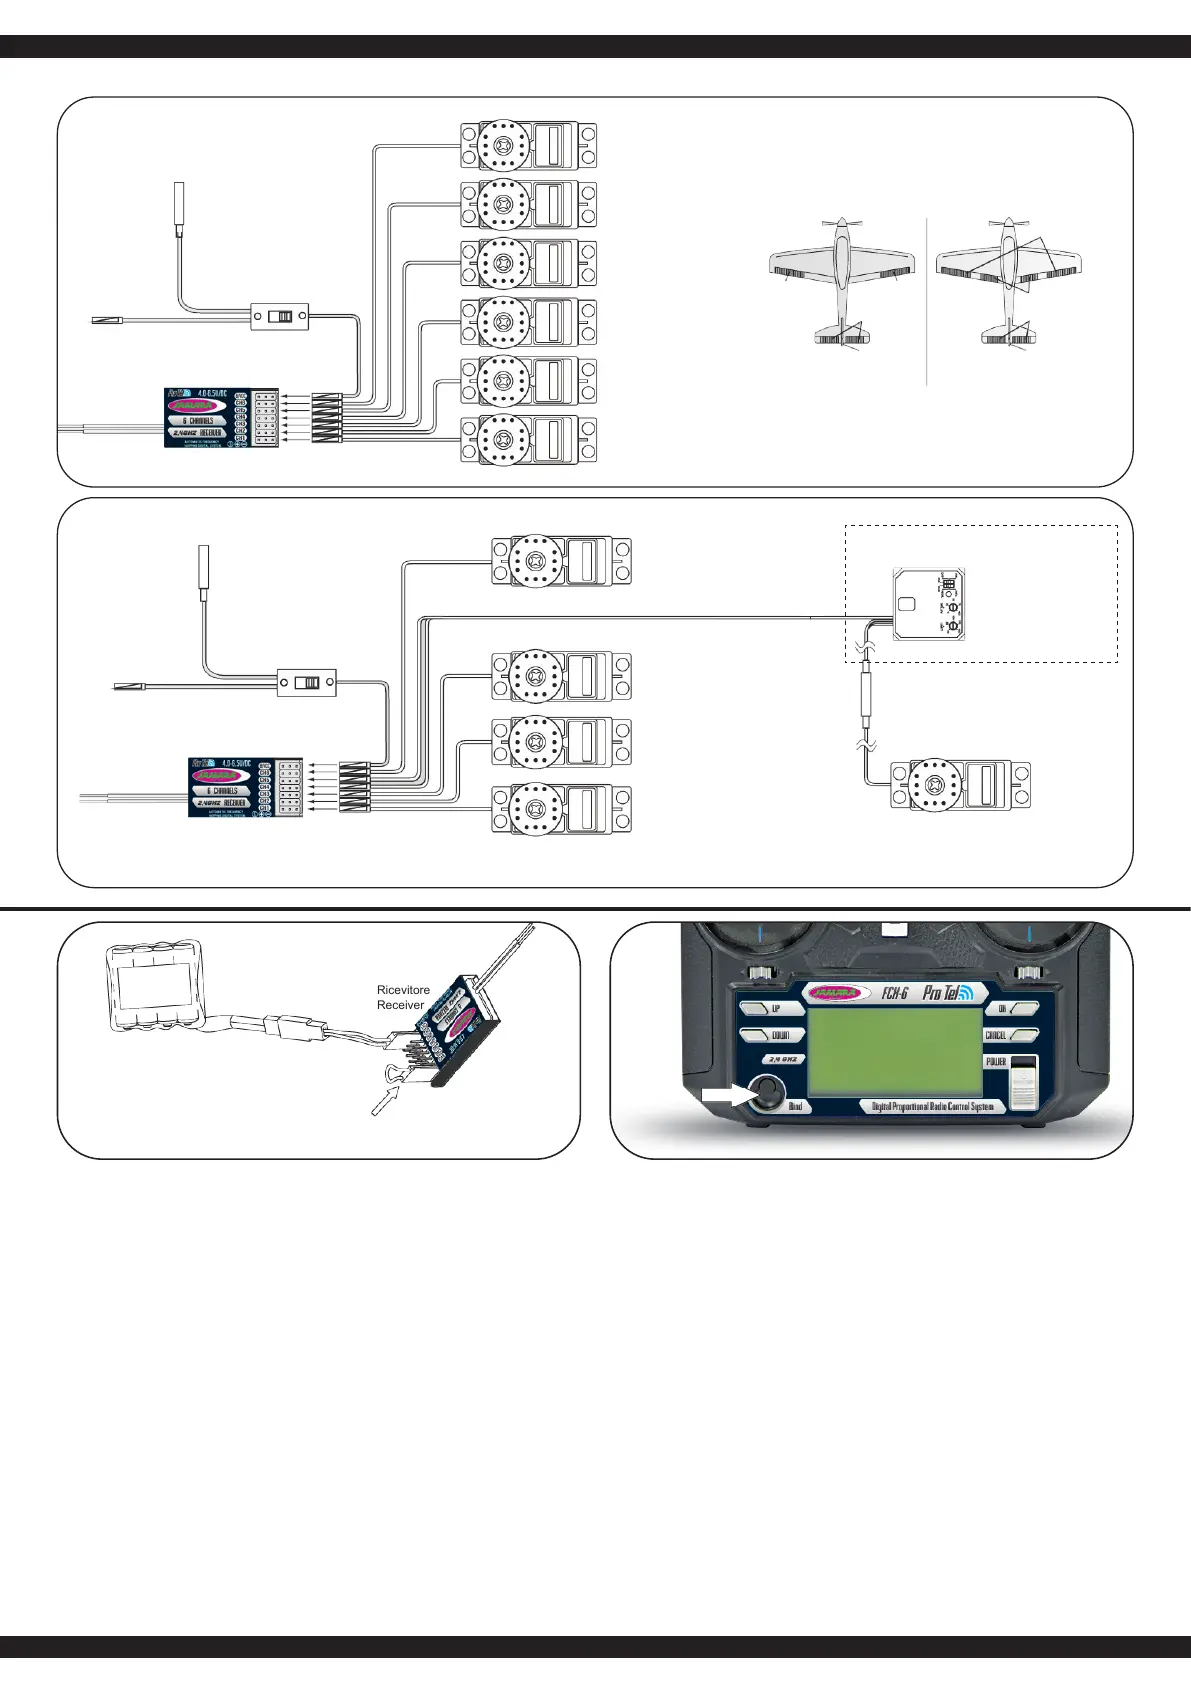
IT - Ricevitore e servo connessioni GB - Receiver and servo connections
per la batteria
to battery
per la batteria
to battery
Presa per caricar
Charging jack
Presa per caricar
Charging jack
Cavo interrutore
Switch harness
Cavo interrutore
Switch harness
Ricevitore
Receiver
Ricevitore
Receiver
Ricevitore
Receiver
CH6
CH6
CH6
CH5
CH4
CH3
CH2
CH2
CH2
CH1
CH1
CH1
Aileron modo
(2 separatamente servo
Aileron), CH 1 & 66
Flaperon mode
(dual aileron servo),
CH 1 & 6
Aileron e ap indipendenti
Independent Aileron & Flap
CH4
CH4
CH6
Gyro sensoriale (CH5), Direzionale (CH4)
Gyro sensory (CH5), Rudder (CH4)
Gyro di monitor
Optional Gyro system
Direzionale servo
Rudder servo
CH3
CH2
CH1
Batteria
Battery
Jumper
Binding jumper

 Loading...