6
FRONT
FRONT
DE - Flyback- & Kompassfunktion:
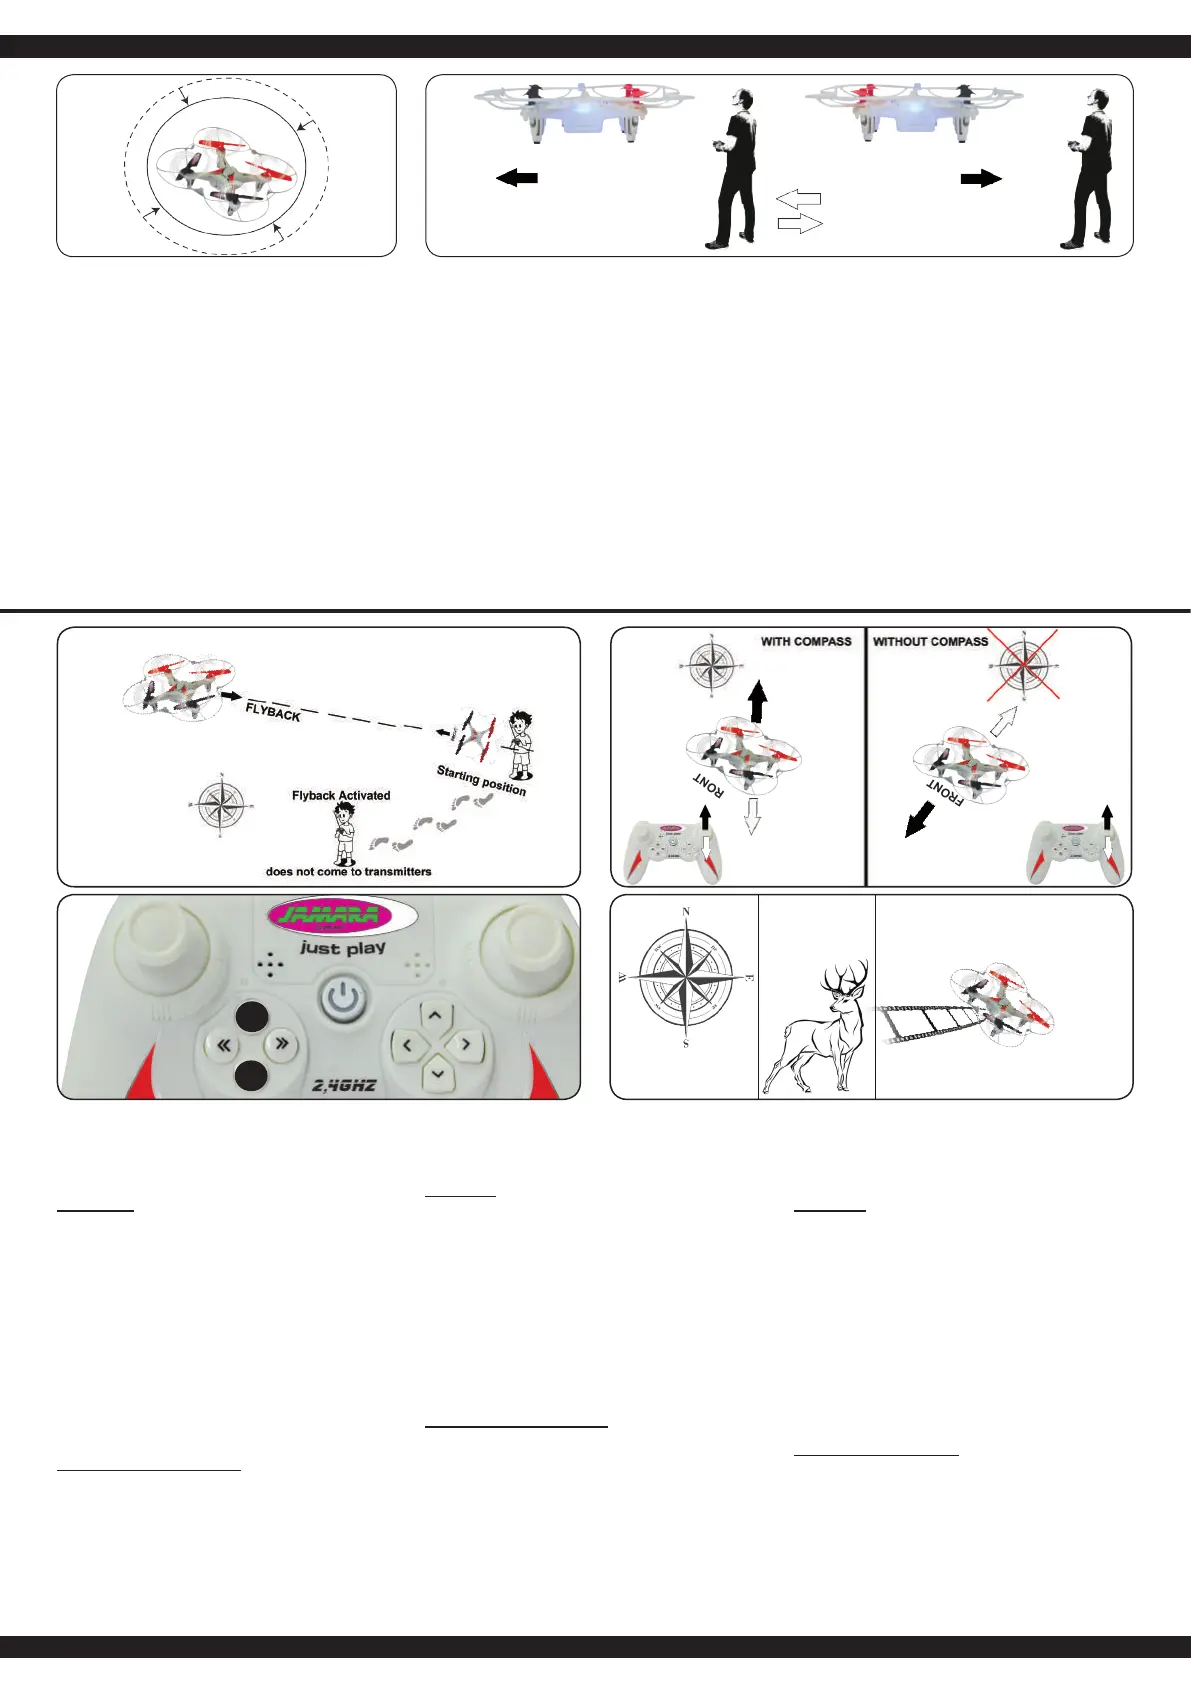
Ihr Modell verfügt über eine Flyback- & Kompassfunktion. Das
heißt es ist in der Lage trotz einer Drehung (der Rumpf zeigt
nicht mehr in Flugrichtung) in eine gewünschte Richtung (die
ursprüngliche Flugrichtung) zu iegen und halbautomatisch zu
Ihnen zurück zuiegen
Vorbereitung:
Zuerst sollten Sie sich Gedanken machen welche Richtung Sie
im Kompass des Models abspeichern wollen. Diese Richtung
wird beim aktivieren der Kompassfunktion automatisch zur ab-
gespeicherten Flugrichtung. Möchten Sie also z.B. einen Weg
entlang iegen und während dessen den Kompassmodus ver-
wenden wählen Sie die Richtung in die der Weg führt als Grund-
richtung für den Kompass. Wenn Sie nun das Modell im Kom-
passmodus um die eigene Achse drehen lassen müssen Sie sich
keine Gedanken um die Flugrichtung an der Fernsteuerung ma-
chen. Wenn Sie den rechten Steuerknüppel nach vorne drücken
wird das Model in Richtung des Weges von ihnen wegiegen.
Wenn Sie den rechten Steuerhebel zu sich herziehen wird sich
das Model den Weg entlang auf Sie zu bewegen.
Die Kompassfunktion kann im Flug durch langes drücken der
Kompasstaste (A) aktiviert werden. Durch eine zusätzliche rote
LED am Sender signalisiert das Modell das es im Kompassmo-
dus ist.
Einrichtung der Flybackfunktion
Die Richtung in die das Modell beim ersten Start gerichtet ist
wird fest als Flybackrichtung abgespeichert. Die Flybackfunktion
kann im Flug durch kurzes drücken der Flybacktaste (B) aktiviert
werden. Das Modell folgt in der Flybackfunktion unabhängig in
welche Richtung der Rumpf des Models zeigt, der vorher ein-
programmierten Flybackrichtung zurück, bis Sie den rechten
Steuerknüppel bewegen. Während des Flyback- bzw. Kompass-
modus müssen Sie weiterhin mit dem Gashebel die Höhe des
Modells kontrollieren.
ACHTUNG! Flyback funktioniert nur wenn Sie im Kompass-
modus sind.
GB | IE | NI - Compass & Flyback function
Your model has a Compass & Flyback function. This means it
is able to keep the desired yback direction even if it turns in
another direction during ight (the front does not face the ight
direction anymore) and ies back to you semi-automatic.
Preparation:
First of all you should choose the direction that you want to save
in the compass of the model. This direction is used by the com-
pass as the main ight direction. For example, you y along a
straight way and would like to use the compass mode; you have
to choose the direction of the way as the main ight direction.
Now if you are using the compass mode to follow a moving ob-
ject you do not have to waste a thought on the ying direction of
the model. If you push the steering stick to the front the model
will y away from you.
If you pull the steering stick to the back the model will y back to
you following the direction of the way.
The Compass function can only be activated while the model is
in the air and by pressing long the compass button (A) on your
remote control. An additional red LED on the transmitter, the mo-
del indicates that it is in compass mode.
Setting up the Flyback function:
The direction in which the model is facing at the rst start is sa-
ved permanently as a yback direction. The yback function can
be activated in ight by pressing short the yback button (B). In
yback mode, the model independently follows the direction pre-
viously programmed no matter in which direction the fuselage of
the model shows. You can stop yback mode by moving the right
control stick. During the yback or compass mode you still have
to control the height oft he model with the throttle stick.
NOTE! Flyback works only when you are in compass mode.
FR | BE - Fonction boussole & yback
Votre modèle a une fonction boussole et yback. Il peut garder
sa direction de vol initiale malgré une rotation dans une direction
souhaitée (le fuselage ne se trouve plus en direction du vol) dans
une direction souhaitée (la direction de vol d‘origine) pour voler
et semi-automatique voler vers vous.
Préparation:
D’abord vous devriez rééchir à la direction dans laquelle vous
voulez sauvegarder la boussole du modèle. Cette direction
sera la nouvelle direction de vol automatiquement sauvegardée
quand vous activez la boussole. Si vous voulez voler le long de
la route et au même moment prendre le mode boussole, choisis-
sez la direction dans laquelle mène la route comme direction de
base pour la boussole. Quand vous tournez le modèle en mode
boussole sur son axe, pour lmer un objet qui se trouve à côté
de votre modèle, il ne faut pas rééchir sur la direction de vol à la
radiocommande. Si vous pressez le levier de commande droit an
avant, le modèle va s’envoler de vous en direction route. Quand
vous rapprochez le levier de commande à vous le modèle va se
bouger le long de la route vers vous.
Dirigez le modèle dans la direction souhaitée et appuyez longue-
ment sur le bouton compas (A). Un rouge à LED supplémentaire
sur l‘émetteur, le modèle indique qu‘il est en mode compas.
Installation du mode yback:
Dirigez le modèle dans la direction souhaitée et appuyez le bou-
ton Flyback (B) courtement. De modèle suit alors la direction
compas installée en avance, indépendamment de la direction
que montre le fuselage et retourne lentement vers vous jusqu’à
ce que vous bougez à nouveau le levier droit. En mode boussole
ou yback, vous devez continuer par contrôler la hauteur du vol
par le levier d’accélération.
ATTENTION! Flyback fonctionne seulement si vous êtes en
mode boussole.
A
B
DE
1. Kombination von Gas, Gieren, Roll und Nick
Nach dem Sie sich mit den verschiedenen Steuermethoden
des Models vertraut gemacht haben versuchen Sie nun die
verschiedenen Steuerungen zu kombinieren.
2. Ändern der Flugperspektive
Nach dem Sie das Fliegen des Models von der Sicht von
hinten auf das Model beherrschen ist es an der Zeit den Flug
aus der seitlich vom Model stehenden Position und von der
vom Model zugewandten Seite aus zu üben. Denken Sie
daran, dass Sie zum Teil invertiert (umgekehrt) steuern
müssen.
GB | IE | NI
1. Combination of gas, rudder, roll and pitch
After you are into the different control methods of the model
now you can try to combine the various controls.
2. Change of ight perspective
After you master the ying of the model of the view from the
rear of the model it is time to practice the ight from the side of
the model and from facing towards to the model. Remember,
you need to invert the controls (vice versa).
FR | BE
1. Combinaison entre le gaz, le trim, le roulement
et le nick
Si vous contrôlez toutes les différentes fonctions de contrôle,
vous pouvez combiner plusieurs fonctions entre-elles.
2. Changement de la perspective du vol
Après avoir fait des essais de vol en voyant le modèle de
l’arrière, il est maintenant temps de s’exercer en ayant le
modèle sur le coté. Pensez, qu’il faut commander le modèle à
l’inverse.
NL | BE
1. Combinatie van gas, helling, kantelling en
afbuigingshoek
Na het leren van verschillende manieren om het model te
besturen, kan je nu proberen om verschillende van
besturingsmanieren te combineren.
2. Het wijzigen van het vlucht perspectief
Als je eenmaal hebt geleert het vliegen uit de „achterkant“,
kan je nu proberen om uit ondere posities vanaf zijde/
voorzijde het vliegen te oefenen. Houd in gedachten dat
sommige besturingsbewegingen moeten (integendeel)
worden gevoerd.
IT | CH
1. Combinazione dei comandi (gas, rotazione, roll e nick)
Appena imparato i singoli comandi, provate a combinarle l’uno
con l’altro.
2. Cambiare la perspettiva del volo
Dopo i test di volo, avete imparato di comandare il modello
visto da dietro. Adesso fate volare il modello vista dal lato,
oppure davanti. In questo caso cambia il senso di comando ed
anche il grado di dif coltà.
ES
1. Combinacion de los controles (gas, rotación, roll y nick)
Después de que haya familiarizado con los diferentes
métodos de control del modelo, probar ahora de combinar los
diversos controles
2. Cambio de la prespectiva de vuelo
Después de los vuelos de pruebas, has aprendido a controlar
el modelo de la vista desde atrás. Ahora hacer volar de la
vista desde el lado del modelo o delante. En esta caso cambia
el sentido de mando y tambien el grado de di cultad.
forwardforward
FRONT
 Loading...