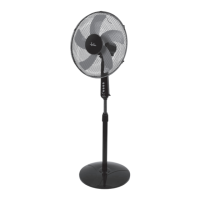
This document describes the Jata JVVP3135 pedestal fan, a device designed for domestic use to provide air circulation. The manual provides instructions for use in multiple languages, including Spanish, Portuguese, English, French, Italian, and German.
Technical Specifications
The Jata JVVP3135 operates on a voltage range of 220-240 V~ at a frequency of 50/60 Hz, with a power consumption of 50 W. These specifications indicate it is suitable for standard household electrical systems in many regions.
Components
The fan consists of several key components:
- Blades (Aspas/Pales/Flügel/Pale): These are the rotating elements that generate airflow.
- Speed Selector (Selector de velocidad/Bouton de vitesse/Drehzahlregulierung/Selettore di velocità/Geschwindigkeitsregler): This control allows users to adjust the fan's operating speed, typically offering multiple settings (e.g., 0-Off, 1-Minimum, 2-Medium, 3-Maximum).
- Base (Base/Sockel/Zoccolo): Provides stability for the fan.
- Front Grid (Parrilla delantera/Grille avant/Vorderer Rost/Griglia anteriore/Frontgitter): A protective cover at the front of the fan.
- Rear Grid (Parrilla trasera/Grille arrière/Hinterer Rost/Griglia posteriore/Heckgitter): A protective cover at the rear of the fan.
- Nut to fix the grid (Tuerca fijación parrilla/Écrou de fixation grille/Befestigungsmutter Gitter/Dado di fissaggio griglia/Gitterbefestigungsmutter): Secures the grids in place.
- Nut to fix the propeller (Tuerca fijación hélice/Écrou de fixation hélice/Befestigungsmutter Propeller/Dado di fissaggio pala/Propellerbefestigungsmutter): Secures the fan blades.
- Oscillation Knob (Mando de oscilación/Bouton d'oscillation/Schalter zur Oszillationseinstellung/Comando di oscillazione/Oszillationsschalter): Activates or deactivates the fan's oscillation function, allowing it to sweep air across a wider area.
- Extendable Tube (Tubo extensible/Tube de base d'extension/Verlängerungsrohr Sockel/Tubo di base estensibile/Ausziehbares Rohr): Allows for height adjustment.
- Height Adjusting (Tuerca fijación de altura/Réglage de la hauteur/Höheneinstellung/Allineamento altezza/Höhenverstellung): A mechanism to lock the fan at a desired height.
- Base Lid (Embellecedor de la base/Couvercle de base/Abdeckung des Sockels/Coperchio base/Sockelabdeckung): A decorative cover for the base.
Usage Features
The fan is designed for ease of assembly and operation:
Assembly:
- Base Assembly: The base lid (12) is placed over the base (3) and secured by pressing.
- Tube Assembly: The L-shaped screw is removed from the extendable tube (10), and the tube is inserted into the base, aligning the holes. The screw is then reinserted and tightened.
- Height Adjustment Nut: The height adjustment nut (11) is fixed to the extendable tube (10).
- Motor Unit: The motor unit (6) is inserted into the extendable tube (10) and secured with the height adjustment nut (11).
- Rear Grid and Propeller: The rear grid (4) is placed onto the motor shaft and secured with the grid fixing nut (7) in an anti-clockwise direction. The propeller (1) is then placed onto the motor shaft, ensuring the pin on the shaft aligns with the propeller's groove, and secured with the propeller fixing nut (8) in an anti-clockwise direction.
- Front Grid: The front grid (5) is placed over the rear grid (4) and secured with clips or screws, ensuring all parts are correctly assembled.
Operation:
- Placement: Always place the fan on a flat and stable surface.
- Connection: Plug the appliance into the mains.
- Height Adjustment: To adjust the height, loosen the height adjustment nut (11), move the fan to the desired height, and then tighten the nut.
- Oscillation: To activate the oscillation function, press the oscillation knob (9). To stop oscillation, pull the knob up.
- Speed Selection: Use the speed selector (2) to choose the desired speed:
- Position 0 - Off
- Position 1 - Minimum speed
- Position 2 - Medium speed
- Position 3 - Maximum speed
Maintenance Features
Regular maintenance ensures the fan's longevity and safe operation:
Cleaning:
- Before Cleaning: Always ensure the appliance is unplugged from the mains.
- General Cleaning: Clean the fan with a slightly damp cloth.
- Grid and Blades: It is important to keep the front grid (5) and rear grid (4) clean to prevent dust and lint accumulation, which can hinder performance. For thorough cleaning, the grids and blades can be disassembled.
- Chemicals: Do not use abrasive or chemical products, such as metallic scourers, which may damage the surfaces of the appliance.
Storage:
- Disassembly: If storing the fan for an extended period, it is recommended to disassemble the fan for easier storage.
- Packaging: Store the fan in its original packaging in a dry place.
Environmental Protection:
- Disposal: Dispose of the appliance according to local garbage regulations. Do not throw it away with household waste. This helps to improve the environment.
Safety Instructions
The manual emphasizes several critical safety precautions:
- Supervision: This appliance can be used by children aged 8 and above, and by persons with reduced physical, sensory, or mental capabilities, provided they have been given appropriate supervision and instruction concerning safe use and understand the hazards involved. Children should not play with the appliance.
- Packaging: Keep all plastic bags and packaging components out of reach of children as they are potentially dangerous.
- Power Connection: Do not connect the appliance to the mains without checking that the voltage on the rating plate matches that of your household.
- Immersion: VERY IMPORTANT: Do not immerse the fan in water or any other liquid.
- Domestic Use: This appliance is designed for domestic use only.
- Contact with Objects: Make sure neither the appliance nor the cable are in direct contact with hot surfaces or objects.
- Placement: Always place it on a flat and stable surface.
- Outdoor Use: Do not use it outdoors.
- Assembly: Do not use it without the front grid correctly assembled.
- Obstruction: Do not put fingers or other objects into the fan to prevent the engine block.
- Power Cord Damage: If the power cord is damaged, it must be replaced by the manufacturer, its after-sales service, or similarly qualified personnel to avoid a hazard.
These instructions are crucial for safe and effective operation of the Jata JVVP3135 pedestal fan.