A.3 Überblick: Anschlussprinzip allgemein
Die Darstellung (3.1) zeigt die einzelnen Schritte, wie der JAYKS 5DX
grundsätzlich mit der Radio-Unit im Fahrzeug, verbunden wird:
1 Radio-Unit ausbauen. Je nach Fahrzeugtyp ist die Unit als Black-Box
ausgelagert, z.B. oberhalb des Handschuhfachs (Renault Kadjar u.a.) oder im
Kofferraumseitenteil (z.B. Touareg 2). Ihre
Fachwerkstatt kann Ihnen hierzu nützliche
Hinweise geben.
2 Fahrzeug-Kabelbaum von der Radio-Unit
entfernen und den Fahrzeug spezifischen
Radio-Adapter (z.B. AD123UNI) zwischen Radio
und Fahrzeugkabel stecken. Die ISO-
Lautsprecher-Stecker
(braun) des JAYKS Anschluss-Kabels mit den
ISO-LS-Steckern des Radio-Adapters verbinden.
3 Kompaktstecker des Kabelbaums am JAYKS 5DX
Verstärker anschließen.
4 Stromversorgung des 5D (12V Dauerplus – gelb
– und Masse – schwarz –) zum Radio-Adapter
herstellen. Je nach Adapter- Typ (A / B - s.u.
A.2), ist der mitgelieferten ISO-Strom-Adapter
erforderlich (Details zum Stromanschluss siehe
A.5 und A.6)
Alternativer Anschluss mit Remote:
5. In wenigen Fällen (insbesondere bei Radiomodellen von vor 1999) ist ein
zusätzliches Remote-Kabel erforderlich, um den Verstärker einzuschalten.
Verbinden Sie dazu einen geschalteten 12V Ausgang, z.B. (Remote-Out,
Zündung, elektrische Antenne o.ä.) mit dem Remote-Eingang des 5DX.
TIPP: Lesen Sie unbedingt die folgenden Kapitel, bevor Sie mit dem Anschließen
beginnen, um die Details der einzelnen Anschlussvarianten zu erfahren.
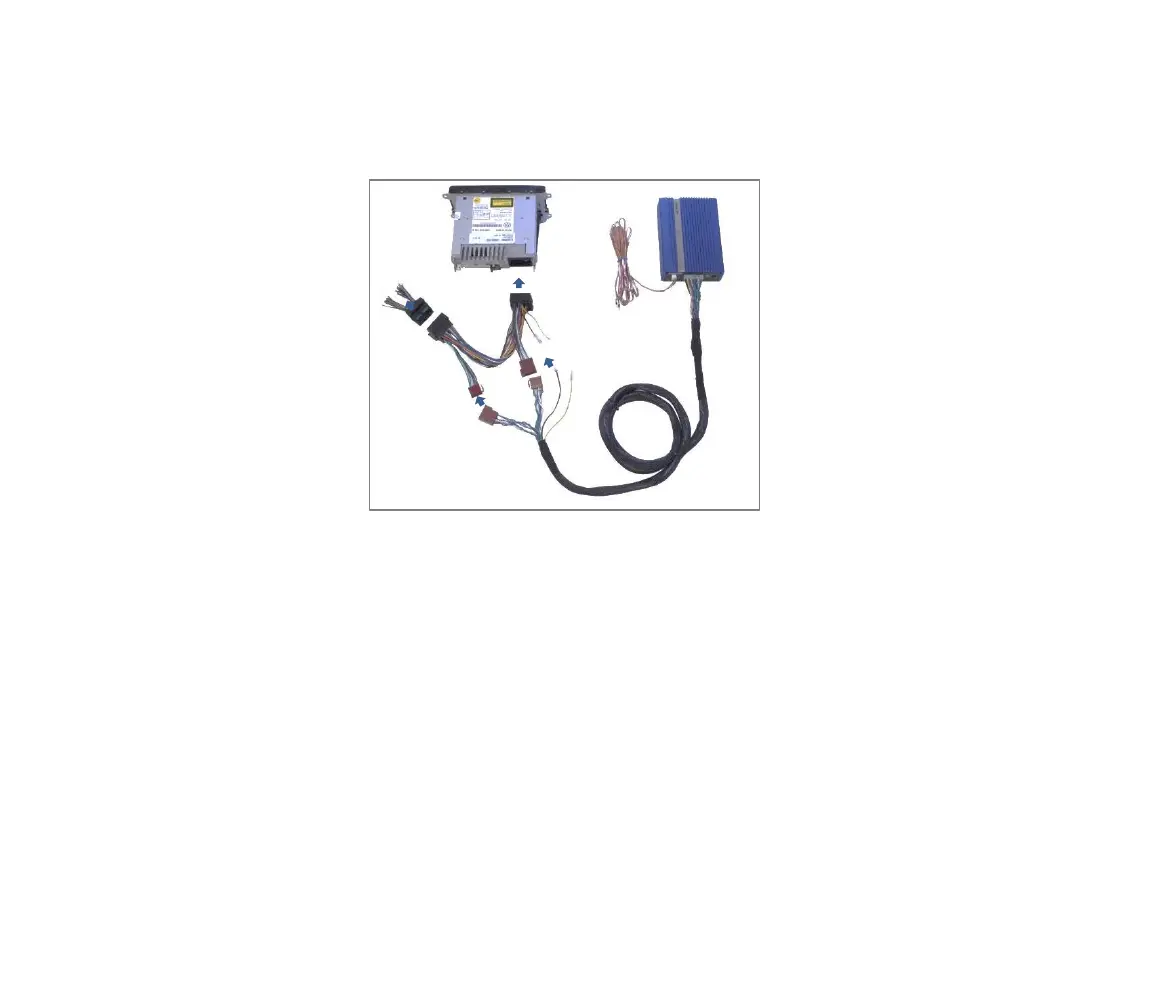
A.3 Overview: The JAYKS connection principle
This depiction 3.1 is designed to give you an overview of how the JAYKS is
connected to your vehicle's components in principle. The following steps are
required to connect the 5DX to your existing car radio unit:
1 Restore the radio. Dependent on the car type this unit is transferred, e.g. in
the glove box or the trunk (e.g. VW Touareg 2). Your car dealer will give you
helpful information.
2 Remove the vehicle harness cable from the radio unit.
Connect then the vehicles specific radio adapter (e.g.
AD123UNI) between radio and car harness cable.
Connect now the ISO-loudspeaker coupling (brown) of
the JAYKS cable harness with the ISO speaker plugs of
the radio adapter (brown).
3 Connect the cable harness to the compact plug at the
JAYKS 5DX.
4 Build the power supply between 5DX and the radio
adapter. According to the configuration of the
vehicles specific adapter (see A2) the supplied ISO
power adapter is necessary in any case. (For details on
the power connection see chapter A.5 and A.6)
Connect remote as alternative:
5. In some cases (mostly old car radios) it is necessary to use an extra remote-
wire to switch on the amplifier. Simply connect a switched battery signal
(ignition, electric antenna, remote out or similar) to the remote-input of the
JAYKS.
HINT: In any case, be sure to read the following chapter before you start
connecting the 5DX to find out about the details of the individual connection
options.
 Loading...