- 13 -
Example hoop :
Preparation is the key to making accurate bends. To make multiple bends in one section of tubing you will need a universal
protractor.Theprotractoristhenclamped,usingamachinistv-blockandaradiatorhoseclamp,tothetube.Makesurethepointer
indicates'0'beforemakingyourrstbend.Alsousingacarpenter'slevel,makesurethetubeisenteringthebenderlevel.On
thesecondbendifyouturnthetubesothatthepointeragainreads'0'andthecarpenter'slevelindicatesthetubeislevel,both
bends will be on the same plane with no noticeable twist.
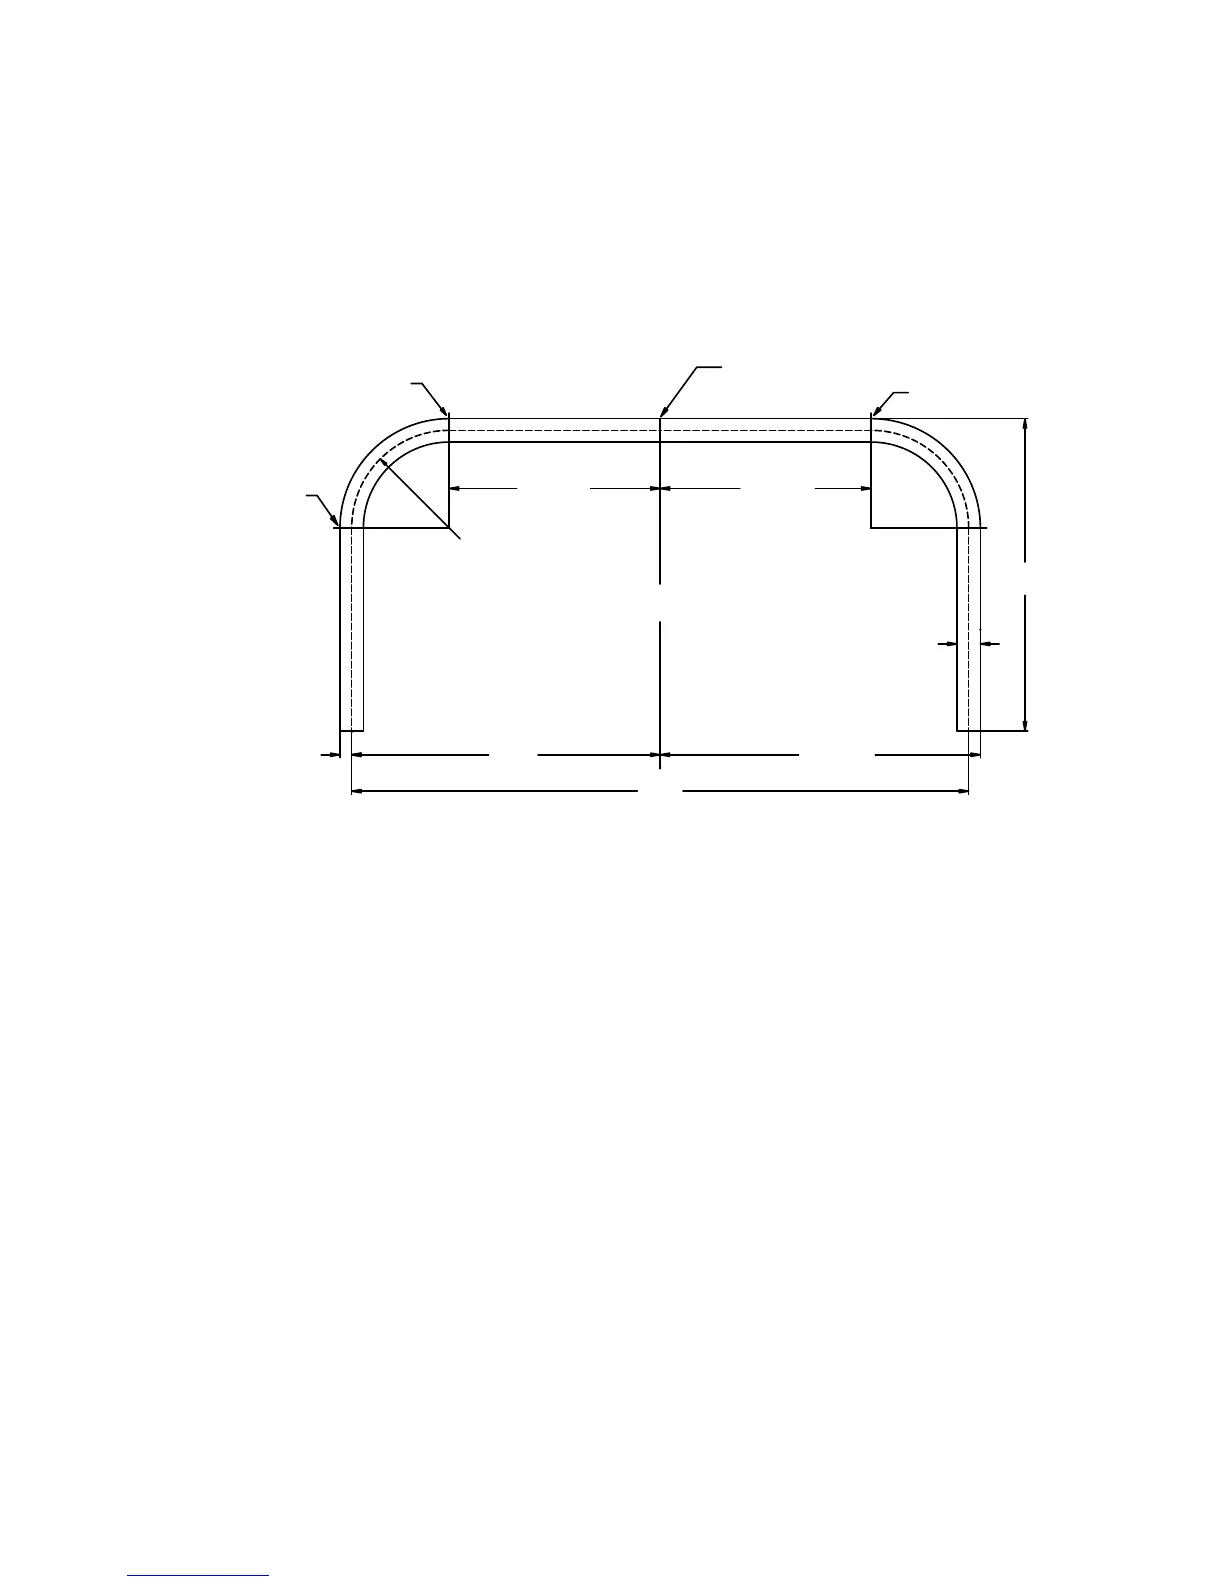
First step is to draw a sketch of the intended shape and all measurements. Figure 27 below is the desired hoop. The Bending
Diehasacenterlineradius(CLR)of61/2".ThetubeO.D.is11/2".Wedeterminedearlier,usingthemethoddescribedonpage
4,thattheBendStartmeasurementis3/4"behindtheedgeofthisparticularBendingDieset.
1) Determine the total length of tubing needed. Using a calculator and the formula below let's add it all up.
6 1/2" (CLR of bend) x 90 (Number of degrees of bend) x .0175 = Length of tubing used in a bend.
Usingtheformulaaboveweget61/2"(CLRofbend)x90(Degreesofbend)x.0175=10.2375.Let'sroundthisoffto101/4"
inches(10.250").Thisistheamountoftubingusedinthebend.Wehavetwobendssowedoublethisandget201/2".Addto
thisthestraightsectionsandweget201/2"(tubinginbends)+27(thecentersection)+131/2"fortheleftupright+131/2"for
therightupright=741/2"oftubingneeded.It'susuallyagoodideatoleaveacoupleofinchesextraontheend.Remember,
it's easier to remove tubing then to add it. So let's add 2" to 74 1/2".
2)Wecutourtubeto761/2".It'sgenerallyeasiertoworkfromthecenteroutwhenmakingtwobendsinatube.Divide741/2"
by 2 and our center point is 37 1/4" from the end of the tube. Place a mark on the tubing 37 1/4" in from one edge and mark the
tubingsoyouwillknowwhichsideisthe371/4sideandwhichsideis391/4".Noticewedidn'tusethe761/2"measurement
thatwecutourtubingto.Thiswayweonlyhavetocut2"offoneendofthenishedtubeinsteadof1"offeachend.Therst
bend is made on the short 37 1/4" side.
3)Usingthemethoddescribedonpage4wedeterminethatthetubeshouldextend125/8"fromtheedgeoftheBendingDie.
Below is the equation from page 4.
20" (Height of hoop) - 6 1/2" (CLR of die) - 3/4" (1/2 of tube's dia.) - 1/8" (Springback) - 3/4" (Bend Start) = 11 7/8".
Aftermakingthebendwehavehalfourhoopcompleted.Thetopofthebendis20"fromthebottomofthetube.
4)Nowfortheotherbend.Firstweneedtodeterminehowmuchthetubestretchedinthebendarea.Fromgure9weseethat
thetubeshouldbe203/4"fromtheoutsideedgetoour371/4"centermark.Howeveraftermeasuringfromourcentermarkto
theoutsideedgeofthebendwenowhave21"andnottheplanned203/4".This1/4"increaseisduetospringbackandthetube
stretching in the area of the bend.
Figure 27- Example hoop.
6 1/2" CLR
3/4"
20"
20 3/4"
20"
40"
13 1/2"
13 1/2"
1 1/2"
Start of 2nd bend
Center mark on tube
End of 1st bend
Start of 1st bend
C
L
 Loading...