EasyManua.ls Logo

JKS OGS125 User Manual

JKS OGS125
3 pages
To Next Page IconTo Next Page
Page #1 background imageLoading...
Page #1 background image
JKS Adjustable Trackbar Installation PN OGS125 / OGS126 Page 1 of 3
Installation
Instructions
Product: Adjustable Trackbar
Part Number: PN OGS125 / OGS126
Welcome
CONGRATULATIONS on purchasing a new
Adjustable Trackbar from JKS Manufacturing.
We are committed to providing you with the
best products available and your satisfaction is
our first priority.
PLEASE READ these Installation Instructions
carefully, and save them for future reference,
as they contain important installation and
maintenance information.
Important
NOT COMPATIBLE WITH right hand drive
vehicles.
CHECK TORQUE SPECIFICATIONS
regularly.
Tools Required
Metric/Standard Socket Wrench Set
Torque Wrench
Tie Rod End Remover *
Tape Measure
1-7/16” Open-End Wrench
9/16” Drill Bit
Flat Metal File *
Heavy Duty Ratchet Strap *
Anti-Seize Lubricant
Grease Gun with Zerk Fitting Coupler
Wheel Bearing Grease
* Asterisk denotes tools that are not required for some
applications. Thoroughly read instructions first to
determine which tools will be required for your
application.
Parts
A
OE Rubber Bushing
B
Male Threaded (Axle) End
C
1” NF Jam Nut
D
Female Threaded (Chassis) End
E
9/16” SAE Flat Washer
F
Preload Washer
G
9/16” NF GR8 Ovalok Nut
H
Polyurethane Bushing
I
Snap Ring
J
9/16” x 4-1/2” GR8 Greaseable Bolt
K
Preload Washer
L
2.5” Johnny Joint Ball
M
Polyurethane Bushing
N
Tapered Split Cone
Question and Answer IconNeed help?

Do you have a question about the JKS OGS125 and is the answer not in the manual?

JKS OGS125 Specifications

General IconGeneral
BrandJKS
ModelOGS125
CategoryAutomobile Accessories
LanguageEnglish

Summary

Product Information and Welcome

Product Details

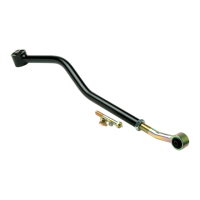
Identifies the product as an Adjustable Trackbar and lists its part numbers.

Welcome Message

Congratulates the customer and emphasizes commitment to satisfaction and product quality.

Important Notes

Highlights compatibility limitations and the importance of checking torque specifications.

Tools Required for Installation

Lists all necessary tools and equipment for performing the trackbar installation.

Parts Included

Details all components provided with the Adjustable Trackbar kit, with labels.

Adjustable Trackbar Installation Procedure

Remove Original Equipment Front Track Bar

Step to remove the existing front track bar and its mounting hardware.

Mount Adjustable Trackbar to Chassis Bracket

Instructions for attaching the trackbar's chassis end, including drilling and bolt placement.

Center Front Axle Housing

Procedure to ensure the front axle is laterally aligned before completing installation.

Set Trackbar Length and Mount to Axle

Guides on adjusting trackbar length and securing it to the axle bracket.

Lubricate Adjustable Trackbar

Instructions for lubricating the greaseable bolt at the chassis end.

Maintenance and Re-Torque Recommendations

Post-Installation Maintenance

Advises re-torquing fasteners after 150 miles and checking regularly.

Bushing Lubrication and Cleaning

Details on lubricating the spherical polyurethane bushing and cleaning the assembly.