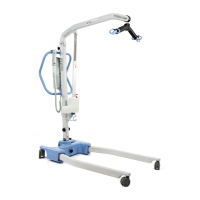
Hoyer
®
Advance
17
English
*THESE CHECKS SHOULD INCLUDE:
1. SPREADER BAR: Check the spreader bar for freedom of rotation and
ü ü
ü
swing. Check for wear on the central pivot. Check for firm attachment to
the boom.
2. BOOM: Check the attachment of the boom to the mast. Make sure there
ü ü ü
is only minimal side movement of the boom and the boom is free to rotate
on the boom bearing.
3. MAST: Check the operation of the mast-locking device. Make sure the
ü ü ü
mast fully engages into the socket. Check the bottom actuator or hydraulic
unit mounting.
4. ACTUATOR: (electric only): The actuator should require no maintenance
X ü
other than checking for correct operation and listening for unusual noise.
5. CONTROL BOX (electric only): Check the function of the emergency stop
button. Inspect the hand control socket for correct fitting. Check functioning
of the hand control. Check the redundant controls and confirm they operate ü ü ü
as intended. Note: The MINIMUM load required to manually lower the hoist
using the emergency lower function is 30 kg.
6. BATTERIES: (electric only): The batteries are housed in the power pack
ü
and should not require maintenance other than the regular charging as
detailed in the charging instructions. Check that the connections remain clean.
7. HYDRAULIC UNIT: The hydraulic unit should require no maintenance other
ü ü
than checking for correct operation and leakage of hydraulic fluid.
8. LEG ADJUSTMENT: Check the legs operate in both full extensions
ü ü ü
(inward/outward).
9. CASTERS: Check all casters for firm attachment to the legs. Check for
ü ü ü
free rotation of the caster and the wheels.
10. CLEANING: Clean with ordinary soap and water and/or any hard surface
X ü
disinfectant. Harsh chemical cleaners or abrasives should be avoided as
these may damage the surface finish of the lift. Avoid wetting any of the
electrical parts.
11. LOAD TEST: The load test should be carried out in accordance with the
X
manufacturer’s test procedures.
12. BASE AND WHEELS: Ensure base is even and level
ü ü ü
(all four wheels are on the floor).
13. SLINGS: Check for wear and fraying.
ü ü ü
14. LUBRICATION: Oil pivot joints, including mast and boom connections,
ü
pedal assembly, spreader bar joint (only if required).
15. FIXINGS: Check all nuts, bolts, screws and fasteners for excessive wear
ü
and for tightness. Replace as required.
Before Use
Initially
Service
Intervals *
ü
= Required X = Recommended
* 6 months in North America

 Loading...