This document outlines the assembly process for a "Climbing Triangle," a children's play structure designed for climbing. The manual provides a parts list and step-by-step instructions for putting the triangle together.
Function Description:
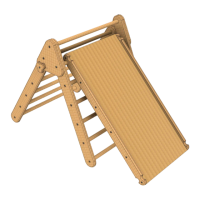
The Climbing Triangle is a children's play apparatus primarily designed for physical activity, specifically climbing. It provides a safe and engaging structure for children to develop gross motor skills, balance, and coordination. Once assembled, it forms a stable, A-frame structure with multiple rungs for climbing. An optional ramp accessory can be attached, further enhancing play possibilities by allowing children to slide or climb up an inclined surface. The design emphasizes a sturdy construction suitable for active play.
Important Technical Specifications (Derived from Parts List and Assembly):
- Components: The climbing triangle consists of several distinct parts, each with a specific quantity required for assembly:
- A (x1): Likely a top connector piece for one side of the triangle.
- B (x1): Likely a top connector piece for the other side of the triangle.
- C (x1): Not explicitly shown in the parts list image, but implied by the "C (X1)" label. This might be a specific type of bolt or a small connector.
- D (x26): Bolts, crucial for securing the rungs and other components. The high quantity indicates extensive use throughout the structure.
- E (x2): Locking mechanisms or end caps that secure the triangle in an open position.
- F (x2): Side support pieces, possibly forming part of the upper structure.
- G (x2): Main side legs or frames, which hold the rungs.
- H (x13): Rungs, the horizontal bars that children climb on. The quantity suggests one side has 7 rungs and the other has 6, or there are 13 rungs in total distributed across the two main frames.
- I (x1): A ramp, an optional accessory that can be attached to the climbing triangle for sliding or inclined climbing.
- Materials: While not explicitly stated, the visual representation suggests wooden components for the main structure (frames, rungs, ramp) and metal components for the bolts and possibly the locking mechanisms.
- Assembly Tools: An Allen wrench or similar tool is depicted in Step 5, indicating that it is required for tightening the bolts.
Usage Features:
- Climbing: The primary use is for children to climb the rungs, promoting physical development.
- Sliding/Inclined Climbing (with optional ramp): If the "I" (ramp) component is purchased, it can be attached to the assembled triangle, offering an additional play element for sliding down or climbing up an incline.
- Adjustable/Foldable (implied): The presence of "Part E's" as locking mechanisms in Step 6, which are screwed in "once the climbing triangle is in an open position," strongly suggests that the triangle is designed to be foldable for storage or adjustable to different angles. This feature enhances its versatility and practicality for home use.
- Safety Considerations: The assembly instructions emphasize not fully tightening bolts until the final step (Step 6), which is a critical safety measure to ensure proper alignment and a flush fit with the floor, preventing instability.
Maintenance Features:
- Tightening Bolts: Step 6 explicitly instructs users to "NOW tighten all bolts that were left loose during all previous steps." This highlights the importance of ensuring all fasteners are securely tightened for the stability and safety of the structure. Regular checks of bolt tightness would be a recommended maintenance practice, though not explicitly stated as a recurring task in the provided steps.
- Even Surface Placement: The instruction to place the triangle "on an even surface" before final tightening in Step 6 indicates that proper placement is crucial for stability and preventing undue stress on the structure. This implies that the climbing triangle should always be used on a flat, level surface.
- Material Care (implied): Given the likely wooden construction, general care for wooden play equipment would apply, such as keeping it dry, cleaning with appropriate methods, and inspecting for wear and tear. However, specific maintenance instructions beyond bolt tightening are not detailed in the provided excerpts.
Assembly Process Overview:
The assembly is broken down into seven steps:
- Step 1: Attaching rungs (H) to one main leg (G) using bolts (D). Crucially, bolts are not fully tightened at this stage.
- Step 2: Attaching rungs (H) to the other main leg (G) and connecting Part B to Part F, again without fully tightening bolts.
- Step 3 & 4: Connecting the two sub-assemblies from Step 1 and Step 2, forming the basic A-frame structure. Bolts (D) are used for this connection.
- Step 5: Screwing in both Part B's (top connector pieces) to the appropriate sides of the climbing triangle.
- Step 6: Screwing in both Part E's (locking mechanisms) once the triangle is in an open position. This is the critical step where all previously loosened bolts are finally tightened, ensuring the structure is stable and flush with the floor.
- Step 7: The assembly is complete, and the optional ramp (I) can be attached.
The manual includes a QR code for "VIDEO INSTRUCTIONS," suggesting that visual guidance is available to aid in the assembly process. The overall tone emphasizes careful assembly to ensure safety and proper function.