EasyManua.ls Logo

Johnson Pumps SPX FLOW Pro L1600 Series - User Manual

Johnson Pumps SPX FLOW Pro L1600 Series
2 pages
Print Icon
To Next Page IconTo Next Page
Loading...
L1600 ProSeries Livewell/Baitwell Pump
12 or 24V Model
Installation Instructions
Important: Read before attempting Installation
The L1600 Livewell/Baitwell Pump has been designed for pumping water in a marine
environment. The pump is not to be used for pumping any other liquids other than
water/seawater. Pumping other liquids can result in personal damage/injury and/or
property damage.
Security
The Livewell/Baitwell pumps are designed to simply install into any valve fitting with 1”
NPT Male threads.
The pump may not be used for other liquids than water/sea water
Always install the pump according to the wiring instructions
Always use the fuse required per pump label.
The wire connections must be sealed with a marine sealant
Insulation or cable sheathings must be placed above the highest water level
Do not run dry for extended periods
Installation:
Please follow the installation instructions carefully to ensure maximum efficiency in your
Livewell/Baitwell pump operation.
1) Pump should be installed below the water line to ensure a flooded suction to the
pump.
2) Install a 1” seacock below the waterline in your boat. Warning: Failure to install a
seacock may subject your vessel to flooding.
3) Install a thru hull pickup with a filter grate to reduce or eliminate debris from
entering the seacock and ultimately your Livewell/Baitwell pump.
4) Install your seacock and Livewell/Baitwell pump using pipe tape sealant such as
Teflon tape on all threaded connections.
5) Attach Teflon tape or pipe tape sealant to a 1” NPT nipple that will screw on to
your Livewell/Baitwell pump on one side and the other side to your 1” seacock.
The Livewell/Baitwell pump is equipped with 1 1/8” or 1 ¼” Barbed ports. The port
threads into the discharge area of the pump. Make sure to apply thread sealant to the port
threads. Tighten port until port is bottomed out with pump body. If the
Livewell/Baitwell pump is to be mounted in a horizontal position, make sure the
discharge is pointing in an upward position to allow air to vent.
1) Fasten your reinforced hose from the pump port to the LiveWell/Baitwell tank.
Avoid sharp bends or loops. Support the hose if necessary. Note: In order to prevent
air locks it is important that the hose is not to be allowed to dip below the pump
outlet. The hose should be constantly rising.
Question and Answer IconNeed help?

Do you have a question about the Johnson Pumps SPX FLOW Pro L1600 Series and is the answer not in the manual?

Summary

Installation Instructions

Pump below waterline

Ensure pump is below waterline for flooded suction to maximize efficiency and prevent priming issues.

Install seacock below waterline

Install a 1" seacock below the waterline. Failure to do so risks vessel flooding.

Install thru hull pickup with filter

Install a thru-hull pickup with a filter to prevent debris from entering the pump.

Use pipe tape sealant on threaded connections

Apply pipe tape sealant (e.g., Teflon tape) to all threaded connections for a secure seal.

Connect pump to seacock with NPT nipple

Connect pump to seacock using a 1" NPT nipple with thread sealant.

Install discharge ports and orient for venting

Install discharge ports with sealant. Orient horizontally mounted pumps upward for air venting.

Connect hose to tank, avoid air locks

Connect hose avoiding sharp bends. Ensure hose rises constantly from pump outlet to prevent air locks.

Security and Usage Guidelines

1 NPT Male thread compatibility

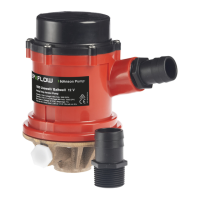
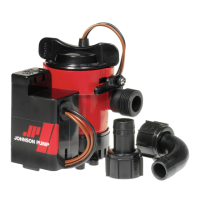
Pumps are designed for 1" NPT male threaded fittings for simple installation.

Use only for water;seawater

Crucial warning: Pump must only be used for water or seawater, not other liquids.

Follow wiring instructions

Always adhere to the provided wiring instructions for proper and safe installation.

Use correct fuse

Ensure the correct fuse, as specified on the pump label, is always used for protection.

Seal wire connections

Seal all wire connections with marine sealant to prevent oxidation and ensure longevity.

Place wiring above water level

Install insulation and cable sheathings above the highest water level to prevent electrical hazards.

Avoid running dry

Do not operate the pump dry for extended periods, as this can cause damage.

Pump Operation and Maintenance

Flood pump with water

Open the seacock to allow water entry and flood the pump before operation.

Check for leaks

Critically check for any leaks from the intake or discharge during installation and operation.

Turn pump on

Turn the Livewell/Baitwell pump on after ensuring it is properly flooded and leak-free.

Monitor tank filling

The tank will fill until water reaches the overflow pipe; the pump exchanges water continuously.

Turn off pump when done

Turn off the pump once fishing is completed and the tank is ready to be drained.

Close seacock when not in use

Close the seacock when the pump/system is not being used, especially for extended periods.

Optional Washdown Port

Connect washdown pump

Remove plug and attach washdown pump to the side port using sealant. Ensure seacock is open.

CE Logo Compliance

Standards conformance

Product conforms to ISO 8846:1990 for electrical devices protecting against ignition of flammable gases.

Warranty Information

Limited warranty terms

Warrants against defects in material/workmanship for three years, provided case is not opened or pump abused.

Exclusive remedy

Exclusive remedy is to return pump freight prepaid with sales receipt and original purchase date.

Warranty void conditions

Warranty void if seal broken, cord cut, splices submerged, or installed contrary to instructions.

Overview

The L1600 ProSeries Livewell/Baitwell Pump is a specialized pump designed for marine environments, specifically for pumping water or seawater. It is available in 12V or 24V models.

Function Description:

The primary function of this device is to circulate water in livewells and baitwells on boats, ensuring a continuous supply of fresh water to keep fish and bait alive. It is designed to be installed below the waterline to ensure a flooded suction, which is crucial for its efficient operation. The pump facilitates the exchange of water in the tank, with old water overflowing and new water continuously entering as long as the pump is running.

Important Technical Specifications:

  • Voltage: Available in 12V or 24V models.
  • Thread Type: Designed for simple installation into any valve fitting with 1" NPT Male threads.
  • Port Sizes: Equipped with 1 1/8" or 1 ½" barbed ports for discharge.
  • Washdown Port: Includes a ½ NPT side port for attaching an optional washdown pump.
  • Material: The manual implies a robust construction suitable for marine environments, though specific materials are not detailed.
  • Safety Certifications: When carrying a CE mark, it conforms to ISO 8846: 1990/electrical Devices - Protection Against Ignition of Surrounding Flammable Gases.

Usage Features:

  • Marine-Specific Use: Exclusively designed for pumping water or seawater in marine environments. It explicitly warns against using it for other liquids, as this could lead to personal injury or property damage.
  • Easy Installation: Designed for straightforward installation into 1" NPT male threaded valve fittings.
  • Continuous Water Exchange: Once activated and the tank is filled, the pump continuously exchanges water, maintaining a fresh environment for live bait or fish.
  • Optional Washdown Capability: A dedicated ½ NPT port allows for the attachment of a washdown pump, providing additional utility for cleaning tasks on the boat.
  • Horizontal Mounting Consideration: If mounted horizontally, the discharge must point upwards to facilitate air venting and prevent air locks.
  • Hose Routing: The reinforced hose from the pump port to the livewell/baitwell tank should avoid sharp bends or loops and must constantly rise to prevent air locks. Support for the hose is recommended if necessary.
  • Pre-Flooding Requirement: Before operation, the seacock must be opened to allow water to flood the pump, ensuring proper priming.
  • Leak Check: It is critical to check for any leaks from the intake or discharge of the pump during installation and initial operation.
  • Power Connection: The brown wire connects to the positive (+) terminal of the battery, and the black wire to the negative (-) terminal.
  • Fuse Requirement: Always use the fuse specified on the pump label.
  • No Dry Running: The pump should not be run dry for extended periods.

Maintenance Features:

  • Sealed Electrical Connections: All electrical wiring connections must be sealed with a marine sealant to prevent oxidation and should be clamped well above the water level. Insulation or cable sheathings must also be placed above the highest water level.
  • Thread Sealant: Pipe tape sealant (such as Teflon tape) should be used on all threaded connections, including the seacock, the pump connections, and the washdown port, to ensure watertight seals.
  • Debris Prevention: Installation of a thru-hull pickup with a filter grate is recommended to reduce or eliminate debris from entering the seacock and the pump.
  • Seacock Management: The seacock must be closed when the pump/system is not in use, especially when leaving the boat for extended periods, to prevent potential flooding.
  • Warranty Conditions: The product comes with a three-year limited warranty from the date of original purchase, covering defects in material and workmanship, provided the case is not opened or the pump is not otherwise abused. The warranty is void if the seal on the product is broken, if any electric cord is cut back more than 3 inches, if electric splices become submerged, or if the product is installed contrary to instructions or warnings. For warranty claims, the pump must be returned to Johnson Pump with the original sales receipt.

Johnson Pumps SPX FLOW Pro L1600 Series Specifications

General IconGeneral
BrandJohnson Pumps
ModelSPX FLOW Pro L1600 Series
CategoryWater Pump
LanguageEnglish

Related product manuals