This document is an instruction manual for the Joie Trillo booster seat, designed for children weighing 15-36kg (approximately 3-12 years old), corresponding to ECE Regulation No. 44, 04 series of amendments, and CNS 11497.
Function Description
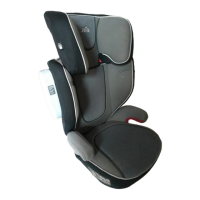
The Joie Trillo booster seat is a high-quality, fully certified safety II/III booster designed to provide a safe and comfortable travel experience for children. It is intended for use with a 3-point retractable adult seat belt. The booster can be used with or without the back support, depending on the child's height and weight.
Important Technical Specifications
- Product Name: Trillo
- Model: C1118C
- Suitable for: Child weighing 15-36kg (approximately 3-12 years old)
- Materials: Plastics, metal, fabrics
- Mass Group: II/III
- Net Weight: 4.24kg
- Product Size: 580mm x 400mm x 685mm
- Approval: Approved to CNS 11497 and UN ECE regulation 44, 04 series of amendments. This is a 'Universal' child restraint.
- Manufacturing Date: Please see detailed date on label (year / month / day)
- Patent No.: Patents pending
- Made in: China
Usage Features
Parts List (refer to Fig. 1):
- Head Support (1.1)
- Back Support (1.2)
- Base (1.3)
- Armrest (1.4)
- Adjustment Button (1.5)
- Shoulder Harness Anchor (1.6)
- Shoulder Belt Positioning Clip (1.7)
- Side Impact Shield (1.8)
- Head Support Adjustment Lever (1.9)
- Should Belt Guide (1.10)
- Latch Connector (1.11)
Installation Concerns:
- DO NOT install this booster on vehicle seats with Lap Belts (Fig. 2, Fig. 5.1).
- This booster is suitable for vehicle seats with a 3-point Retractor Safety Belt (Fig. 3). If your vehicle has an ISOFIX Anchorage System, it is strongly recommended to use the latch connector to the ISOFIX Anchorage System together (Fig. 4).
- DO NOT install this booster on vehicle seats that face sideways or rearward with respect to the moving direction of the vehicle (Fig. 5.1).
- Refer to your vehicle owner's manual for recommended or suggested installation position.
- This booster must be installed in the rear vehicle seat (Fig. 5.2).
- DO NOT install this booster on movable vehicle seats during installation.
Booster Assembly:
- Assemble Head Support:
- Take the booster from the carton (Fig. 6).
- Flip the head support and lower back support over (Fig. 7).
- Squeeze the adjustment lever (Fig. 7.1) and slide the two pieces together until they snap into place (Fig. 7.2). Check for secure snapping by pulling.
- Flip the seat over and insert the fabric from the head support underneath the fabric on the lower back support (Fig. 8). To ease insertion, slide the upper and lower back pieces apart by squeezing the red adjustment button.
- Assemble Lower Back Support:
- When attaching the backrest to the base, press the backrest down strongly. The "U"-shaped hooks on the bottom of the backrest will interlock with bars on the base (Fig. 9). Ensure no part of the seat covering interferes.
- Once the backrest is securely attached, push it forward (Fig. 10). Hold the base with one hand while pushing the backrest forward.
- Assemble Side Impact Shield:
- Align the side impact shield with the slot of the lower back support plastics mounts, and then insert to lock (Fig. 11).
- Press the side impact shield locking button (Fig. 12); a click sound indicates complete closure (Fig. 13).
- Always use the side impact shield for child's safety.
- The side impact shield assembled should be upon the back support cover.
- The completely assembled booster is shown in Fig. 14.
Height Adjustment for Head Support:
- Adjust the head support to the proper height according to the child's height.
- Squeeze the head support adjustment lever and pull up or push down the head support until it snaps into one of the 7 positions (Fig. 15).
- Before adjusting, have the child lean forward slightly.
Installation with 3-point-belt (With back support):
- The back of the booster seat MUST fit tight against the vehicle seat back (Fig. 16).
- The front of the booster seat MUST NOT hang over the front of the vehicle seat.
- DO NOT use a booster seat in a reclined position (Fig. 17).
- Open the route of the vehicle safety belt through the belt path (Fig. 18), and lock it into the buckle (Fig. 18.3).
- Position the shoulder belt through the shoulder belt guide (Fig. 18.1).
- DO NOT position the vehicle belt over the top of the armrests; it must pass underneath the armrests (Fig. 18.2).
- The booster cannot be used if the vehicle safety belt with a female buckle is too long to tie the booster (Fig. 18.4).
- Ensure the lap strap is worn low down to firmly engage the pelvis.
- The vehicle safety belt assembled as Fig. 18.
- For correct head support height, the bottom of the headrest must be level with or slightly higher than the highest point of the child's shoulder (Fig. 19).
- In the back seat, a forward-facing booster must use the vehicle safety belt correctly.
- Ensure the child sits with their back flat against the booster seat back.
- DO NOT fasten the buckle and pull up on the shoulder belt to tighten as shown in Fig. 20.
- If the belt lays across the child's neck, head, or face, readjust the head support height (Fig. 21).
- The belt must not be twisted.
- If the vehicle is equipped with ISOFIX:
- Place the booster in a forward-facing position on a forward-facing vehicle seat with anchors. Attach the latch (removed from soft goods rings) to the vehicle anchors (Fig. 22).
- NEVER put two latch connectors on one vehicle ISOFIX anchor unless specifically allowed by the vehicle manufacturer.
- Secure the booster firmly by pushing it downward with your knee or hand while pulling the adjustment belt (Fig. 23).
- To ease unhooking, extend the adjustment belt to its maximum length while pressing the adjustment button (Fig. 24).
Installation with 3-point-belt (Without back support):
- Adjust the backrest to a flat position, then use one hand to detach the backrest as shown in Fig. 25 to use the base assembly independently.
- Take good care of the back support and head support.
- Check whether the shoulder belt lays across the child's shoulder in the red zone (Fig. 26).
- You must use the shoulder belt positioning clip when using the base independently.
- Insert the end of the shoulder belt positioning clip webbing into the hole on the base (Fig. 27).
- Check the direction of the shoulder harness anchor as shown in Fig. 28 to avoid hurting the child if the shoulder harness anchor is in the opposite direction.
- Pull the shoulder belt positioning clip webbing slightly to make sure the webbing is fixed on the base.
- Make the webbing and clip wind round the bar, then tension the webbing (Fig. 28, Fig. 29).
- Slide the shoulder harness anchor to adjust the webbing length.
- Slide the shoulder belt positioning clip to make sure the clip is close to the child's shoulder (Fig. 30.1). Buckle the vehicle safety belt (Fig. 30.3).
- The vehicle safety belt must pass underneath the armrest (Fig. 30.2).
- The booster cannot be used if the vehicle safety belt with a female buckle is too long to tie the base (Fig. 30.4).
- Rear view of child sitting in seat (Fig. 31).
- The shoulder belt positioning clip must pass through the vertical bar of the base farthest from where the vehicle shoulder belt lays across the child (Fig. 31).
- The importance of ensuring that any lap strap is worn low down, so that the pelvis is firmly engaged, shall be stressed.
- Store the shoulder belt positioning clip on the bottom of the base when not in use.
- If the vehicle is equipped with ISOFIX, the vehicle lower anchor points may be visible at the vehicle seat crease. Refer to your vehicle owner's manual for exact locations, anchor identification, and requirements for use.
- Refer to the description of Fig. 22 - Fig. 24 to attach.
Detach Soft Goods:
- Open 2 pairs of buttons and 6 pairs of elastics on the back of the soft goods to remove it (Fig. 32).
- Pull down to remove the button as shown in Fig. 32.1.
- To refit the seat pad, simply reverse the steps above.
Maintenance Features
- Wash soft goods and inner padding with cold water under 30°C.
- Do not iron soft goods.
- Do not bleach or dry clean soft goods.
- Do not use undiluted neutral detergent, gasoline, or other organic solvent to wash the booster, as it may cause damage.
- Do not twist soft goods and inner padding to dry with great force, as it may leave wrinkles.
- Hang dry soft goods and inner padding in the shade.
- Remove the booster from the vehicle seat if not in use for a long period. Store it in a cool, dry place where your child cannot access it.