Do you have a question about the JoinTech Clincher Fence Machine and is the answer not in the manual?
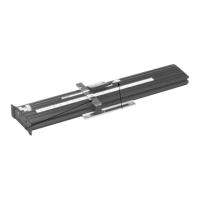
Instructions for securely mounting the CLINCHER fence machine.
Steps for attaching and aligning the fence to the CLINCHER machine.
Guidance on connecting a dust collection system to the SmartFence.
Instructions for installing and using the Vertical Push Fixture.
Setup and calibration of the X-Y stop block and fence scales.
Procedures for cutting custom profile inserts for the SmartFence.
Method for creating straight, true, and square edges on boards.
Overview of shaping operations like tongue and groove, lock-wedge, etc.
Techniques for constructing wood frames, focusing on mortise and tenon joints.
Detailed steps for creating mortise and tenon joints for frames.
Method for creating cope and stick frames with decorative molded rails.
Procedures for creating raised panels for doors using router bits.
Instructions for making raised panels using horizontal router bits.
Instructions for making raised panels using vertical router bits.
Foundational steps for achieving precise and symmetrical woodworking joints.
Initial setup and considerations for making woodworking joints.
Guidance on choosing the appropriate template for specific joint projects.
Steps for correctly inserting templates into the CLINCHER carriage.
Basic principles of using templates for making various joints.
Method for accurately centering workpieces for symmetrical joint cuts.
Step-by-step instructions for achieving perfect workpiece centering.
How to identify and assign pin and tail cuts based on template plans.
Criteria for selecting workpieces for different joint types.
Procedure for assigning template cut lines to pin and tail boards.
Options for varying joint appearance using symmetry marks.
How to align the template correctly with the workpiece and cursor.
Detailed guide for creating precise box joints using the Jointech system.
Importance of using the correct router bit for box joints and its impact on fit.
How to set the router bit depth for box joints based on stock thickness.
Steps to center workpieces for symmetrical box joint cuts.
How to determine pin and tail cut assignments for box joints.
Aligning the template to the workpiece for box joint cuts.
Procedures for making the actual box joint cuts.
Comprehensive instructions for creating half-blind dovetail joints.
Critical steps for setting the correct depth of cut for dovetails.
Centering workpieces for symmetrical half-blind dovetails.
Assigning pin and tail cuts for half-blind dovetails.
Aligning the template for half-blind dovetail cuts.
Detailed process for cutting the pins in half-blind dovetails.
Detailed process for cutting the tails in half-blind dovetails.
Performing the rabbet cut for a clean half-blind dovetail fit.
Instructions for cutting through dovetail joints for decorative purposes.
Key considerations and tips for planning through dovetail projects.
Setting the critical depth of cut for through dovetails.
Preparing workpiece thickness for through dovetail cuts.
Centering workpieces for symmetrical through dovetails.
Assigning pin and tail cuts for through dovetails.
Aligning the template for through dovetail cuts.
Cutting the tails for through dovetails.
Making the pins for through dovetails using vertical and horizontal cuts.
Performing the vertical cut for through dovetail pins.
Performing the horizontal sliding cut for through dovetail pins.
Achieving the final fit for through dovetail joints.
Instructions for creating double dovetail joints.
Choosing stock width for aesthetically pleasing double dovetails.
Setting the critical depth of cut for double dovetails.
Preparing workpiece thickness for double dovetails.
Centering workpieces for symmetrical double dovetails.
Aligning the template for double dovetail cuts.
Cutting the tails for double dovetails.
Cutting the pins for double dovetails.
Methods for creating the middle section of double dovetails.
Using the vertical method to create the middle section.
Using the sliding method to create the middle section.
Achieving the final fit for double dovetail joints.
Detailed guide for making double-double box joints.
Choosing stock width for visually pleasing double-double box joints.
Setting the depth of cut for double-double box joints.
Centering workpieces for symmetrical double-double box joints.
Aligning the template for double-double box joints.
Cutting pins and tails for double-double box joints.
Methods for creating middle sections for double-double box joints.
Using the vertical method for middle sections of double-double box joints.
Using the sliding method for middle sections of double-double box joints.
Instructions for creating the exotic Boxtail joint.
Choosing stock width for visually pleasing Boxtail joints.
Setting the depth of cut for Boxtail joints.
Centering workpieces for symmetrical Boxtail joints.
Aligning the template for Boxtail joints.
Cutting pins and tails for Boxtail joints.
Creating middle sections for Boxtail joints using the vertical method.
Performing the final straight cuts for Boxtail joints.
Reinforcing mitered corner joints with splines.
Cutting sockets for miter splines.
Creating and fitting splines for mitered joints.
Constructing sliding dovetails with a looser fit than blind dovetails.
Using scale templates for repetitive cuts and spacing.
| Brand | JoinTech |
|---|---|
| Model | Clincher Fence Machine |
| Category | Power Tool |
| Language | English |