The Joyoung Air Fryer Oven (models KX26-V581-US01 and KX26-V581-CA01) is a versatile kitchen appliance designed to offer more delicious and healthier cuisine through its all-new 360° HOT AIR CIRCULATION technology. This instruction manual is for household use only and not for commercial use. The enterprise that produced this product has passed ISO9001 International Quality Management System Certification.
Function Description
The Air Fryer Oven combines the functionalities of an air fryer and an oven, allowing for a wide range of cooking methods. It features preset settings for various dishes such as Air Frying, Cake, Pizza, Ferment, Ribs, Dehydrate, Chicken, Toast, Seafood, Preheat, Roast, Rotisserie, and Broil. The device is equipped with a door sensor that pauses cooking when the door is opened and resumes when closed, ensuring safety and consistent cooking. A rotisserie function is available for even cooking of whole or large pieces of meat.
Important Technical Specifications
- Power Supply: 120V/60Hz
- Rated Power: 1800W
- Capacity: 28QT
- Package Dimension: 22.017.418.9 inches
- Oven Light: 25W halogen bulb
- Temperature Range: Presets range from 95°F (Ferment) to 450°F (Air Fry, Toast).
- Time Range: Presets range from 6 minutes (Toast) to 4 hours (Dehydrate).
Usage Features
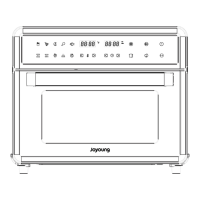
The Air Fryer Oven is operated via a touchscreen control panel.
Main Components:
- LED Control Panel: Displays settings and cooking status.
- Door Handle: For opening and closing the oven door.
- Oven Light: Illuminates the interior, can be turned on/off by tapping the light icon, and automatically turns off after 5 minutes to conserve energy.
- Visible Door (Double Glass): Allows monitoring of cooking progress.
Accessories:
- Roast Chicken Fork (x1): Primarily used for rotating whole or large pieces of meat during baking to ensure even heating.
- Oven Rack (x1): Ideal for toasting, grilling meats & vegetables, pizzas, snacks, and more. There are four groove positions for accessories: position 1 (top) for broil, position 2 for bake/pizza/chicken wings, position 3 for roast/toast/dehydrate, and position 4 (bottom) for air fry basket.
- Air Fryer Basket (x1): Suitable for smaller foods like fries, wings, other vegetables, snacks, and dehydrating fruits, meats, and herbs.
- Drip Tray or Baking Pan (x1): Used as a drip tray to protect lower heating coils and catch excess oil/grease for easy cleanup. Can also be used for baking cookies and desserts.
Control Panel Functions:
- Preset Settings: Tap the desired preset icon to select a cooking mode. The display will show the preset temperature and time.
- Temperature Increase & Decrease: Use the corresponding icons to adjust the temperature. Holding the finger on the icon allows for faster cycling.
- Time Increase & Decrease: Use the corresponding icons to adjust the cooking time. Holding the finger on the icon allows for faster cycling.
- Oven Light: Tap the light icon to turn the oven light on/off. It automatically turns off after 5 minutes.
- Toast: Tap the toast icon to toast food.
- Preheat: Tap the preheat icon to preheat the oven.
- Power On/Off: Tap the power icon to turn the oven on/off.
- Rotisserie: When the rotisserie function is active, the icon flashes. It stops flashing when the door is opened or cooking is finished.
Operation Guide:
- Power On: Insert the power supply, and the screen will light up. Touch POWER to turn on the oven.
- Preheat: Touch "PREHEAT" icon, set desired temperature. When preheat is finished, a signal will sound, and the food can be placed in the oven. Note: Dehydrate function does not require preheat.
- Function Selection: Tap the desired menu icon to set the function. The function will flash, and the screen will display the default temperature and time. These can be adjusted.
- Accessories Position: Insert accessories with food into the desired position. Refer to the accessory rack position diagrams for guidance.
- Start/Stop: Touch the START/STOP icon to begin cooking. The display will show the timer counting down. It will beep 5 times and display "END" with all menu icons lighting up when cooking is finished. When cooking is finished, the buzzer will sound five alarms 5 seconds before the end of the cooking cycle, and the word "end" will be displayed. The fan will stop after 1 minute of normal operation, and then enter standby mode. If there is no operation within 1 minute, it will enter shutdown mode.
Important Safeguards:
- Read all instructions before use.
- Unplug from outlet when not in use and before cleaning.
- Do not touch hot surfaces; use oven mitts.
- Do not immerse cord, plug, or any parts of the air fryer oven in water or other liquid.
- This appliance should not be used by or near children.
- Do not operate with a damaged cord or plug.
- Use of accessory attachments not recommended by the manufacturer may cause hazard or injury.
- Do not use outdoors.
- Do not let cord hang over the edge of the table or countertop.
- Do not place on or near a hot gas or electric burner.
- Do not use this appliance for other than intended use.
- Extreme caution should be exercised when using containers constructed of materials other than metal or glass in the air fryer oven.
- When not in use, always unplug the unit.
- Do not place any of the following materials in this appliance: cardboard, plastic, paper, or anything similar.
- Do not cover crumb tray or any part of the air fryer oven with metal foil.
- Oversized foods, metal foil packages, or utensils must not be inserted.
- A fire may occur if the appliance is covered or touching flammable materials.
- Do not clean with metal scouring pads.
- Never leave the appliance unattended during use.
- Use recommended temperature settings for all functions.
- Do not rest cooking utensils or baking dishes on glass door.
- Do not operate in an appliance garage or under a wall cabinet.
- Check voltage compatibility before plugging in.
- Always attach plug to appliance first, then plug cord into the wall outlet.
- A short power-supply cord is provided to reduce risks.
- This appliance has a polarized plug; do not modify it.
Maintenance Features
Before First Use:
- Remove all packaging.
- Place on a stable, level, heat-resistant surface, at least 4.33 inches from electrical outlets, walls, and furniture.
- Wash all accessories and clean the interior of the Air Fryer Oven. Dry and place accessories back in the oven.
- Check power and socket compatibility, then plug into a suitable power outlet.
- Run the oven empty for 18 minutes at the highest temperature (450°F) to sterilize and remove any initial odor or smoke caused by the protective film on the heater.
Replacing the Light:
- Rotate the light cover counterclockwise to remove it.
- Remove the used bulb by pulling it directly.
- Insert the new bulb.
- Rotate the light cover clockwise to tighten it.
Cleaning the Interior:
- To clean any spattering that may occur while cooking, wipe the walls with a soft, damp sponge. An on-abrasive liquid cleanser or mild spray solution may be used to avoid build-up of stains. Apply the cleanser to the sponge, not the oven surface, before cleaning.
- Let all surfaces dry thoroughly prior to inserting the power plug into a power outlet and turning the oven on.
- WARNING: Use extreme caution when cleaning the heating elements. Allow the oven to cool completely, and then gently rub a soft, damp sponge or cloth along the length of the heating element. Do not use any type of cleanser or cleaning agent.
Cleaning the Crumb Tray:
- After each use, slide out the crumb tray and discard crumbs. Wipe the tray with a soft, damp sponge. An non-abrasive liquid cleanser or mild spray solution may be used to avoid build-up of stains. Apply the cleanser to the sponge, not the tray, before cleaning. Dry thoroughly.
- To remove baked-on grease, soak the tray in warm soapy water then wash with a soft sponge or soft plastic scouring pad. Rinse and dry thoroughly.
- Always ensure to re-insert the crumb tray into the oven after cleaning and prior to inserting the power plug into a power outlet and turning the oven on.
Cleaning the Outer Body and Door:
- Wipe the outer body with a soft, damp sponge. A non-abrasive liquid cleanser or mild spray solution may be used to avoid build-up of stains. Apply the cleanser to the sponge, not the oven surface, before cleaning.
- To clean the glass door, use a glass cleaner or mild detergent and a soft, damp sponge or soft plastic scouring pad. Do not use an abrasive cleanser or metal scouring pad as these will scratch the oven surface.
- Wipe the LED screen with a soft damp cloth and apply cleanser to the screen. Please do not apply cleanser directly to the LED surface. Cleaning with dry cloth or abrasive cleaners may scratch the surface.
- Let all surfaces dry thoroughly prior to inserting the power plug into a power outlet and turning the oven on.
- WARNING: Do not immerse the body, power cord or power plug in water or any other liquid as this may cause electrocution.
Storage:
- Remove the power plug from power outlet. Allow the oven and all accessories to cool completely before disassembling and cleaning.
- Ensure the oven and all accessories are clean and dry.
- Ensure the door is closed.
- Store the appliance in an upright position standing level on its support legs.
- Do not store in a wet or hot condition.
Extension Cord:
- A short power-supply cord (for detachable power-supply cord) is provided to reduce risks resulting from becoming entangled in or tripping over a longer cord.
- Longer detachable power-supply cords or extension cords are available and may be used if care is exercised in their use.
- If a long detachable power-supply cord or extension cord is used, the marked electrical rating of the detachable power-supply cord or extension cord should be at least as great as the electrical rating of the appliance.
- The longer cord should be arranged so that it will not drape over the counter top or table top where it can be pulled on by children or tripped.
- This appliance has a polarized plug (one blade is wider than the other). To reduce the risk of electric shock, this plug will fit in a polarized outlet only one way. If the plug does not fit fully in the outlet, reverse the plug. If it still does not fit, contact a qualified electrician. Do not modify the plug in any way.
Troubleshooting:
- The oven does NOT Work:
- Possible Cause: The appliance is not plugged in.
- Solution: Make sure the oven is plugged in.
- Possible Cause: You have not turned on the oven.
- Solution: Press "ON/OFF" button to power on.
- Possible Cause: The door is not closed properly.
- Solution: Make sure the door is closed well.
- Steam is coming out from the top of the oven door:
- Possible Cause: You are cooking high moisture content foods.
- Solution: This is normal. The door is vented to release steam created from high moisture content foods such as frozen breads.
- This is the first time to use oven:
- Solution: This is normal. The oven may produce some white smoke when you use it for the first time. We suggest that run the highest temperature in function working 10-20 minutes without food to eliminate smoke.
- White smoke is coming out of the oven:
- Possible Cause: You're cooking the greasy food.
- Solution: This is normal. Frying greasy foods will cause oil to leak into the heaters and drip tray or baking pan, the oil will produce white smoke. You should not affect cooking.
- Possible Cause: Baking pan or crumb tray or heaters still contains grease residues or oil from previous use.
- Solution: Make sure you clean these parts properly after each use.
- Dark smoke is coming out of the oven:
- Possible Cause: Food is burning.
- Solution: Immediately turn off the oven, be careful when you take out the food.
- Too much amount of food:
- Solution: Reduce the amount of food for single cooking.
- The ingredients are not done cooked with the oven:
- Possible Cause: Setting temperature too low or time too short.
- Solution: Set the temperature higher or time longer.
- Possible Cause: Choose the incorrect function.
- Solution: Make sure you cook with the proper function.
- Possible Cause: Ingredients are stacked or close to each other during cooking.
- Solution: Make sure ingredients spread out evenly.
- Foods are cooked unevenly:
- Possible Cause: Baking pan, Air Fry basket or oven rack position is not adjusted.
- Solution: Before or during cooking, adjust these accessories on the proper position.
- Foods are not crispy after Air Frying:
- Possible Cause: Ingredients with highly moisture.
- Solution: Spraying or brushing a small amount of oil on food evenly can increase crispiness.
- Display shows Error Code "E1":
- Possible Cause: There is a short circuit in the temperature monitor.
- Solution: Remove the power cord from the power outlet. Contact Customer Support.
- Display shows Error Code "E2":
- Possible Cause: There is a open circuit in the temperature monitor.
- Solution: Remove the power cord from the power outlet. Contact Customer Support.
- Display shows Error Code "E3":
- Possible Cause: The temperature monitor or heaters is in inoperative.
- Solution: Remove the power cord from the power outlet. Contact Customer Support.
- Display shows Error Code "E4":
- Possible Cause: The communication protocol is abnormal.
- Solution: Remove the power cord from the power outlet. Contact Customer Support.