EasyManua.ls Logo

JPI EDM-900 - User Manual

JPI EDM-900
55 pages
Print Icon
To Next Page IconTo Next Page
Loading...
FAA Approved Installation Manual for the Report No 908
EDM-900 and EDM-930 Page 1 of 55 Rev I
Primary Engine Data Management System Date 1-18-2013
TABLE OF CONTENTS
1. Revisions ______________________________________________________________________________________ 3
2. Instrument Marking ______________________________________________________________________________ 4
3. Primary TSO Label ______________________________________________________________________________ 4
4. Operation and Abbreviations ______________________________________________________________________ 5
5. Dimming ______________________________________________________________________________________ 6
6. Locating and Installing the Indicator and Remote Alarm Display (RAD and Alert Light) ________________________ 9
6. EDM-900/930 Key information installation __________________________________________________________ 11
7. Routing the Wiring Harnesses_____________________________________________________________________ 12
8. Power Connection ______________________________________________________________________________ 12
9. Wiring Markings _______________________________________________________________________________ 13
10. Exhaust Gas Temperature Probe (EGT) Installation ___________________________________________________ 13
11. RADIAL Engine EGT_____________________________________________________________________________ 14
12. Turbine Inlet Temperature (TIT) Probe Installation (optional) ___________________________________________ 14
13. TIT for second Turbine Inlet Temperature ___________________________________________________________ 14
14. Using the Factory original TIT Probe_______________________________________________________________ 14
15. Cylinder Head Temperature (CHT) Probe Installation__________________________________________________ 15
16. Radial Engine CHT (spark plug gasket) _____________________________________________________________ 15
17. Outside Air Temperature (OAT) Probe Installation ____________________________________________________ 15
18. Induction Air (IAT), Compressor Discharge Temperature Probe Install (optional)____________________________ 15
19. Carburetor Probe Installation (optional) ____________________________________________________________ 15
20. Oil Temperature Probe Installation ________________________________________________________________ 15
21. Oil Pressure Sensor Installation ___________________________________________________________________ 16
22. Fuel Pressure Sensor Installation __________________________________________________________________ 17
23. Adding a non-primary gauge to the system ___________________________________________________________ 17
24. Fuel Pressure Sensor Installation __________________________________________________________________ 17
25. Ammeter Shunt Installation _______________________________________________________________________ 18
26. Load Meter Configuration________________________________________________________________________ 19
27. Fuel Level Sender Wiring Types ___________________________________________________________________ 20
28. Capacitive Sender Frequency Output Type Sender System_______________________________________________ 20
29. Resistive Output Type Sender System (Float type, most common) _________________________________________ 20
30. Voltage Output Type Sender System ________________________________________________________________ 22
31. Fuel Tank Calibration Setting Fuel Calibration Points _________________________________________________ 22
32. After you have collected your data _________________________________________________________________ 24
33. Fuel Flow Totalizer, Refuel Question _______________________________________________________________ 26
34. GPS Interface _________________________________________________________________________________ 27
35. Manifold Pressure (MAP) Sensor __________________________________________________________________ 27
36. RPM Sensor installation _________________________________________________________________________ 28
37. EDM-900/930 Specifications and Limitations_________________________________________________________ 29
38. EMI Radio Test and functional check:_______________________________________________________________ 30
39. Component Parts_______________________________________________________________________________ 31
40. Weight and Balance Data ________________________________________________________________________ 32
41. Pilot Programming _____________________________________________________________________________ 33
42. Programming the HP Constant ____________________________________________________________________ 33
43. Selecting Fuel Pressure Type (EDM-900 only)________________________________________________________ 34
44. Customizing Non-Primary Data (EDM900 only) ______________________________________________________ 34
45. K Factor______________________________________________________________________________________ 34
46. Adjusting the K Factor___________________________________________________________________________ 37

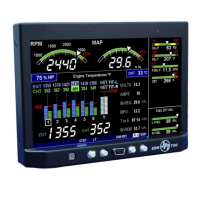
Table of Contents

Questions and Answers

  • S
    Shelby JeffersonAug 20, 2025
    Why does my JPI Avionics Display show '--- GPH'?
    • A
      Ashley FieldsAug 20, 2025
      Dashes displayed instead of GPH indicate that there are no fuel flow transducer signals. To resolve this, have a mechanic verify the sensor and wiring.
  • H
    Henry RoseAug 22, 2025
    How to fix off-scale EGT columns on my JPI EDM-900?
    • S
      Sara RivasAug 22, 2025
      Off-scale EGT column readings in your JPI Avionics Display usually mean the EDM is in Normalize view (blue EGT scales). To return to the Standard mode, hold the LF button.
  • T
    tstewartAug 25, 2025
    What to do if my JPI EDM-900 Avionics Display freezes or is incorrect?
    • B
      brittney66Aug 25, 2025
      If your JPI Avionics Display freezes or shows incorrect data, it might be due to a power transient causing the processors to malfunction. Try recycling the power to the EDM.
  • E
    eliAug 26, 2025
    Why does my JPI Avionics Display show '--- H.M'?
    • H
      Holly ManningAug 26, 2025
      Dashes displayed instead of H.M indicate that there are no fuel flow transducer signals. This may be due to no GPS signal. Check the wiring.
  • A
    amy97Aug 27, 2025
    How to fix a missing column in the JPI EDM-900 Avionics Display on start up?
    • D
      Daniel MeyerAug 28, 2025
      A missing column in the JPI Avionics Display upon start up means that the diagnostic routine has found an open line or probe with no connection. Replace the EGT or CHT probe shown in the error message.
  • J
    Jacob JacksonAug 29, 2025
    What to do if there is a missing column in the JPI Avionics Display during flight?
    • J
      Jasmine YoungAug 29, 2025
      A missing column in the JPI Avionics Display during flight means a reading that is jumping around or incorrect. The probe is removed from the line up. Replace the EGT or CHT probe shown in the error message on the next flight.
  • A
    ashley59Aug 31, 2025
    Why is there a red 'X' on a single gauge of my JPI Avionics Display?
    • W
      watkinsandreaAug 31, 2025
      A red ‘X’ drawn through a single gauge on your JPI Avionics Display indicates a measurement out of range. Have a mechanic verify if it is the engine or the sensor and replace as necessary.
  • V
    vpetersSep 2, 2025
    Why does LeanFind on my JPI EDM-900 Avionics Display find a peak too soon?
    • W
      William TurnerSep 2, 2025
      If LeanFind on your JPI Avionics Display finds a peak too soon, it could be due to failure to pre-lean before performing LeanFind or stopping while leaning, or leaning too slowly. Continue to lean without stopping and lean more rapidly.
  • K
    Katie JonesSep 4, 2025
    Why is there a red 'X' on all gauges for an engine on my JPI EDM-900?
    • Q
      qjensenSep 4, 2025
      A red ‘X’ drawn through all gauges for an engine on your JPI Avionics Display indicates a DAU failure or DAU communications error. Check the power to DAU and wiring harness connections.
  • W
    webbchristinaSep 6, 2025
    What does 'OPEN PRB' mean on my JPI EDM-900?
    • H
      Hannah NelsonSep 6, 2025
      If the JPI Avionics Display shows 'OPEN PRB', it indicates an open probe. This means the wiring to the probe is open circuit. Check the wiring and crimps. Swap probes to troubleshoot.

Summary

1. Revisions and Installation Notes

Read This First

Provides essential warnings and preliminary notes for installation.

2. Instrument Marking

3. Primary TSO Label

4. Operation and Abbreviations

5. Dimming and Alarm Hierarchy

Alarm hierarchy for the EDM-900;930

Outlines the priority sequence for system alarms and warnings.

6. Locating and Installing the Indicator and Remote Alarm Display

Single Engine Aircraft EDM-900;930 Installation

Specific installation guidance for single-engine aircraft models.

Mounting Bracket for the EDM-900

Instructions for installing the mounting bracket for the EDM-900 unit.

5. EDM Display Installation

EDM-900;930 Key Information Installation

Explains loading aircraft configuration data via USB.

7. Routing the Wiring Harnesses

8. Power Connection

9. Wiring Markings

10. Exhaust Gas Temperature Probe (EGT) Installation

11. RADIAL Engine EGT Installation

12. Turbine Inlet Temperature (TIT) Probe Installation (optional)

13. TIT for Second Turbine Inlet Temperature

14. Using the Factory Original TIT Probe

15. Cylinder Head Temperature (CHT) Probe Installation

16. Radial Engine CHT (Spark Plug Gasket)

17. Outside Air Temperature (OAT) Probe Installation

18. Induction Air (IAT), Compressor Discharge Temperature Probe Install (optional)

19. Carburetor Probe Installation (optional)

20. Oil Temperature Probe Installation

21. Oil Pressure Sensor Installation

22. Fuel Pressure Sensor Installation

23. Adding a Non-Primary Gauge to the System

24. Fuel Pressure Sensor Installation

25. Ammeter Shunt Installation

26. Load Meter Configuration

General Fuel Flow Transducer Installation

27. Fuel Level Sender Wiring Types

28. Capacitive Sender Frequency Output Type Sender System

29. Resistive Output Type Sender System (Float Type)

30. Voltage Output Type Sender System

31. Fuel Tank Calibration Setting

Collecting Fuel Level Calibration Data

Initial steps for collecting fuel level calibration data with the EDM unit.

32. After Data Collection

Entering; Editing Fuel Level Calibration Data

Detailed steps for managing fuel level calibration data in the EDM.

33. Fuel Flow Totalizer and Refuel Question

34. GPS Interface

35. Manifold Pressure (MAP) Sensor

36. RPM Sensor Installation

37. EDM-900;930 Specifications and Limitations

38. EMI Radio Test and Functional Check

39. Component Parts

Component Parts Lists

Compilation of parts lists for various EDM system probes and sensors.

40. Weight and Balance Data

41. Pilot Programming

42. Programming the HP Constant

43. Selecting Fuel Pressure Type (EDM-900 Only)

44. Customizing Non-Primary Data (EDM900 Only)

45. K Factor Entry

Fine Tuning the K Factor

46. Adjusting the K Factor

47. Programming Accumulate Trip Total

48. Trouble Shooting

GPS Interface Diagnostics

Troubleshooting steps for GPS interface connectivity and data issues.

49. Connector Pin Assignments on EDM, J1 through J5 (EDM 930)

50. Connector Pin Assignments on EDM, J1 through J5 (EDM 900)

J1 Connector Pin Assignments

For 4 and 6 Cylinder Installations

J1 connector pin assignments for 4 and 6 cylinder engines.

For 7, 8, and 9 Cylinder Installations

J1 connector pin assignments for 7, 8, and 9 cylinder engines.

J2 Connector Pin Assignments

51. J3 RPM, MP, Oil-P Connections

J4 (FF, GPS, AMP 2) Connections

51.1 J5 PN 790719 (Fuel Tanks, Fuel Press, Amps)

Typical Single Engine Harness Routing

54. Appendix C Connector Pin Assignments on EDM, J1-J2 with ARINC 429

Appendix B: Instructions for Continued Airworthiness (ICA)

Revisions for ICA

1. Introduction

2. Description

3. Programming, Alarm Limits, and Dimming

Alarm Limits

Explanation of how the system manages and displays alarm conditions.

Dimming

Details manual and automatic control of display brightness.

Maintenance and Reference Procedures

Servicing and Installation Follow-up

Covers servicing, maintenance, troubleshooting, and component replacement guidelines.

Troubleshooting and Diagram References

Refers to troubleshooting sections and diagrams for system issues.

Special Inspection Requirements

Lists any special inspection requirements for the system.

JPI EDM-900 Specifications

General IconGeneral
Display TypeLCD
Power Supply10-32 VDC
Oil Pressure Range0 to 150 PSI
Accuracy±1% of full scale
Data LoggingYes
Operating Temperature-20°C to 70°C
Number of Cylinders Supported9
EGT/CHT Range0°F to 1999°F
Oil Temperature Range0°F to 300°F
RPM Range0 to 9999 RPM
Manifold Pressure Range10 to 50 inHg
Engine Monitoring ParametersEGT, CHT, Oil Temp, Oil Press, Fuel Flow, RPM, Manifold Pressure, Volts, OAT
AlarmsYes

Related product manuals