Do you have a question about the JRC JMA-9102-CA and is the answer not in the manual?
Describes the radar's design for withstanding severe conditions, maintenance, and troubleshooting, including semiconductor considerations.
Introduces detailed specifications for various radar models, including scanner size, output bands, and CRT size.
Details overall technical specifications such as emission type, display system, range, resolution, environmental conditions, and power input.
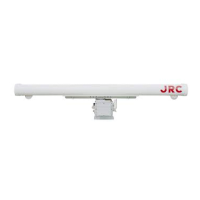
Provides specifications for the antenna unit, including dimensions, weight, polarization, directional characteristics, revolution, and drive motor.
Details specifications for the transceiver unit, covering modulator, receiver, T/R control circuit, and frequency characteristics.
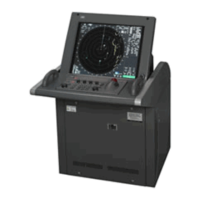
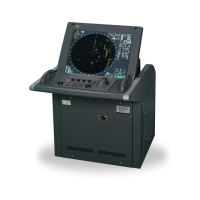
Lists specifications for the display unit, including dimensions, structure, power supply, consumption, and various operational features.
Lists special parts for the NKE-1052 (S band 10KW Transceiver) and NKE-1052 (X band 25KW Antenna).
Provides a list of spare parts, specifically fuses, with their types, codes, quantities, and usage locations.
Lists the ROMs used in various units such as Transceiver, NSK, Panel, and ARPA CPU, along with their versions and unit names.
Details the specifications and composition of the 14-core composite cable used between the scanner unit and display unit.
Provides guidance on planning antenna unit location, considering hull structure, and allowable bending angles for radar waves.
Describes the installation of the display unit, focusing on connection cables, shielding, grounding, and proper mounting.
Covers the installation of the interswitch unit, including its role, modification kits, and connection procedures.
Details the procedures for adjusting the NSK unit, including setting buttons S1, S2, S5, and gyro ratio.
Outlines the initialization procedures for the NSK unit, covering tuning, bearing, range, performance monitor, and other settings.
Explains the step-by-step process for tuning the radar display to achieve optimal signal indication.
Describes how to adjust bearing measurements to match the compass and ensure accurate target positioning on the radar.
Details the procedure for adjusting the radar's range settings to correctly display targets within the specified display area.
Guides the user through adjusting the optional performance monitor for optimal radar performance and tuning.
Explains how to adjust the radar's true bearing display to accurately reflect the gyrocompass heading.
Details the process for setting the ship's speed, either manually or via log input, for accurate radar operation.
Describes how to select and configure the radar to receive data from external navigation equipment like GPS or Loran.
Explains how to set the time and day display format on the radar CRT using navigation data.
Provides instructions for adjusting the interswitch unit after installation, covering inspection and operational checks.
Details the adjustment procedures for the CRT screen position, including centering and magnetic field adjustments.
Describes the antenna's function, including the radiator part and the scanner drive unit's operation.
Explains the structure and function of the radiator part of the antenna, responsible for transmitting and receiving radar waves.
Details the components and operation of the scanner drive unit, including the drive motor and safety switch.
Outlines the functional blocks of the transceiver unit, comprising modulator, receiver, and T/R control circuits.
Describes the modulator unit's circuit, including power supply, trigger, and pulse transformer functions.
Explains the receiver unit's circuits, including IF unit, monitor unit, and tuning indicator, and their signal processing.
Details the T/R control circuit, covering its sub-circuits like CPU control, A/D converter, and signal generator.
Describes the functional blocks of the display unit, including NSK circuit, power supply, keyboard, CRT, and CPU control.
Explains the NSK circuit within the display unit, covering its components and signal processing for gyro and log data.
Details the power supply circuit, including rectifier, smoothing, pre-power, and AVR parts for stable operation.
Describes the keyboard unit's circuits, including CPU control, track ball, and panel circuits for user interface.
Explains the CRT part, including deflection coils, dynamic focus, blanking, and video amplifier circuits.
Details the CPU control circuit's functions, including serial communication, graphics processing, and memory management.
Describes the timebase circuit's functions, including clock generation, video signal separation, and gain control.
Explains the ARPA process circuit, comparing its features with older radar models and detailing its target detection methods.
Details the interswitch process circuit, covering its CPU, communication, signal exchange, and power supply functions.
Provides a comprehensive guide to diagnosing common trouble symptoms and implementing recovery methods for radar systems.
Explains how to use the radar's self-diagnosis function to check memory, sensor conditions, and communication status.
Details procedures for replacing major components like transceiver units, magnetrons, CRTs, and geared motors.
Provides step-by-step instructions for removing and replacing the transceiver unit, including handling the cover and connectors.
Guides the user through the process of replacing the magnetron, emphasizing safety precautions due to high voltage.
Details the replacement procedure for the diode limiter, including screw removal and proper alignment.
Explains how to replace the PIN attenuator, including removal of the unit and wiring checks.
Provides instructions for replacing the 21-inch CRT, covering screw removal, cable disconnection, and handling.
Details the replacement procedure for the 28-inch CRT, including safety precautions and component handling.
Guides the replacement of the geared motor for the NKE-1052 unit, covering power supply, scanner safety switch, and wiring.
Details the replacement of the geared motor for the NKE-1072 unit, including power supply connections and capacitor handling.
Explains the procedure for replacing ROMs, including initial settings and replacement of IC-16 in the CPU circuit.
Details voltage adjustment procedures for the PC5102 power supply unit, ensuring correct voltage outputs.
Describes LED status checks and voltage adjustments for the 28-inch CRT power supply unit (PC7504).
Provides detailed instructions for adjusting the 28-inch CRT, covering horizontal linearity, focus, and brilliance.
Details the adjustment procedures for the 21-inch CRT, focusing on horizontal linearity, vertical linearity, and focus.
Explains how to adjust the timebase circuit using an oscilloscope to set gain, video waveforms, and signal levels.
Describes the method for setting up and using the ARPA gate function for target tracking and data reading.
Details the output signals for a slave display, including video, trigger, and turning signals.
Describes the output signals for the Radar Buoy option, covering trigger, turning, and video signals.
Explains the output signals for a remote display, including horizontal and vertical synchro signals, and video signals.
Details the input signals required for a unit to function as a slave radar, including video, trigger, and turning signals.
Briefly mentions the Interswitch option, referring to section 2.4 for details.
Provides maintenance procedures for the antenna, including tightening torque for holding bolts and radiator surface cleaning.
Details display unit maintenance, focusing on cleaning the CRT surface to maintain transparency and readability.
Explains coaxial cable maintenance, emphasizing careful handling of tube glands and checking for water leakage.
Provides guidance on maintaining the wave guide, recommending checks at junction points and periodic painting.
| Display | Color LCD |
|---|---|
| Antenna Rotation Speed | 24 rpm |
| Operating Temperature | -15°C to +55°C |
| Frequency | X-band |
| Range | 96 nm |
| Display Size | 19-inch |
| Range Resolution | 25 m |
| Power Supply | 100-115 VAC / 200-230 VAC, 50/60 Hz |
| Antenna Size | 6 ft (1.8 m) |
| Range Scales | 0.125, 0.25, 0.5, 0.75, 1.5, 3, 6, 12, 24, 48, 72 NM |