EasyManua.ls Logo

JUKI LH-1152-5 User Manual

JUKI LH-1152-5
12 pages
To Next Page IconTo Next Page
Page #1 background imageLoading...
Page #1 background image
BE003600B0B
U
MODEL
LH-1152-5
2-ISIEEDLE,
NEEDLE
FEED
LOCKSTITCHER
WITH
AUTOMATIC
THREAD
TRIMMER
Before
operating
your JUKI Lockstitch
Machine,
please
reaid
this
Instruction
Book
carefully
in
order
to operate it in thecorrectandefficient
manners.
Instruction
Book
BEFORE
OPERATION
1.
Don't
run
the
machine
before
filling
the
oil .'reservoir
with
the
prescribed
lubrioatirtgoil.
2.
After
setting up
your
machine, make sure
that
it runs
in
the
correct
direction;
lower
the
needle
by
turning
the
handwheel
and
watch
the
handwheel's
revolution
by
momentarily
switching
the
power
"on"
(correct rotational
direction
of
the
handwheel:
counterclockwise
when
viewed
from
the
handwheel's
end).
3.
Run
the
newly
installed
machine
at
a speed
of
4,000
s.p.m.
or
lower
for
the
first
4
weeks.
4.
Don't
hold the machine by its synchronizer behind
the
handwheel when you move
the
machine head for
installation.
5. Confirm
the
ratings of
your
power source by
the
machine
plate stuck on the motor (power voltage, phase etc.).
SPECIFICATIONS
Stitch
specification
CAUTIONS
IN
OPERATION
1. Don't
put
your hand under
the
needle when you turn the
main
switch
"on"
or
operate
the
machine.
2.
Don't
put
your fingers into
the
thread take-up cover.
3. Don't forget to turn the main switch
"off"
before you tilt
the
machine
head
back
or
remove
the
V-belt.
4. Never bring your fingers or hair close
to,
or place anything
on
the
handwheel, V-belt,
bobbin
winder wheel or
motor
during operation. It may lead
to
serious personal injuries.
5. If your
machine
is
provided
witha belt
cover,
finger
guard
and eye
guard,
never
operate your
machine
with any of
them
removed.
Fabrics
Sewing
speed
General
fabric
medium-weight
Gtemical
shoes
Stitch
length
(max.)
Needle
gauge
Presser
foot
lift
Lubricating
oil
See "34. Table of sewing speed for needle gauges" (p.8)
4
mm
(5/32").
6 mm
(15/64")
4
mm
(5/32")
Sgxl906
#9~#U
DPX5
#11-#22
DP
X 5
#18
-
#22
3/32"
~ 1-1/4"
(2.4
mm
~
31.8
mm)
3/16"
-1-1/4"
1/8" - 1-1/4"
(3.2-31.8
mm)
(1/8" on special request)
(i/8" on
special
request)
|
(4.8
mm
31.8
mm)
[
6 mm (15/64") by hand lifter. 10 mm (25/64") by knee lifter
JUKI
New
Defrix
Oil No. 2 (Oil for Overedger)
3/32"
-
1/4"
(2.4
mm
-
6.4
mm)
1.
INSTALLATION
From the library of: Superior Sewing Machine & Supply LLC
Question and Answer IconNeed help?

Do you have a question about the JUKI LH-1152-5 and is the answer not in the manual?

JUKI LH-1152-5 Specifications

General IconGeneral
BrandJUKI
ModelLH-1152-5
CategorySewing Machine
LanguageEnglish

Summary

Before Operation

Cautions During Operation

Hand Safety

Keep hands away from the needle area while operating or turning the main switch on.

Finger Safety

Do not put fingers into the thread take-up cover.

Power Switch Protocol

Always turn the main switch off before tilting the head or removing the V-belt.

Proximity Hazards

Keep fingers, hair, and objects away from moving parts like the handwheel and V-belt.

Guard Safety

Never operate the machine with safety guards removed.

Lubrication

Threading the Machine

Standard Threading

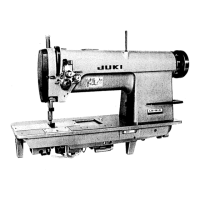
Thread the machine as illustrated for the left and right needles.

Pedal Operation

Four-Stage Pedal Control

Operate pedal lightly forward for low-speed, further for high-speed, back to stop, and backward for trimming.

Thread Tension

Needle Thread Tension Adjustment

Turn tension nut clockwise to increase or counterclockwise to reduce needle thread tension.

Bobbin Thread Tension Adjustment

Turn tension adjusting screw clockwise to increase or counterclockwise to reduce bobbin thread tension.

Presser Foot Pressure Adjustment

Pressure Adjustment

Loosen nut, turn regulator to adjust pressure, then tighten nut.

Timing to Release Thread Tensions

Tension Release Link Adjustment

Adjust height of thread tension release link to release thread.

Needle-to-Hook Relation

Moving Knife Adjustment

Initial Knife Position

Set stitch dial to "0", align needle with feed dog, adjust moving knife.

Moving Knife Height

Align feed dog edge with fixed knife, adjust moving knife height.

Rocker Arm Adjustment

Adjust rocker arm clamp screw and cam follower for moving knife contact.

Clamp Spring Pressure Adjustment

Spring Pressure Setting

Loosen screw, lightly touch adjusting screw to metal fitting, then tighten screw.

Reverse Feed Switch Lever

Switch Lever Operation

Depress lever to run machine in reverse; release for forward sewing.

Reverse Feed Solenoid Position

Set stitch dial to max, adjust solenoid bracket for 0.5-1.0 mm clearance.

CPU Box Switches

CPU Box Switch Operation

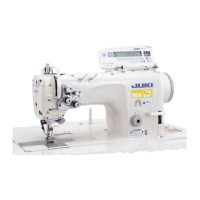
Turn CPU box switches ON/OFF to adjust settings, e.g., DIP switch 2 ON for timing.

PSC Box Switches

PSC Box Switch Operation

Turn DIP switch 21 ON in PSC box to reduce motor clutch noise for heavy-weight material.

Pedal Pressure and Stroke

Troubleshooting

Thread Breakage Causes

Identifies causes like sharp edges, high tension, or hook blade issues.

Stitch Skipping Causes

Identifies causes like low tension, tight spring, or wrong needle-to-hook relation.

Loose Stitch Causes

Identifies causes like bobbin thread path, rough surface, or low bobbin tension.

Thread Escape After Trimming

Identifies causes like high tension, early trimming action, or caught thread.

Thread Escape at Start

Identifies causes like high tension, low clamp spring pressure, or wrong position.

Automatic Presser Foot Lifter

Related product manuals