Subject to technical changes without notice; no responsibility is accepted for the accuracy of this information. 7
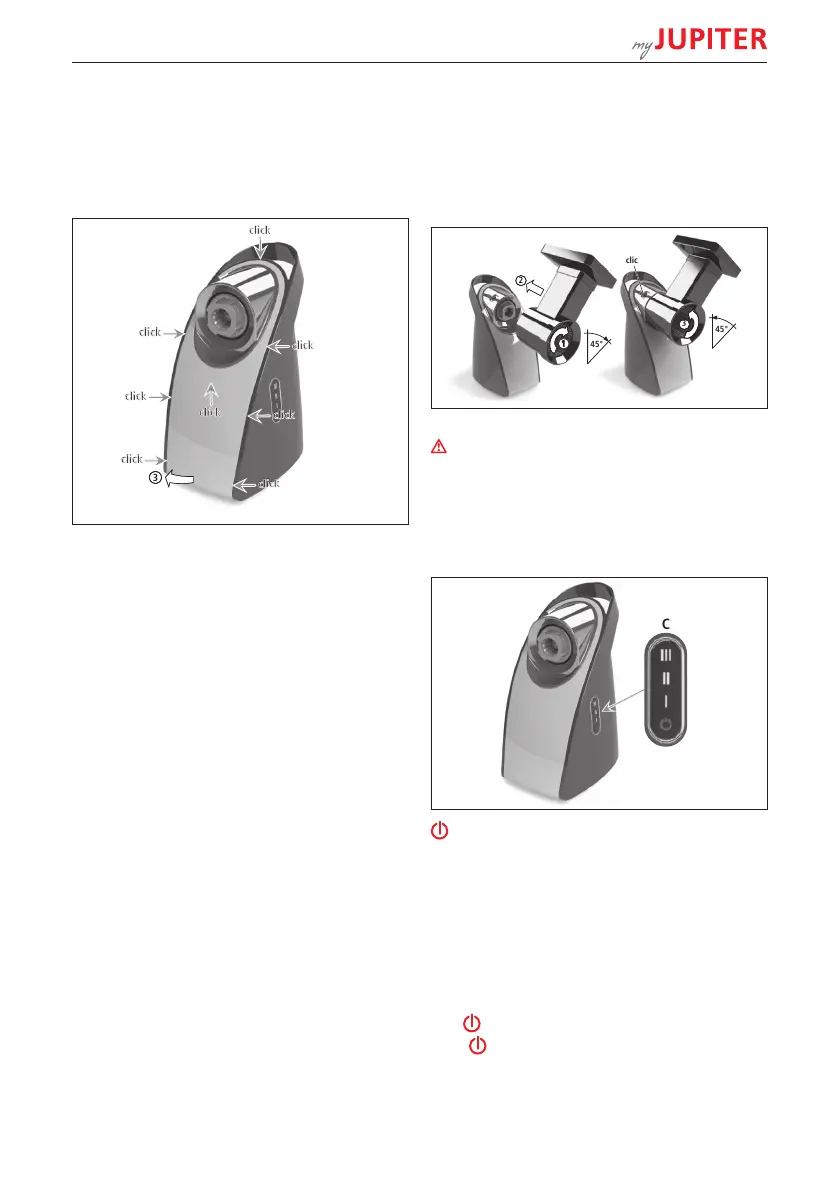
Changing the colour panels
The colour panel F is clipped onto the drive unit at 8 points.
1 Ensure that the appliance’s mains plug D is plugged out.
2 Hold the drive unit with one hand by the handle B.
3 Grip under the bottom edge of the colour panel and
pull the colour panel carefully upwards and off the drive
unit.
4 To re-attach the panel, clip the colour panel downwards
onto the drive unit.
Original JUPITER attachments
NOTE Risk of damage to the appliance!
Only use original JUPITER attachments. Attachments from
other manufacturers can damage the drive unit.
For instructions on the safe use of original JUPITER attach-
ments, please refer to the operating instructions for the
specific attachment.
First use
• Ensure that the appliance’s mains plug D is plugged out.
• Clean the appliance thoroughly using a damp cloth be-
fore using it for the first time.
• Place the appliance on a non-slip, even and clean sur-
face.
Removing the timer from the connector
(see also section Removing the attachment)
1 Push the release slider A to the back.
2 Turn the timer G 45° clockwise.
3 Remove the timer from the connector H.
Mounting the attachment
1 Turn the attachment 45° clockwise.
2 In this position, connect the attachment to the drive unit
connector.
3 Turn the attachment counter-clockwise until it is vertical.
Locking pin
I engages audibly.
4 Place the collecting pan under the attachment.
1
2
45°
1
2
45°
3
3
clic
45°
Switching on the appliance
CAUTION
Rotating parts can cause injury!
Never put your hand into the attachment when the motor
is running.
NOTE Motor can overheat!
Never cover the ventilation openings on the drive unit.
The appliance has a touch panel
C.
ON/OFF
I Level1: 60rpm
II Level 2: 120rpm
III Level 3: 180rpm
Info: The optimal setting
for the safe use of original
JUPITER attachments
is detailed in the
attachment-specific
operating instructions.
1 Plug in the mains plug D.
Self-test; the touch panel C lights up briefly.
lights red.
2 Tap .
The ring of the touch panel and the speed setting
symbols light white.