Subject to technical changes without notice; no responsibility is accepted for the accuracy of this information. 7
J
L
K
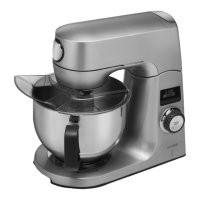
Disassembly/assembly
1 Remove the splash guard lidL.
2 Press the release B downwards.
3 Raise the drive arm A upward, until it engages. click
On first disassembly: Remove the mixing attachments
stored in the bowlJ.
4 Turn the bowl J counter-clockwise.
The bayonet fitting is released.
5 Remove the bowl J from the holder H.
If a mixing attachment is fitted:
6 Push the mixing attachment upwards against the spring.
7 Turn the mixing attachment one ¼ turn clockwise.
The bayonet fitting is released.
8 Remove the mixing attachment from the drive shaft.
7
6
8
• The attachment can be assembled using the same steps
in reverse order.
Info: In order to fold the drive arm back down again, you
must first press the release.
LCD displayD
• In the top line of the LCD display, the processing time
elapsed, the preset time selected, or the remaining time
left of the preset time is displayed in minutes and sec-
onds.
• In the bottom line, the currently set speed level (0-12)
is displayed as a bar diagram and in decimal format.
+ and -buttons D
By pressing the + and - buttons, you can pre-set a time
for processing, which is then displayed on the LCD display:
• 0 - 20 min in 30 s steps
• 20 - 90 min in 5 min steps
Info:
• The time setting 20 - 90 min is only of relevance for the
Timer and Stopwatch functions (see page 8)
• You can reset the preset time by simultaneously pressing
the + and - buttons to 00:00.
Rotary knob for speed settingE
With the rotary knob, you can set the speed levels 0-12
and start or stop the appliance.
CAUTION
Rotating parts can cause injury!
• Processing starts immediately once the knob is turned
from position0!
• If you turn the rotary knob to position0 during process-
ing, processing stops and the elapsed processing time
or the remaining time left of the preset time is set to
00:00.
• You can change the speed level at any time.
PAUSE/START buttonF
• By pressing the PAUSE/START button, you can stop and
restart the currently running processing and the Timer
and Stopwatch functions.
• The time displayed on the LCD display is stopped by
pressing the PAUSE/START button and continues to run
once the button is pressed again.
Accessory connectorM
All original Jupiter attachments can be fitted to the acces-
sory connector using the adapter supplied.
• Remove the cover from the accessory connector M and
store it in holder C.
• Fit the supplied adapter to the accessory connector
(bayonet fitting, ¼ turn counter-clockwise).