Do you have a question about the JVC CA-MXG500 and is the answer not in the manual?
Caution regarding the operation of the standby/on switch and its effect on power disconnection.
Details FCC compliance for digital devices and potential radio interference issues in the USA.
Warning about invisible laser radiation and the need for qualified service personnel.
Warning to reduce the risk of fire or electric shock by avoiding exposure to rain or moisture.
Details the organization and structure of the user manual, including special marks used.
Provides essential safety and installation guidelines for operating the unit.
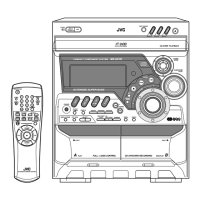
Identifies and describes the buttons and controls located on the front panel of the main unit.
Indicators for timers (Daily, REC, Sleep) and tape deck status (operation, REC).
Indicators for CD modes (Repeat, PRGM, RANDOM), tuner status (MONO, ST), and sound modes.
Indicators for volume, subwoofer level, disc status, track numbers, and main display.
Buttons for turning the unit on/off, setting the sleep timer, and selecting auxiliary input.
Buttons for selecting radio bands (FM/AM), tape decks (A/B), and CD player.
Buttons for controlling CD playback, track skipping, and fast forward/rewind functions.
Buttons for adjusting main volume, subwoofer level, and sound modes.
Instructions for checking all supplied items after unpacking the unit.
Guide on how to insert batteries into the remote control, matching polarity.
Steps for attaching and extending the supplied FM antenna for optimal reception.
Instructions for powering the unit on, putting it on standby, and switching off completely.
Steps to set the current time on the unit, including checking and adjusting the clock.
How to select different audio sources like radio (FM/AM), CD, tape, or external inputs (AUX).
Function to enhance the bass playback sound by adjusting the subwoofer level.
Options to choose preset sound effects (Surround and SEA modes) for playback.
Steps for automatically or manually tuning into FM and AM radio stations.
How to store and recall up to 30 FM and 15 AM radio stations for quick access.
Method to select and listen to previously stored radio stations using preset numbers.
Procedure for placing one, two, or three discs into the carrousel tray.
How to play all loaded CDs continuously or select a single disc for playback.
Procedure for changing CDs while another disc is playing without interrupting.
Method to skip to the next CD in the carrousel using the remote control.
How to fast forward or reverse within a track using specific buttons.
Instructions for skipping to the next or previous track, or selecting tracks directly.
Steps to arrange and program up to 32 tracks from different CDs for custom playback order.
How to erase the last programmed track or the entire program before playback.
Options to repeat a single track, all tracks on a disc, or all tracks on all discs.
Instructions for inserting a cassette tape and playing it back on either deck.
Procedure for recording audio sources like radio or AUX onto a cassette tape in Deck B.
How to record audio from a CD onto a tape with synchronized start and stop.
Setting the unit to turn on and off automatically at specified times daily for wake-up.
Setting the unit to record radio broadcasts automatically at a specified time.
Setting the unit to automatically turn off after a specified period of time.
Instructions for cleaning the exterior of the unit with a soft cloth and mild detergent.
Tips for managing loose tapes and avoiding damage during handling.
Guidelines for removing, handling, and storing CDs to prevent damage.
Detailed technical specifications for the amplifier, tuner, CD player, and cassette deck of the MX-GT700 system.
Detailed technical specifications for the amplifier, tuner, CD player, and cassette deck of the MX-G500 system.
Technical details of the SP-MXGT700 speaker system, including type, units, and power handling.
Technical details of the SP-MXG500 speaker system, including type, units, and power handling.
Details JVC's commitment to repair or replace defective parts during the warranty period.
Customer actions required for warranty service, including returning the product.
List of conditions and damages not covered by the limited warranty.
| Brand | JVC |
|---|---|
| Model | CA-MXG500 |
| Category | Speaker System |
| Language | English |