
P
Patrick WangAug 14, 2025
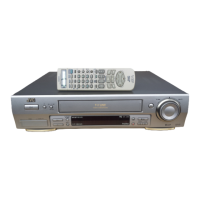
Why is my JVC VCR remote control not working?
- JjmirandaAug 14, 2025
If the remote control isn’t working, the batteries might be dead. Replace the old batteries with new ones.
Why is my JVC VCR remote control not working?
If the remote control isn’t working, the batteries might be dead. Replace the old batteries with new ones.
What to do if the playback picture is not showing on my JVC HR-J870EU?
If you're using an RF connection, ensure the TV receiver is set to the correct video channel and that the recorder’s video channel is correctly set by performing “Video Channel Set”. If you're using an AV connection, make sure the TV is set to AV mode.
How to fix a JVC VCR that has no power?
If your JVC VCR isn't getting power, make sure the mains power cord is properly connected.
What to do if the playback picture is blurred on my JVC HR-J870EU VCR?
The video heads may be dirty. Use a dry cleaning cassette TCL-2UX or consult your JVC dealer.
What to do if the tape doesn't run when recording on my JVC HR-J870EU?
If “i” is displayed on the front panel, press 4 to turn the “i” indicator off. This should allow the tape to run during recording.
Why are there breaks in the Hi-Fi soundtrack on my JVC HR-J870EU VCR?
The automatic tracking mode may be engaged. Try switching to manual tracking.
Why won't my JVC HR-J870EU VCR tape rewind or fast-forward?
The tape might already be fully rewound or fast-forwarded. Check the cassette to confirm.
Why is there noise during normal playback on my JVC HR-J870EU?
The automatic tracking mode may be engaged. Try switching to manual tracking.
What to do if my JVC VCR won't power on but the clock works?
If "#" is displayed on the front display panel and "AUTO TIMER" is set to "OFF", press the # button to turn the "#" indicator off. This should allow the recorder to power on.
Describes internal voltage hazards and service referrals.
Warns against exposure to rain and moisture to prevent hazards.
Explains SECAM types and their playback compatibility.
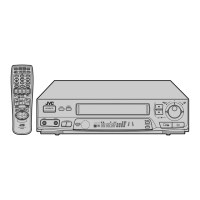
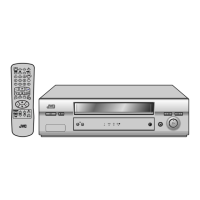
Identifies and describes buttons, dials, and displays on the front panel.
Describes AV inputs/outputs, JLIP, Synchro Edit, and SAT control ports.
Buttons for tape playback, search, pause, and navigation.
Buttons for starting recordings and programming timers.
Buttons to switch between VCR, TV, Satellite modes and access menus.
Instructions on switching the remote's operational mode.
Instructions for connecting via RF or AV (SCART) cables.
Choosing the country for regional settings.
Choosing the display language.
Executes the automatic channel and clock setup process.
Steps to initiate the channel data download process.
Choosing the country and desired display language.
Steps for physically setting up the controller unit.
Connecting the recorder, satellite receiver, and decoder.
Connecting the controller to the recorder's SAT CONTROL port.
Inputting the brand code for the satellite receiver.
Testing control by selecting a channel on the receiver.
Verifying if the satellite receiver channel changed correctly.
Viewing static images or single frames of the tape.
Playing back the tape at a reduced speed.
Quickly scanning through a tape at different speeds.
Skipping unwanted sections during playback.
Accessing recorded segments using index codes.
Setting automatic actions after tape rewinding.
Manually adjusting tape tracking for optimal picture quality.
Selecting between Hi-Fi stereo, bilingual, or normal audio tracks.
Easy method for short, timed recordings.
Viewing different content during recording.
How these programmes are recorded onto the tape.
How the system optimizes picture quality during playback.
How the system optimizes picture quality during recording.
Steps to access the SHOWVIEW interface and input program code.
Selecting recording speed and configuring VPS/PDC.
Activating the timer for programmed recordings.
Specific steps for timer-recording satellite broadcasts.
Handling missing Guide Program numbers for SHOWVIEW.
Setting the desired start time, stop time, and date for recording.
Selecting the channel and recording speed.
Configuring VPS/PDC and activating the timer.
How to quickly locate and play recorded programs.
Removing tape title and related information from memory.
Removing individual program titles and information from memory.
Replacing picture, Hi-Fi audio, and normal audio simultaneously.
Configuring input for AV2 connector (Decoder/SAT) and related notes.
Selecting PAL/NTSC or MESECAM and related tape speed adjustments.
Automatically scanning and storing receivable stations.
Executing the scan and reviewing the results.
Removing a specific channel from memory.
Moving a recorded channel to a different position.
Tuning into scrambled channels using the decoder.
Setting station names for channels already registered.
Setting station names for channels not previously registered.
Adjusting tuning for channels already stored.
Adjusting the channel for RF or AV connection.
Step-by-step manual setup of Guide Program numbers.
Manually adjusting the recorder's internal clock and date.
Troubleshooting problems with power supply and operation.
Troubleshooting problems related to tape movement.
Troubleshooting common problems encountered during tape playback.
Troubleshooting common issues encountered during recording.
Troubleshooting common issues with programmed timer recordings.
Troubleshooting for camcorder audio, channel scanning, and remote control issues.
Technical details on signal system, recording, resolution, and I/O.
Details on channel capacity, tuning, coverage, and memory backup.
| Type | VCR |
|---|---|
| Video Format | PAL |
| Number of Heads | 4 |
| Remote Control | Yes |
| Tuner | Yes |
| Noise Reduction | Yes |
| Timer | Yes |
| Playback Formats | VHS |
| Recording Formats | VHS |
| Audio System | Stereo |