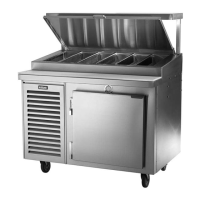
The Kairak KRP Prep Table is a commercial refrigeration unit designed for food preparation and storage, featuring both a pan chiller for ingredients and a lower storage cabinet.
Function Description
The primary function of the Kairak KRP Prep Table is to provide a refrigerated workspace for preparing food, keeping ingredients at safe temperatures in a pan chiller, and offering additional cold storage in a lower cabinet. The pan chiller system is designed to maintain proper food temperatures in exposed insert pans, while the lower storage cabinet is intended for refrigerated or frozen product storage. The unit incorporates independent temperature controls for the pan chiller and the lower storage cabinet, along with a time clock for automatic defrost cycles.
Important Technical Specifications
The serial tag, located inside the lower storage cabinet on the right-hand wall of all standard KRP models, provides vital electrical and refrigeration data. Key specifications include:
- Serial Number: Permanent ID# of the Kairak unit.
- Model Number: Model # of the Kairak unit.
- Electrical: Volts, Hz (Cycle), PH (Phase), Total Current (Maximum amp draw), Minimum Circuit (Minimum circuit ampacity), Lights (Light wattage), and Heaters (Heater amperage for Hot Food units only).
- Refrigeration: Refrigerant type used, Design Pressure (High & low side operating pressures and refrigerant charge).
- Agency Listings: Designates agency listings (e.g., ETL, NSF).
- Temperature Control:
- Pan Chiller: Set at 23°F with a 3°F differential, operating display range between 20°F and 28°F.
- Base Refrigerator: Set at 37°F with a 3°F differential, operating display range between 34°F and 40°F.
- Freezer Base: Set at 0°F with a 2°F differential, operating display range between –2°F and 2°F.
- Clearance: Prep table models longer than 36” require no clearance at the back and sides. Units 36” or shorter with a rear-mount compressor require a minimum clearance of 3 inches at the back and sides for sufficient air circulation.
Usage Features
- Unpacking and Installation:
- Inspect for shipping damage upon delivery. Save crating materials if damage is found.
- Remove components and packing materials from inside the lower storage cabinet.
- Install the cutting board by aligning holes with pins on the countertop.
- Install the compressor filter by sliding it into tracks below the compressor compartment after removing the louvered panel.
- If equipped, install the electric condensate evaporator by attaching mounting rails to the cabinet bottom, placing the evaporator in the heater bracket, sliding the bracket into the rails, and plugging it in. The drain should be located above the evaporator opening.
- Refrigeration Lines (Remote Units):
- Refrigeration lines (suction 3/8” copper, supply 1/4” copper) are shipped under pressure.
- Cut tubing with a tube cutter, deburr, degrease, and use Silfos 5% for brazing.
- Follow manufacturer's instructions for system charge.
- Electrical Connections:
- Cord Connected Units: Plug into a properly sized, three-pronged grounded outlet.
- Permanently Wired Units: Connect to a junction box on the back of the unit.
- Prestart Checks:
- Time Clock Settings (Pan Chillers): Set the time clock to the correct time of day (24-hour disc). Factory preset is "off at 12:00 midnight and back on at 5:00 a.m."
- Removing Food Product at Night: Set tripper pins to shut off the pan chiller at closing and turn on one hour before food is placed the next day (pins pulled out = refrigeration off, pins pushed in = refrigeration on).
- Leaving Food Product Overnight: Set tripper pins for 15 minutes on and 60 minutes off consistently. Close the night cover and place plastic wrap over exposed food to prevent condensation.
- Time Clock Settings (Freezer Models): Factory preset is defrost 3 times a day for 15 minutes each (12:00 a.m., 8:00 a.m., 4:00 p.m.). Adjust pins for desired off times.
- Temperature Control Settings: Factory preset, but can be adjusted by an authorized service technician if local conditions necessitate. Controls for Models 27S-36S are on the bottom sides toward the back; for Models 42S-120S, they are in the compressor compartment; for remote units and earlier self-contained models, they are in the lower storage cabinet.
- Operation:
- Allow cabinet and pan chiller to reach normal operating temperature (approx. 1 hour) before loading. Frosting of pan chiller plates is normal.
- Pan Chiller:
- Avoid direct air blowing on food.
- Maintain room ambient temperatures of 86°F or less.
- Food should sit a minimum of 1 inch below the top of the insert pan.
- Insulate shelving mounted over insert pans if heated equipment is above.
- Stir certain foods occasionally for consistent temperatures.
- Double pans can help prevent over-chilling.
- For remote units, ensure refrigeration equipment is properly sized and in good working condition.
- Lower Storage Cabinet: Designed for 33°F-40°F (refrigerated) or -2°F-2°F (freezer). Overloading with warm food or frequent door openings will increase temperature and recovery time.
- Shutdown for Extended Periods: Disconnect power, open doors/drawers, and wipe out the pan chiller cavity and base interior once divider bars have defrosted and the cabinet has warmed to room temperature.
Maintenance Features
- General Cleaning: Disconnect electrical power before cleaning.
- Lower Storage Cabinet:
- Clean with warm, soapy water. Avoid grit, abrasives, bleach, or harsh chemicals. Rinse and dry with a soft cloth, rubbing in the direction of the stainless steel grain.
- Remove and clean wire shelves in a sink. Ensure shelf clips are reinstalled at the same height and "snapped" into place.
- If equipped with tray slides, lift the front of the assembly to clear the door opening, then pull out.
- If equipped with drawers, remove drawers from the drawer frame module. Loosen black clamping knobs on Cross Rail Locks and Liner Locks, pull Cross Rail Locks toward the center, and allow Liner Locks to drop to remove the frame assembly.
- Pan Chiller:
- WARNING: DO NOT HOSE DOWN OR POUR WATER OR LIQUID CLEANERS into the pan chiller compartment to avoid damage and voiding the warranty.
- Clean with a soft cloth or sponge. Exercise caution to avoid wetting the fan assembly.
- Clean both drains regularly (minimum once a month). The top drain is typically at the right end above the louvered compressor compartment and has a removable screen.
- The second drain is below the fan assembly. Access by removing the fan shroud and fan housing assembly (requires a 7/16” hex socket). Clear dirt and debris from both drains.
- Condensing Unit (Self-Contained Models):
- Clean the coil and filter regularly (minimum once every three months) for optimal performance. Failure to do so may cause premature compressor failure and void warranty.
- Models 42 through 120: Remove the louvered panel (lift up, pull out) and rear access panel (phillips head screwdriver). Clean dirt and lint from the condenser coil with a vacuum cleaner or soft brush (no wire brush). The filter is located behind the louvered panel, below the condensing unit. Clean the filter by sliding it out, rinsing with hot water, and reinstalling.
- Models 27 through 36: The condensing unit is at the back, behind a removable, slotted access panel. Remove the panel with a phillips head screwdriver. Clean the condenser coil with a vacuum cleaner or soft brush (no wire brush). These units do not have a removable filter.
- Replacement filters are available from Kairak Parts and Service Department (800-833-1106).
- Evaporator Coils:
- Clean every six months for optimal performance.
- Coils are in the storage cabinet behind the coil can cover. Remove four screws with a phillips head screwdriver to take off the cover. Clean with a vacuum cleaner or soft brush (no wire brush). Replace cover.
- Tips for Long Life and Performance:
- Ensure time clock and temperature controllers are set correctly.
- Clean/replace air intake filters regularly (monthly/quarterly).
- Keep drain strainers clean and in place to prevent water accumulation and freezing.
- Cover all pan openings in the cold rail with proper-sized hotel pans.
- Ensure compressor area covers are always in place.
- Do not store anything in the compressor area.
- Keep rails clean of debris and wipe up spills immediately.
- NEVER dump water into the rail when cleaning to prevent fan failure.
- Do not use sharp utensils to clean gaskets; wipe daily.
- Wipe casters regularly to prevent grease clogging and "flat spotting."
- Units 36" or shorter with rear-mount compressors need a minimum 3” clearance on sides and back.
- Do not place trash receptacles or solid objects in front of compressor areas.
- Be aware of the condensate evaporator and plug underneath the unit when mopping/sweeping; ensure the plug is fully seated.
- Clean evaporator coils in bases every 6 months.
- Monitor for conditions hindering cooler operation (e.g., heat lamps, adjacent cooking equipment).
Kairak's warranty covers defects in materials and factory workmanship for Kairak-branded products. It applies only to the original purchaser and excludes damage from transit, improper installation, alteration, normal wear, misuse, abuse, improper voltage, accident, negligence, T-stat/time clock adjustments, gaskets, cutting boards, filters, clogged drains, ice build-up without mechanical failures, and food contamination loss due to mechanical/electrical failure. Warranty does not apply outside the United States.
- Authorization: Prior authorization is required for service. Model and serial numbers must be provided. Kairak is not responsible for expenses incurred without authorization.
- Limitations: Kairak is not liable for loss of use, revenue, profit, substitute use, incidental, indirect, special, or consequential damages, loss of refrigerant, or other similar losses.
- Freight Damage: Do not refuse shipment. Note details on the freight bill and file a claim with the freight agent immediately.
- BLU FIXTURES: 3-year parts and labor warranty, 5-year compressor warranty (one-time replacement after the first year). Labor for compressor replacement is covered for the first three years (30 days from ship date). After three years, labor, tax, shipping, and miscellaneous parts are excluded. BLU remote fixtures must operate with Kairak remote systems only.
- REFRIGERANT FIXTURES: 1-year parts and labor warranty, 5-year compressor warranty (one-time replacement after the first year). Labor for compressor replacement is covered for the first year (30 days from ship date). After the first year, labor, tax, shipping, and miscellaneous parts are excluded.
- REMOTE SYSTEMS: 1-year parts and 90-day labor warranty (option to purchase 1-year labor warranty at purchase). Does not apply to motors, switches, controls, accessories, or parts manufactured by others unless warranted by the manufacturer to Kairak. 5-year compressor warranty (one-time replacement after the first year). Labor for compressor replacement is covered for the first year (30 days from ship date). After the first year, labor, tax, shipping, and miscellaneous parts are excluded.
- Service Hotline: To request authorized service, call (800) 833-1106. After-hour requests must be urgent and documented with Kairak's after-hours service line. Kairak is responsible for straight time only unless otherwise approved.