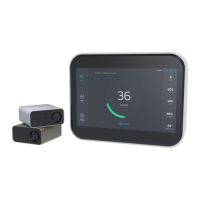
The Sensedge Mini utilizes a modular design to allow for easy control and replacement of sensors. A
CO
2
sensor is built into the core of the device, and a variety of other sensors may be inserted using the
two sensor bays on the lower side of the device.
To insert a sensor module, simply align it with the bay and press it in, ensuring the Kaiterra logo on the
plastic tab is facing outwards. When inserted correctly, the module will click into place, and an LED light
above the bay will briefly flash red if the device is powered on.
To remove a sensor module, gently pull the tab outward and remove the module from the bay. Make
sure to pull at a 90 degree angle.
Sensors may be inserted in either sensor bay, and in any order. They may be swapped both when the
Sensedge Mini is powered on and operational, and when the device is turned off.
By default, the Sensedge Mini is shipped with the KM-200 and KM-203 sensor modules, which together
measure PM
2.5
, TVOC, temperature, and relative humidity.
Sensor Modules
Steady OFF
Flash red once
Flash red rapidly
Device working normal
Device powered on
Reset successful
STATUS Light Indications:
Standard operation:
Move the ON/OFF switch right to turn on the device. The STATUS light will go on briefly to indicate the
device has been powered on.
To reset the device, use a paperclip and hold down the RESET pinhole. The STATUS light will flash red
rapidly, indicating that the reset is successful.
Control and Status
Steady OFF
Flash red once
Steady ON
Flash slowly
Glow gradually
Sensor working normal
Sensor module powered on
Sensor module needs to be changed
Sensor module failure
Sensor module in sleep mode
Sensor Module Status Light Indications:
Flash yellow
Flash yellow rapidly for 5 seconds
Flash green rapidly
Glow green gradually
Device in configuration mode
Identify via configuration tool
Connecting to the network
Connecting to the cloud
Configuration:
3
4
Steady ON in red
Flash red
Device failure
No network connection
Troubleshooting:
Kaiterra provides a 1-year limited manufacturer warranty on the Sensedge Mini. To obtain a copy of the
warranty for this product, please visit https://support.kaiterra.com/policies
Warranty Information
The Sensedge Mini can be mounted on a concrete block wall, drywall, ceiling, or to an electrical box.
For detailed instructions on installation, power, and connectivity setup, please visit our support center
website at http://support.kaiterra.com/sensedge-mini or scan the QR code below.
Installation
For additional support, please contact your sales representative or email us at
support@kaiterra.com
Troubleshooting
中文
FrançaisEspañol
English
Deutsch
中文
Français
Español
English
Deutsch

 Loading...