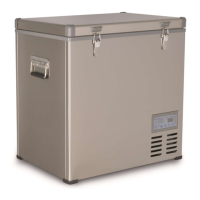
This document outlines the features, operation, and maintenance of the Kalamera Portable Compressor Refrigerator, available in models KRC-45SS, KRC-55SS, and KRC-65SS. Designed for versatility, this appliance is suitable for both cooling and freezing food and drinks, making it ideal for various applications including vehicles, boats, caravans, and household use.
Function Description
The Kalamera Portable Compressor Refrigerator utilizes high-efficiency compressor cooling technology and environmentally friendly refrigerants, ensuring rapid cooling performance. It is designed to operate from multiple power sources, including a 12V or 24V DC on-board supply socket (such as a cigarette lighter in a vehicle) and an AC 100-240V power supply via an external DC/AC power supply adapter. This dual-power capability enhances its adaptability for different environments.
The device incorporates a microcomputer control system with button/key pressing operation and an LED display, allowing for precise temperature control. Users can set temperatures ranging from -7°F to 50°F, and the display also provides failure tips for easy troubleshooting. For safety, the refrigerator includes several protection features: low voltage protection to prevent excessive battery discharge, power supply reverse polarity protection, and ultra-high temperature protection.
A notable feature is the multi-level battery protector, which safeguards your vehicle's battery from excessive discharging. If the refrigerator is connected to a 12/24V supply and the vehicle ignition is off, the unit will automatically switch off when the supply voltage drops below a preset level. It will then restart once the battery has been recharged to the restart voltage level. This system helps prevent situations where the battery is too low to start the vehicle.
Usage Features
Before initial use, it is recommended to clean the refrigerator's interior and exterior with a damp cloth. To optimize energy consumption, users should select a well-ventilated location, keep the refrigerator away from heat sources or direct sunlight, and cool hot food before placing it inside. Reducing the frequency and duration of lid openings, defrosting in a timely manner, and setting the temperature appropriately also contribute to energy efficiency.
Connecting the refrigerator to power is straightforward. For DC power, slide the emergency switch to the "Standard mode" position and insert the DC plug into a car's cigarette lighter socket or other DC 12V/24V socket. The emergency mode is a provisional function, applicable only when the operating panel malfunctions, offering reduced refrigerating speed without temperature setting capabilities. It is not suitable for long-term food storage as super-cooled temperatures may freeze food.
Upon switching on, the power indicator light will turn orange, indicating standby mode. To activate the refrigerator, press the power button for three seconds; the digital display will show the current interior temperature, and the power light will turn yellow, signifying that the refrigerator has started working. It is crucial to ensure good ventilation and an unblocked heat dissipation outlet during operation.
Temperature setting is intuitive: press the settings button once to enter temperature setting status, then use the up and down arrows to adjust the temperature from -7°F to 50°F. Pressing the settings button again allows users to switch between Celsius (°C) and Fahrenheit (°F) display. The refrigerator retains its set parameters even after being re-energized, thanks to its memory function. The power indicator light changes color to reflect the compressor's status: green when working and orange when stopped.
The battery protector can be configured by pressing the settings button for three seconds to enter the battery protection setting mode. Options include Lo (LOW), MED (MEDIUM), and HI (HIGH). For vehicles using the auto starter battery, the HI mode is recommended to maintain a high battery power level. If an additional battery is used, the Lo mode is applicable. The refrigerator is designed to automatically resume operation after a power interruption, provided it reconnects to power.
Maintenance Features
Regular cleaning and maintenance are essential for the refrigerator's longevity and efficient operation. Always disconnect the device from the mains before cleaning or servicing. It is important to avoid using abrasive cleaning agents or hard objects, as these can damage the refrigerator's surfaces. The interior and exterior should be cleaned occasionally with a damp cloth. The heat dissipation window should also be cleaned frequently to ensure proper heat dissipation.
Defrosting is necessary when humidity causes frost to build up inside the cooling device or on the evaporator, as this reduces cooling capacity. To defrost, remove all stored items from the refrigerator (and transfer them to another refrigerator if necessary). Cut off the power, open the lid, and keep it open until all ice and frost have melted. The defrosted water should then be wiped away with a clean cloth. Crucially, never use hard or pointed tools to remove ice or loosen frozen objects, as this can cause damage.
The manual also provides instructions for replacing the plug fuse (12/24V) and the interior light. For fuse replacement, unplug the DC power plug, unscrew the cap anticlockwise to remove the fuse, replace it with a new one of the correct rating (32V 10-15A), and then tighten the cap. It's important to use a fuse with a rated current between 10A and 15A to prevent issues like premature burning or damage to the car's battery fuse. For replacing the interior light, unplug the power plug, open the lid, unscrew the light pressing board, pry out the transparent light cover, remove the old light component, replace it with a new one, and then reassemble in reverse order.
A comprehensive troubleshooting guide is included to address common issues such as the power indicator not turning on, the digital display showing error codes (Err1, Err2, Err3), the device not cooling, or the error indicator light blinking. This guide provides possible causes and suggested remedies, including checking power input, changing fuses, cleaning connections, repairing temperature sensors, charging batteries, or sending the unit for professional repair if necessary. The manual notes that if the error indicator light blinks, the compressor will attempt to restart every 60 seconds until successful. In emergency mode, if the error indicator light blinks every 4 seconds, it indicates that the input voltage is below the lowest starting voltage, requiring battery charging.