Do you have a question about the Kanto P301 and is the answer not in the manual?
Determine the correct bolt size for projector mounting holes.
Select the correct size spacer for mounting surface leveling.
Determine the mounting arm configuration using extension arms.
Test the projector's center of gravity by lifting the assembly.
Loosen the locking nut using the provided wrench.
Rotate the plastic tension ring to set the desired tension.
Tighten the locking nut to secure the plastic tension ring.
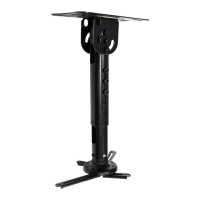
The Kanto P301 Projector Ceiling Mount is a versatile and robust solution designed to securely mount projectors to various ceiling types. Its primary function is to provide a stable and adjustable platform for projectors, ensuring optimal positioning for viewing. This universal mount is engineered to accommodate a wide range of projectors, making it a flexible choice for both home and professional installations.
One of the key usage features of the P301 is its impressive adjustability. The mount allows for installations at a distance of 15 to 18 inches (38 to 45 cm) from the ceiling, providing flexibility in placement depending on room dimensions and projection requirements. This extension capability is crucial for achieving the ideal projection angle and image size. Beyond vertical adjustment, the P301 boasts a remarkable ±90° tilt range. This feature is particularly useful for mounting to sloped ceilings or even on the side of beams, offering unparalleled adaptability to challenging architectural spaces. This extensive tilt ensures that the projector can always be leveled and aimed correctly, regardless of the mounting surface.
Further enhancing its versatility, the P301 includes a 360° swivel capability. This allows for full rotational adjustment of the projector, enabling users to fine-tune the projection direction without having to remount the entire unit. Complementing the swivel, the mount also offers a ±20° tilt for leveling the projector. This micro-adjustment feature is essential for achieving a perfectly straight and undistorted image on the screen, compensating for any minor misalignments during installation.
The installation process of the P301 is designed to be as straightforward as possible, though it requires careful attention to detail. The first step involves attaching the projector to the projector adapter. The manual emphasizes the importance of determining the correct bolt size from the provided selection (A through K) to avoid damaging the projector. Users are advised to hand-test the bolts to ensure a proper fit. Optional spacers (Q through T) are included to address uneven mounting surfaces, allowing for a level attachment even on irregular projector bodies. The projector adapter comes pre-assembled with 50mm and 100mm mounting arms, and extension brackets (Y) are provided for projectors with wider mounting hole patterns. The flexibility of the mount and varying arm lengths mean there might be multiple configurations to fit a projector, with the recommendation to use the shortest arm configuration possible while maintaining a suitable center of gravity. After assembly, users are guided to test the projector's center of gravity by lifting the assembly from the adapter's center. If necessary, the extension arms can be slightly loosened to adjust the adapter's position until the projector is balanced, then tightened. A crucial warning is provided against over-tightening bolts into the projector body.
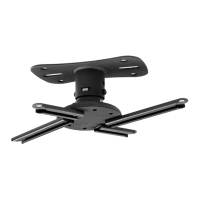
The next stage involves attaching the ceiling plate. The P301 Ceiling Plate Assembly (U) features eight slots for mounting, making it suitable for flat, sloped ceilings, or even beam installations. The pivot plate is inserted into the mounting plate, and the assembly is secured using appropriate hardware, which is not included due to the wide variety of ceiling types and associated hardware requirements. Users are advised to consult a qualified installation contractor if unsure about the necessary hardware.
Following the ceiling plate installation, the optional extension tubes are attached. The P301 includes two extension tubes that can be assembled to the desired length using M8 x 55mm screws (M) and locking nuts (M). These are then attached to the ceiling plate assembly using M8 x 60mm screws (N) and locking nuts (N), ensuring the tubes hang vertically. Tightening screws (P) are used to firmly secure the extension tubes together. The manual stresses the importance of tightening these components using the provided Allen Keys (L) but warns against over-tightening.
A key usage feature for easy projector attachment to the ceiling is the P301's spring-loaded locking tabs. After the extension tubes are in place, the projector adapter (V) is pushed up into the ceiling plate or extension tube until the two spring-loaded locking tabs engage in two of the four square holes. Safety screws (O) are then installed to further secure the projector. Once attached, the projector can be gently twisted left or right, or tilted +/- 20° to aim at the screen.
The P301's ball joint mechanism allows for tilting the projector up to 20° in any direction. Users can adjust the tilt by holding the projector and applying pressure in the desired direction. The tension of the ball joint is pre-tensioned from the factory to ensure the projector remains in position once adjusted.
Maintenance features are also integrated into the design, particularly concerning tension adjustment and removal. Should the ball joint tension be too tight or too loose, the manual provides clear instructions on how to adjust it. This involves removing the projector from the ceiling, which is another maintenance-friendly feature. The projector adapter (V) is designed for easy removal for cleaning, servicing, realignment, or tensioning adjustments. To remove, the two safety screws (O) are first taken out. Then, the projector/projector adapter is gently pushed up to disengage the spring-loaded locking tabs. By turning the projector slightly left or right, the locking tabs are prevented from re-engaging, allowing the projector to be pulled down and removed. A warning is included to support the projector's weight during removal to prevent it from falling.
For tension adjustment, if necessary, the user is guided through a specific procedure. This involves using the included wrench (Z) to loosen the locking nut, then rotating the large plastic tension ring to achieve the desired level of tension. Finally, the locking nut is tightened with the wrench to ensure the plastic tension ring cannot loosen. This detailed adjustment process ensures that the projector's tilt mechanism can be customized to the user's preference and maintained over time.
In summary, the Kanto P301 Projector Ceiling Mount is a thoughtfully designed product that prioritizes flexibility, ease of installation, and long-term usability. Its extensive range of adjustments for tilt, swivel, and extension, combined with user-friendly attachment and maintenance features, makes it a comprehensive solution for mounting projectors in diverse environments.
| Swivel angle | 360 ° |
|---|---|
| Certification | CE |
| Mounting type | Ceiling |
| Product color | Black |
| Housing material | Metal |
| Tilt angle range | -20 - 20 ° |
| Height adjustment type | Manual |
| Height adjustment range | 381 - 457 mm |
| Maximum weight capacity | 10 kg |
| Quantity per pack | 1 pc(s) |
| Depth | 200 mm |
|---|---|
| Width | 134 mm |
| Height | 457 mm |
| Weight | 2700 g |
| Package depth | 158 mm |
| Package width | 330 mm |
| Package height | 90 mm |
| Package weight | 2900 g |