EasyManua.ls Logo

Kärcher BR 100/250 User Manual

Kärcher BR 100/250
8 pages
To Next Page IconTo Next Page
Page #1 background imageLoading...
Page #1 background image
QUICKSTART
5.964-044.0 01/11
Warning
These are only brief instructions! Please read and comply with these instructions prior to using or servicing your
appliance.
The non-compliance of the operating and safety instructions may lead to damages of the appliance and to dangers
for the operator and other persons.
Start up
1
A B C A Tilt the seat towards the front.
B Check if the battery plug is connected to the
appliance.
C Fold the seat backwards.
2
A B C A Sit on the driver's seat.
B Set main switch to “1”.
C Check battery status.
Note
The device is equipped with a safety mechanism
to prevent total discharge, i.e. when the permissi-
ble minimum capacity is reached, then the
machine can only be driven and existing lamps
can be switched on. In such a case, the battery
monitoring symbol on the control console glows
red.
Drive the machine directly to the charging
station; avoid any steep gradients in the proc-
ess.
3
A
D
B
E
C
F
A Pull seat adjustment lever outwards.
B Slide seat, release lever and lock in place.
C Adjust the seat springs.
D Adjust the seat back.
E Set up the lumbar support.
F Loosen the wing nut to adjust the steering
wheel.
Position the steering wheel.
Tighten the wing nuts.
BR/BD 100/250
Question and Answer IconNeed help?

Do you have a question about the Kärcher BR 100/250 and is the answer not in the manual?

Kärcher BR 100/250 Specifications

General IconGeneral
Brush speed180 rpm
Motor rating1.1 kW
BatteryNot applicable
Battery capacityNot applicable
Operating timeNot applicable
Traction motorNot applicable
Frequency50 Hz

Summary

Start Up Procedures

Initial Seat Adjustment

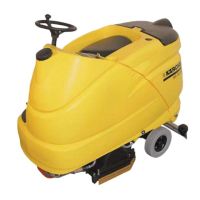
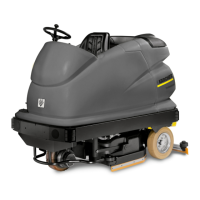
Tilt seat forward, check battery plug connection, and fold seat backward.

Appliance Activation

Sit on seat, set main switch to '1', and check battery status indicator.

Seat and Steering Wheel Adjustment

Adjust seat position, backrest, lumbar support, and steering wheel angle.

Startup: Water and Driving

Fill Fresh Water and Detergent

Fill fresh water tank and pour in detergent as instructed by safety notes.

Operation: Turning On and Driving

Turn On Appliance and Drive

Sit, set main switch to '1', select drive program, and use pedals to drive.

Operation: Cleaning Modes

Scrubbing, Wet Scrubbing, Vacuuming

Wet clean and vacuum dirt water, wet clean for detergent reaction, or suck dirt.

Polishing and Manual Cleaning

Polish without liquid, scrub with vacuum for dust, or use manual cleaning nozzle.

Info Button Usage

Use Info button to select menus and make settings via scrolling and pressing.

Finish Operation Steps

Empty Waste Container and Tanks

Remove and empty waste container, drain fresh and dirt water tanks, then rinse.

Turn Off Appliance

Set programme switch to step 1 and turn the key to '0' to switch off.

Maintenance and Care

Filter, Waste Container, and Hoses

Check filter, empty waste container (BR), drain tanks, and rinse dirt water tank.

Cleaning Lips and Suction Channel

Clean vacuum and wiping lips, check for wear, and clean the suction channel.

Maintenance: Brushes and Exterior

Brush Wear Check and Exterior Cleaning

Check brushes for wear, replace if needed; clean appliance exterior with damp cloth.

Battery Poles and Seals Check

Check battery poles for oxidation, lubricate, and check seals for tightness.

Prescribed Inspection

Arrange for the prescribed inspection to be carried out by customer service.

Troubleshooting Common Issues

Start-up, Water, and Vacuum Problems

Address issues like appliance not starting, low water quantity, or poor vacuum.

Cleaning Results and Brush Movement

Resolve poor cleaning results, worn brushes, or brushes not turning.

Troubleshooting: Fault Displays

Fault Indication on Display

Interpret fault indications on display, follow reset procedures, or call service.

Faults with Display Information

Refer to operating instructions chapter 'Faults with display' for detailed guidance.

Related product manuals