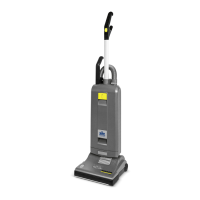
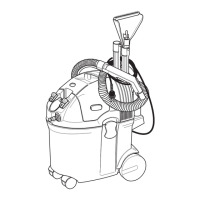
The Kärcher Sensor XP15 is an upright vacuum cleaner designed for professional use, offering efficient cleaning for both hard floors and carpets. Its robust construction and intelligent features make it suitable for various cleaning tasks.
Function Description
The Sensor XP15 operates as a vacuum cleaner, utilizing suction and a revolving brush to effectively remove dust, dirt, and debris from surfaces. It is equipped with a powerful vacuum motor and a brush roller system that adapts to different floor types. The machine's primary function is to provide thorough cleaning while ensuring user safety and ease of maintenance.
Important Technical Specifications
- Model: 1.012-612.0 SR XP15
- Vacuum Motor: 1200 Watt
- Water Lift: 2300 mm (90")
- Air Flow: 50 l/s
- Dust Bag Capacity: 5.3 liters
- Working Width: 378 mm (15")
- Brush Drive: Tooth Belt
- Brush Speed: 2700 rpm
- Floor Adjustment: Automatically (Sensor Advised)
- Cable Length: 12.2 m (40")
- Weight: 7.7 kg (16.9 lbs)
- Ratio Suppression: EN 55014 Verf 242./91
- Electrical: Standard 15 amp 115 volt A.C. power circuit (USA/Canada).
Usage Features
The Sensor XP15 boasts several features designed to enhance its usability and performance:
- Automatic Floor Adjustment: The vacuum automatically adjusts the brush height based on the floor type. On hard floors, the adjustment wheel moves upwards, making the brush flush with the floor. On carpeted floors, the wheel moves downwards, raising the brush for optimal setting. This ensures effective and gentle brushing with a smooth action.
- Upright Position Brush Control: When the machine is switched on in the upright position, the brush automatically rises from the carpet. To release the machine from the upright position, the user presses down the foot pedal (18), which automatically lowers the brush.
- Telescopic Handle Grip and Hose: For cleaning corners or hard-to-reach areas, the telescopic handle grip can be lifted away from the machine, and the hose can be stretched out. After use, the attachment tube (15) is inserted back into the machine, and raising the handle automatically retracts the hose. The hose can also be used without the tube by pulling it out while the tube is fitted, or by pressing the release catch (27).
- Display Functions: The machine includes a display with indicator lights:
- Green Light (A): Brush Lowers
- Green Light (B): Brush Raises
- Red Light (C) (Flashing, Motor Off): Brush Jammed - Clear
- Red Light (C) (Flashing, Motor On, Upright Position): Take Care: Brush in contact with carpet
- Red Light (D) (Continuous): Change paper bag or clear blockage
- Red Light (D) (Flashing): Motor switched off due to full paper bag or blockage
- Safety Precautions: The manual emphasizes important safety instructions, including proper grounding, avoiding use in wet conditions, keeping the cord away from heated surfaces and sharp edges, and ensuring the machine is unplugged before servicing. A manual reset thermal protector is included, which resets by switching off the vacuum and allowing it to cool.
Maintenance Features
Maintaining the Kärcher Sensor XP15 is designed to be straightforward, with clear instructions for key components:
- Dust Bag Replacement: When the red light (D) indicates a full paper filter bag, the cover release (5) is pulled forward, and the cover is lifted from the dust bag housing. The sealing plate (28) of the old bag is slid from the holder (29), and a new bag's sealing plate is inserted. The cover is then reinserted and locked.
- Exhaust Filter (101) and Micro Hygiene Filter (45) Replacement:
- The micro hygiene filter (45) should be changed when clogged or after approximately 20 paper bags have been used. To change it, the cover is removed, and the filter is slid out from the bottom. A new filter is slid in by lifting the lever (32).
- The exhaust filter (101) is recommended to be changed at the same time as the micro-hygiene filter. It is located underneath the cover (19) on the back of the power head. To remove, the exhaust filter cover (19) is lifted by pressing the two recessed grips (A). The filter is then pulled out after slightly lifting the additional catch (B). For fitting a new filter, the closed end is slid in first, ensuring the filter end (C) fits the air channel (D) and the catch (B) locks. The correct positioning can be checked through slots (E). Filters must not be washed.
- Brush Roller Maintenance: The brush roller consists of two parts (128, 138). Push buttons (122, 133) release the side plates (127, 137). The brushes are turned (128 clockwise, 138 counterclockwise) and pulled out. For replacement, the parts are slid into the housing and turned until they locate, then the respective button is pushed, and side plates are pressed back into place. Regular vacuuming of brush roller ends is recommended to prevent dust and fiber buildup. Hair and other debris should be removed without cutting into the bristles.
- Removing Blockages: An inspection door (144) underneath the machine allows checking for blockages. Blockages in the neck (20) can be checked by lifting the dust bag housing (by pressing catch 8), releasing the foot pedal, lowering the neck, and checking the tube. Hose blockages can be cleared by removing the hose, reattaching it the wrong way round to the connecting tube (26), holding it upright with one hand blocking the top, and switching on the machine (quickly lifting hand on and off the hose end if necessary).
- Warranty: The guarantee is invalidated if parts not approved by the manufacturer (e.g., bags, filters, brush roller) are fitted.