54
Il vostro nuovo radiomicrofono è in grado di
operare in perfetta autonomia e in assenza di
cavi di collegamento. Sia il microfono trasmittente
che la piccola ricevente incorporano una batteria
ricaricabile che garantisce ore di utilizzo.
Prima di utilizzare l’apparecchio assicuratevi che
le batterie siano cariche. In dotazione trovate un
cavetto USB con doppio connettore micro USB
per la ricarica in contemporanea dei 2 dispositivi.
Collegate le prese di ricarica (5/10) al cavo tramite
le micro USB (6), quindi inserite la spina USB(7)
in una normale presa USB (1A min). Noterete
illuminarsi dei led sui 2 apparecchi a conferma
della ricarica in corso. Una volta ricaricati i led si
spegneranno.
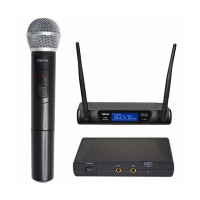
Collegate la ricevente ad un mixer, diusore
amplicato o amplicatore sfruttando una comune
presa microfonica (9). Eventualmente utilizzate il
riduttore in dotazione (8) per trasformare la spina
della ricevente da 3,5mm a 6,3mm.
Una volta collegata la ricevente accendetela
tramite il tasto (11), quindi accendete il microfono
trasmittente agendo sul tasto (4). Attenzione:
assicuratevi di accendere sempre prima la ricevente
e poi la trasmittente.
La ricevente lampeggerà per un paio di secondi.
Successivamente, a collegamento avvenuto, il
led rimarrà acceso sso. L’apparecchio risulta in
funzione.
In caso di interferenze o di mancato collegamento
potete premere il tasto (2) sul microfono per
cambiare canale (10 canali disponibili). La ricevente
si setterà automaticamente.
Durante l’utilizzo potete variare il volume
direttamente dal microfono agendo sui due tasti
(1/3).
In caso si verichino sgradevoli schi o inneschi,
abbassate il volume e assicuratevi di non stare
di fronte ai diusori. Il suono è dovuto al ritorno
in capsula dell’audio riprodotto. Per prestazioni
ottimali, una volta indossato, aggiustate la posizione
dell’archetto (13) anchè la capsula (12) risulti a
circa 2cm dalla bocca.
Your new wireless microphone can operate in
perfect autonomy and without connection cables.
Both the transmitter microphone and the small
receiver come with a rechargeable battery that
guarantees hours of use.
Before using the device make sure the batteries
are charged. Included you will nd a USB cable
with double micro USB connector to recharge the
2 devices simultaneously. Connect the charging
sockets (5/10) to the cable via the micro USB (6),
then insert the USB plug (7) into a standard USB
socket (1A min). The leds on the 2 devices will
light up to conrm charging is in progress. Once
recharged, the leds will turn o.
Connect the receiver to a mixer, a powered speaker
or an amplier through a standard microphone
socket (9). If necessary, use the supplied adapter
(8) to change the plug of the receiver from 3.5mm
to 6.3mm.
Once the receiver is connected, turn it on using the
button (11), then turn on the transmitter microphone
by pressing the button (4). Warning: make sure
you always turn on the receiver rst and then the
transmitter.
The receiver will ash for about two seconds. Then,
once the connection is completed, the led will
remain steady on. The appliance is now correctly
operating.
In case of interferences or no connection you can
press the button (2) on the microphone to change
the channel (10 channels available). The receiver
will be set up automatically.
During use, you can adjust the volume directly from
the microphone, by pressing the two keys (1/3).
In case of unpleasant whistling or audio feedback,
turn the volume down and make sure you are not in
front of the speakers. The sound is due to the return
of audio into the microphone’s capsule. To obtain
the best performance, once you have worn the
headset, adjust the headband (13) positioning the
capsule (12) at about 2cm from the mouth.
Impostazione e uso Setup and operation
 Loading...