2
Loading the Transmitter Batteries
Remove the battery hatch located on the back side of the transmitter push-
ing the cover at the arrow mark with your thumb. Load 4 fresh alkaline bat-
teries or AA size accumulators carefully keeping the correct polarity (marked
on the bottom of the battery holder). Plug the battery holder cable into the
socket at the bottom of the battery compartment keeping the correct polar-
ity (+) red wire, (-) black wire. (The transmitter features a protection circuitry
– if you connect the plug the other way around, the transmitter will not work,
but will not be destroyed by reversed polarity.)
We especially recommend low self-discharge NiMH batteries as the Pana-
sonic Eneloop® 1900 mAh or KAVAN 2000 mAh ones.
Put the hatch back in place.
Charging the Transmitter Batteries
The accumulators have to be charged prior the rst ight.
CAUTION: Never ever try to charge the primary (zinc-carbon, alkaline...) bat-
teries that are not rechargeable. Otherwise explosion and/or re might hap-
pen!.
Checking the Transmitter Battery
Turn on the transmitter and check the LED on the front panel - both the red
and green has to glow. These LEDs indicate the status of the transmitter, not
the transmitter battery voltage. The low battery alarm is acoustic - once you
will hear beeping you have to land immediately and replace/recharge the
batteries. If the transmitter beeps immediately after being turned on, DO
NOT try to y at all.
CAUTION: Do not mix dierent types of batteries or accumulators or
fresh batteries with (partly) discharged. Do not mix regular (zinc-car-
bon) batteries with alkaline batteries.
Checking the Servo Reverse Switches position
Set the servo reverse switches to the default position - CH1 DOWN (R), CH2,
CH3 and CH4: UP (N). Turn the transmitter o.
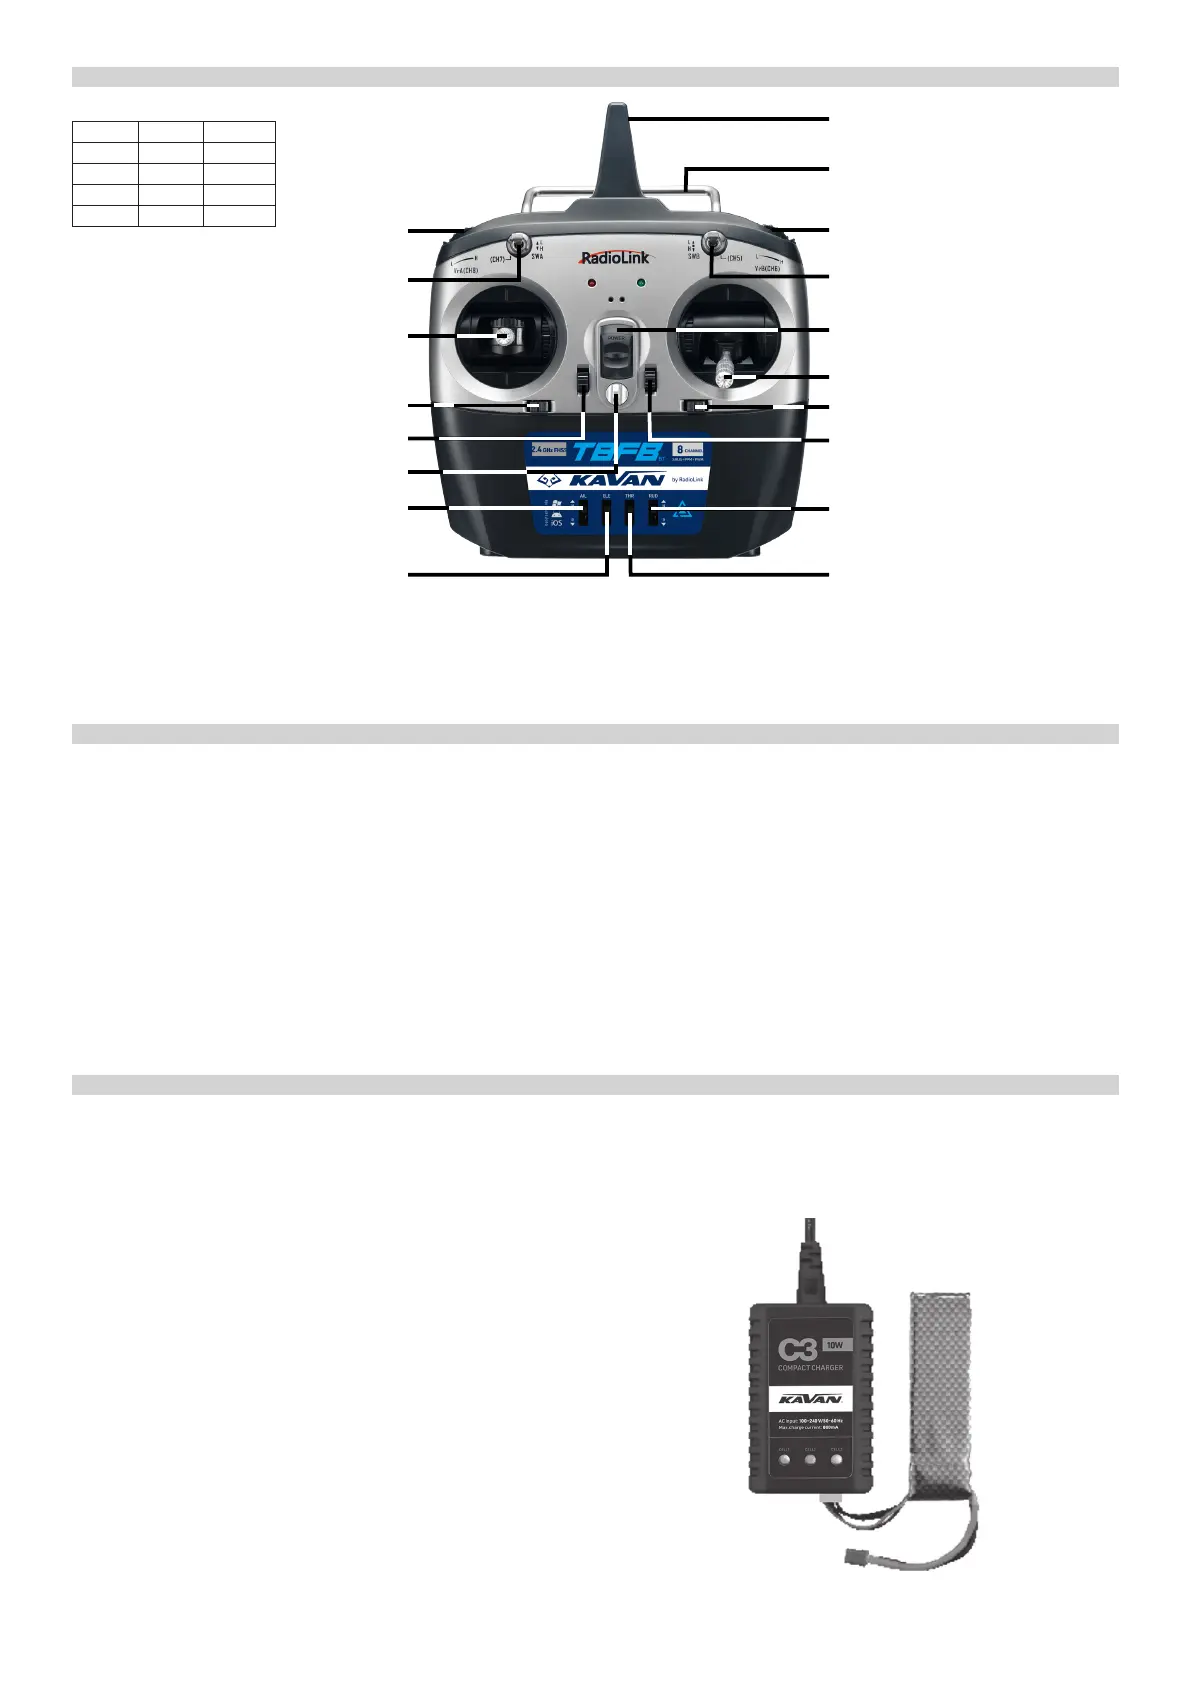
T8FB TRANSMITTER CONTROLS
TRANSMITTER (RTF SET VERSION)
Your BETA 1400 is to be powered by a 3-cell Li-Po battery pack. The Li-Po
battery supplied in the RTF Set features two connectors: one is for the bal-
anced charge of the cells (JST-XH type) and the other one is dedicated to
the discharge (XT60). The RTF set contains also a dedicated KAVAN C3 wall
fast charger (230 V/50 Hz) designed for charging of the ight pack using the
balance cable.
Charging the Flight Battery (RTF Set)
1) Connect the power cable to the charger.
2) Plug the power cable of the charger into the mains socket (230 V/50 Hz). All
the LED glow green and ash red indicating the charger is ready to charge.
3) Plug the balance connector of your ight battery (JST-XH) into the corre-
sponding socket on the charger.
4) The charger starts charging. LEDs will start to glow red. If 2S pack is con-
nected, Cell 1 and Cell2 LEDs will glow red; if 3S pack is connected, Cell 1,
Cell2 and Cell3 LEDs will glow red.
5) Once a particular cell in the ight battery has been fully charged, the cor-
responding LED will glow green. 2S pack will be fully charged, if Cell 1 and
Cell2 LEDs glow green; 3S pack will be fully charged, if Cell 1, Cell2 and
Cell3 LEDs glow green.
6) Disconnect the ight battery from the charger; LEDs will glow green in-
dicating the charger is ready to charge another pack. Unplug the charger
from the mains socket if you are not going to charge another battery.
WARNING: Charge the Li-Po battery with the battery charger included in
the RC Set or with a fully compatible charger that assures a safe charge to the
Li-Po pack. Always follow the safety precautions as laid down in the manu-
facturer’s manual.
In the charging process, keep your charger and your battery in a cool and
shady place, away from any possible source of re. Do not cover the charger
or the battery with clothes or similar: the ventilation is crucial for the neces-
sary cooling of the devices.
Important: Never leave unguarded the battery in charge. If the battery
becomes too hot or starts to “inate”, disconnect it immedi ately from the
charger.
CHARGING THE FLIGHT BATTERY
BETA 1400: Servo Reverse Switch Default Position
Channel Function Default
AIL (CH1) Aileron R (DOWN)
ELE (CH2) Elevator N (UP)
THR (CH3) Throttle N (UP)
RUD (CH4) Rudder N (UP)
Transmitter
System: 2.4GHz FHSS
Frequency Range: 2.400-2.4835 GHz
Output Power: <20 dBm (Tx)/<4 dBm (BT)
Input voltage: 4.8-11.1 V (4x AA alkaline batteries or NiMH accumulators, 2S
or 3S Li-Po)
Receiver (2.4 GHz FHSS)
Frequency Range: 2.400-2.4835 GHz
Output Power: -
Range: ca 500 m on the ground, ca 1000 m in the air
Input voltage: 4.8-10.0 V
Dimensions: 48,5x21x11 mm / Weight: 7 g
Rotary Knob VrA (CH8)
Switch A (SwA, CH7)
Elevator/Rudder Stick (Mode 1) /
Throttle/Rudder Stick (Mode 2)
Rudder Trim
Elevator Trim (Mode 1)/Throttle Trim (Mode 2)
Neckstrap Hook
Aileron Reverse Switch (AIL)
Elevator Reverse Switch (ELE)
Antenna
Transmitter Handle
Rotary Knob VrB (CH6)
Switch B (SwB, CH5)
ON/OFF Switch
Throttle/Aileron Stick (Mode 1) /
Elevator/Aileron Stick (Mode 2)
Aileron Trim
Throttle Trim (Mode 1) / Elevator Trim (Mode 2)
Rudder Reverse Switch (RUD)
Throttle Reverse Switch (THR)
 Loading...