6
makes a boat or car to turn left or right, applying more throttle the vehicle
speeds up – and this is it. Moving the control sticks left or right has more
eect than simply turning the model. The aileron and rudder control will be
explained later.
Please note: the control is fully proportional – the more you move the stick,
the more movement of the control surface. The actual stick movement re-
quired is mostly quite small, and almost never from one end stop to the
other!
Elevator controls the model in the vertical axis; apply up elevator and your
model’s nose will raise (and the model will climb if it has sucient power),
apply down elevator and your model will descend. Please note that your
model can only climb if it has sucient power applied. Your model will not
necessarily climb simply because you have applied up elevator, and will nor-
mally need full power applied for a safe gentle climb. If the climb angle is too
great, or the power applied insucient, your model will lose ying speed
until the minimum (stall) speed. At the stalling speed (when the airow starts
to break away from the upper surface of the wing), your model will start to
feel as though it is not responding as normal to control inputs, and then drop
with little warning – apply down elevator to regain ying speed and full nor-
mal control.
Ailerons control the angle of bank. If you gently move the aileron stick to
the left, your model will start bank to the left as long as you are holding the
stick. Now if you return the aileron stick to the centre position (neutral), your
model will maintain the bank. If you want to resume straight ight you have
to move the aileron stick to the opposite direction.
Rudder of a model without ailerons (you might be already familiar with) con-
trols the angle of bank, which then controls the rate of turn. Natural stability
of your model keeps the wings level in normal straight ight. Since your BETA
1400 features a “full house” controls including ailerons that are the main
means how to control the angle of bank, the use of the rudder is slightly dif-
ferent. You can even start to control your model without use of the rudder
- but you will learn lately the correct coordinated turn actually requires both
aileron and rudder inputs.
Any turn requires an appropriate bank angle – BETA 1400 will y nice big and
safe at turns with only a small angle of bank. During initial ights never use
a bank angle of greater than 45 degrees. By planning the direction that the
model will take, normal turns will be made with less than 30 degrees of bank.
Move the rudder to the left a little way, and your model will bank into a gen-
tle turn. Increase the rudder input a little more, and your model will continue
turning to the left, but it will also start to descend (this is a good time to move
the control stick to the centre to allow your model to recover from the dive!).
Why does your model descend when only rudder is applied? Once the rud-
der leaves its exactly vertical position it also starts to work as an elevator
turned down telling your model to dive. When in a banked turn to maintain
level ight it is necessary to apply a little up elevator to counter the eect
of the down turned rudder. (Actually, the reason why your model descends in
the bank is much more complex - the wing gives less lift in the bank as the verti-
cal projection of the wing is the area that counts and you also have to beat the
inertia that tries to keep your model in the straight ight...) The elevator applied
when your model is in a banked turn also works like a rudder - fortunately it
helps to maintain the turn!
In practise, the ailerons are used to put your model to the desired angle
of bank, the rudder is used to maintain it, and the elevator input helps
to control height whilst also increasing the rate of turn.
Alternatively, you can use only the ailerons to bank your model, then turn
your model using just the elevator and nally resume the straight and level
ight with the opposite deection of ailerons.
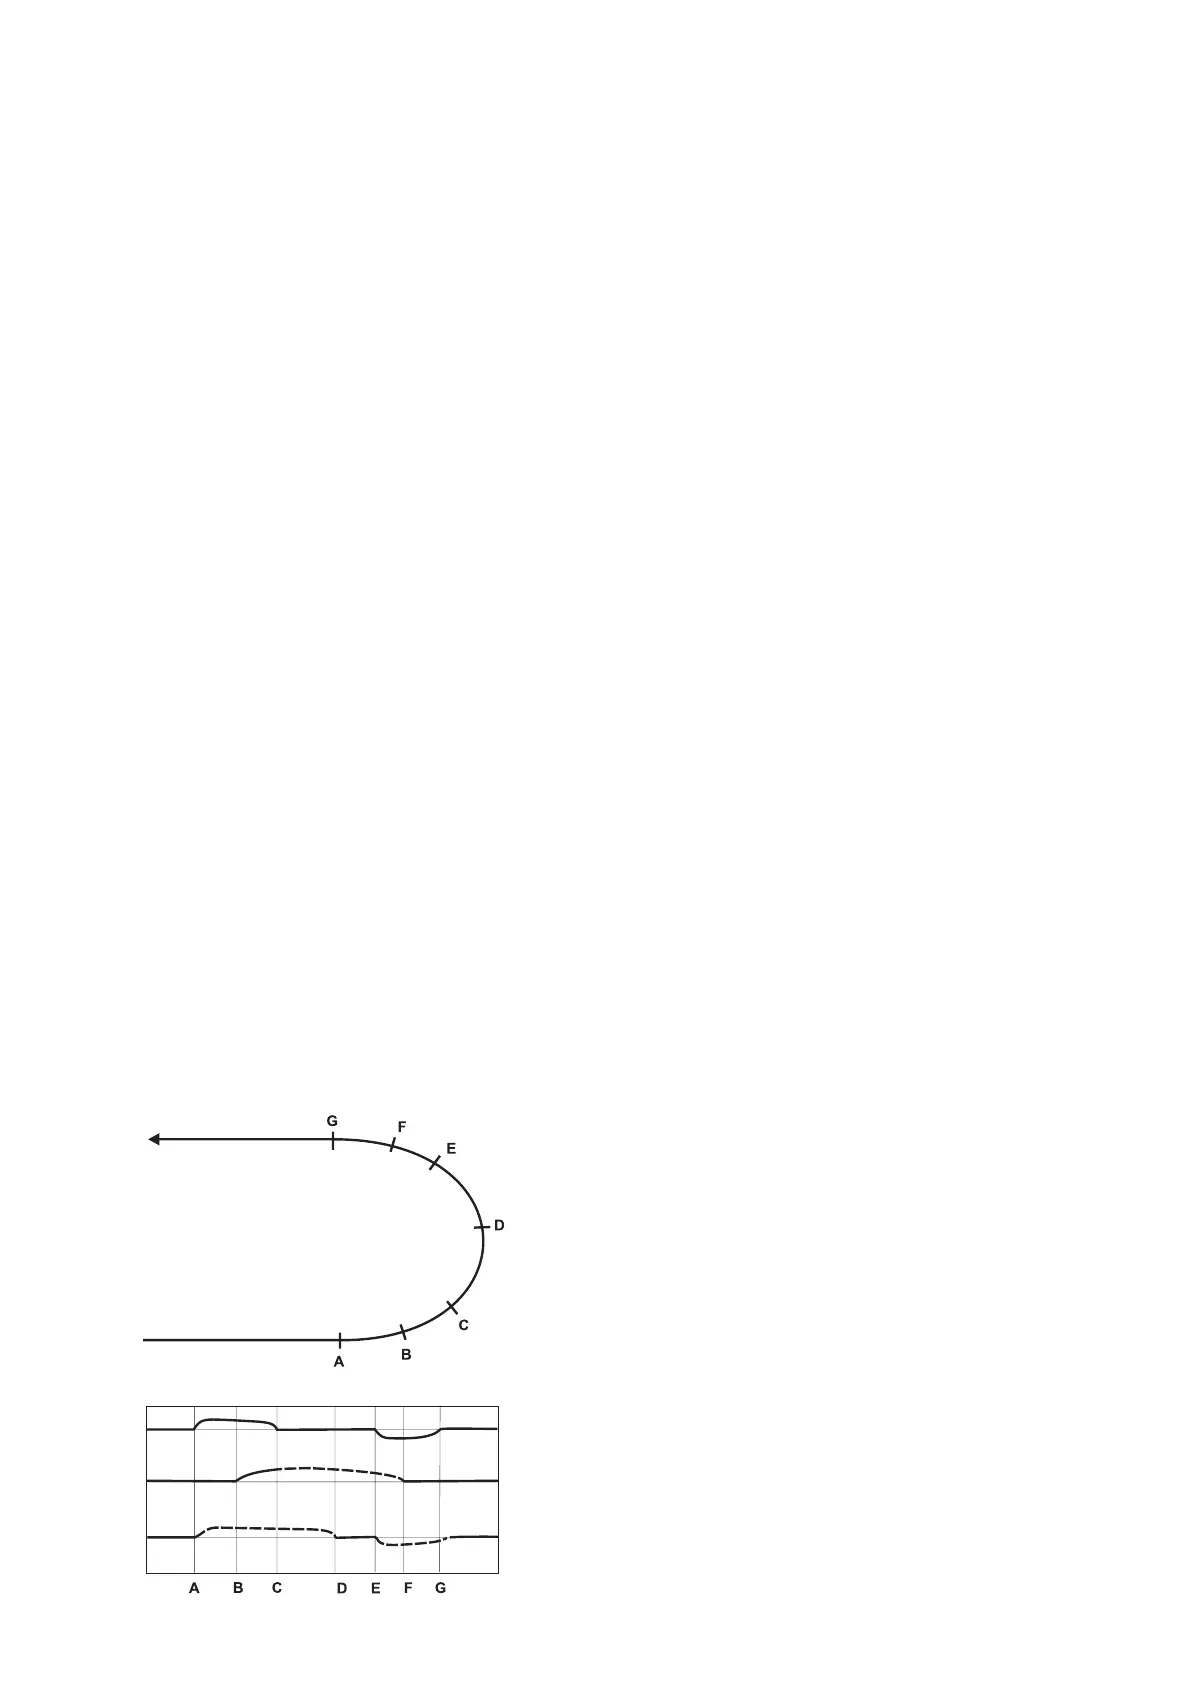
We have got through about 3/4 of the turn and it is the time to think about
returning to straight and level ight in the desired direction. Return the con-
trols to the middle position (you may need to correct the turn with a little
right ailerons and/or rudder). If necessary give slight elevator input to settle
your model into a straight and level ight.
If you take a look at our drawing on the right you will notice that it takes some
time until the model actually starts to turn. And, when leaving the turn, you
have to start to apply the opposite ailerons and rudder sooner than the nose
of your model is pointing to the desired nal direction. The elevator and rud-
der deections are marked with dotted lines – this is because you cannot
tell exactly the track that the model will take during a gentle banked turn, or
entry to straight and level ight.
Congratulations! You have learnt how to achieve a coordinated turn using
rudder and elevator. Remember that model aircraft control is about guid-
ing your model in the desired direction rather than precise steering. Another
complication is the rudder control. It is easy and natural while the model is
ying away from you, but when your model is ying toward you the direc-
tion of control commands has to be reversed. A simple trick when the model
is ying towards you is to move the control stick towards the wing that you
want to lift, imagine supporting the wing by moving the stick under that
wing – it works!
Final setup
Now is the time for the nal setup. Fly your BETA 1400 straight into wind,
leave the controls in the neutral position. If the model turns in one direction
apply the rudder trim in the opposite direction until BETA 1400 ies straight.
Without power your model must settle into a gentle glide, not too fast so
that it plummets to the ground, and not so slow that the controls feel “sog-
gy” and the model is on the edge of the stall. Apply the elevator trim in the
way described in the initial trimming section.
If your model banks to a side, apply a little of the aileron trim in the opposite
direction.
Powered and unpowered ight
The model has been already ne tuned for the unpowered phase of ight.
When you turn on the motor your model might tend to pitch nose up when
full throttle is applied. You cannot completely trim out this tendency with
any motor powered glider – just be aware of this characteristic when ying
your model. In practise you might have to make slight elevator corrections to
maintain a gentle, but positive climb.
Landing
When the power available starts to reduce check that you landing eld is
clear of people and other obstructions. Position your model about 10 to 20m
o the ground at the down wind end of your eld. Make the nal approach
into wind, keeping the wings level all the time as your model descends slow-
ly, and nally settles gently onto the ground. With more practice you will be
able to use a little up elevator to “round out” (slow down the model) at less
than 1m o the ground.
Congratulations!
Coordinated left turn (180°)
Left bank
Resuming straight ight
Straight and level ight
Control Surface Movement
Maintaining
constant
bank,
speed
and altitude
Elevator
Rudder
Left
Right
Up
Down
Straight and level ight
Ailerons
Left
Right
 Loading...