3
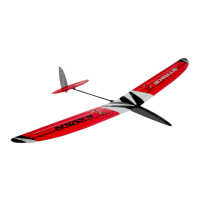
STRIKE DLG Kit
High Performance Discus Launch RC Glider
Designed and manufactured in the Czech Republic
Specication
Wingspan: 1498 mm
Length: 1070 mm
All-up Weight: 230 g
Wing Section: YA 0801
CG Position: 74-78 mm
Controls: Ailerons, rudder, elevator
Recommended RC Equipment
◊ Servos: KAVAN GO-6MG 4x ◊ Receiver Battery: 1S LiPo 3.7 V 500-600 mAh
MODEL ASSEMBLY
Tail Surfaces
◊ Trial t the parts of the horizontal stabilizer, elevator, n and rudder – no
glue yet! Sand as necessary to obtain perfect t. (Fig. 1)
◊ Roughen the surface of the 3x0.5 mm R3 carbon spar using No. 120 sand-
paper and glue it with medium CA to the trailing edge of the n R1.
◊ Glue the T3 liteply reinforcement plate into the horizontal stabilizer T1.
Once the glue has cured sand it ush with the stabilizer.
◊ Sand the entire surface of the horizontal stabilizer, elevator, n and
rudder with No. 120-150 sand paper; round the outer edges. Bevel the
leading edges of the rudder and elevator referring to the Det. D-D.
◊ Put the tail surfaces aside for now; they will be nished after the tailplane
seat is installed to the tail boom.
Fuselage
◊ Trial t the parts of the fuselage– no glue yet! Sand as necessary to obtain
perfect t. Be sure the tail boom F1 could be inserted easily but tightly
into the openings in F10 and F8 formers.
◊ Glue the balsa reinforcement plate F2L to the inner side of the F3L fuse-
lage left side (with the large opening for the F11 hatch); glue the plate
F2R to the inner side of the F3R fuselage right side (without the hatch
opening). (Fig. 2)
◊ Glue the F14 locking plate to the front of the F11 hatch; the locking plate
has to match the position of a notch in the F2L reinforcement plate and
the hatch matches the opening in the F3L fuselage side. The pair of F15
magnets will be epoxied into the F11 hatch and F2L plate only after the
fuselage is covered – otherwise the high temperature of your sealing iron
might de-magnetize the magnets. (Fig. 4+5)
◊ Epoxy the M4 aluminium captive nut into the F9 fuselage brace. Do not
forget bevelling the edges of the fuselage formers and braces where requi-
red.
(Fig. 6+3)
◊ Epoxy the fuselage formers and braces F10, F9, F8, F6 rst into one fuse-
lage side from the rear to the nose and then attach the other side. Put the
fuselage straight bottom side onto the building plan protected by a sheet
of thin clear plastic lm and check the fuselage is true and straight - pin
down as necessary until the glue sets.
◊ Epoxy the F4 former in place and bevelled F5 nose balsa block as well as
the F17 and F18 cross braces.
◊ Epoxy the tow hook plate F7 in place. (Fig. 7)
◊ Partially cut (ca 0.5-1 mm deep) and crack the fuselage sides along the
F10 fuselage former (the cut line is to be soaked with thin CA before the
nal sanding). Slide the tail boom tube F1 onto the openings in F8 and
F10 formers – do not glue yet.
◊ Slide the F21 liteply tail boom fairing ring onto the tail boom F1; tack glue
the fuselage sides to the ring (be sure not to glue the tail boom yet). Glue
the top and bottom balsa plates F20 and F19 in place. (Fig. 8)
Recommended Glues
Unless stated otherwise, use medium cyanoacrylate (CA) glue (KAV56.9952
KAVAN Power CA Medium). Wing sheeting is better to be glued using a wa-
ter resistant white aliphatic resin, like our KAV56.9960 KAVAN White Glue
SUPER (alternatively, you can use this sort of glue for most of wood-to-wood
joints). The highly loaded parts (wing roots, fuselage formers etc.) should
be glued together using 30 minute (or slower) epoxy oering high strength
and enough time for the correct positioning.
Tools and Accessories
◊ Very sharp modeller’s knife (e.g. Excel 16001 with No. 11 blades)
◊ Scissors
◊ Electric drill with drill bits
◊ Wire cutter
◊ Long nose pliers
◊ Screwdrivers
◊ Razor saw
◊ Sandpaper No. 100-120, 180-220, 360-400
◊ Needle les
◊ Soldering iron and solder
◊ Clothing pegs
◊ Modeller’s pins
◊ Epoxy mixing stick and vessel
◊ Masking tape, clear sticky tape
◊ Rubbing alcohol (for cleaning up excessive epoxy)
◊ Paper tissue or soft cloth (for cleaning up excessive epoxy)
◊ Straightedge with scale
◊ Square edge
◊ Thin clear plastic lm (for protecting the building plan)
◊ Permanent marker
◊ Modeller’s sealing iron, heat gun (for covering)
◊ Lightweight balsa ller
◊ Hot melt glue gun & hot melt glue
 Loading...