10 11
Instructions for use - M452.01 - stainless steel slide ‘Steg’
ASSEMBLY - MONTAGE - MONTAJE - MONTAGGIO - MONTAŻASSEMBLY - MONTAGE - MONTAJE - MONTAGGIO - MONTAŻ
ASSEMBLY - MONTAGE - MONTAJE
MONTAGGIO - MONTAŻ
ASSEMBLY - MONTAGE - MONTAJE
MONTAGGIO - MONTAŻ
>250
>400
>460
4X
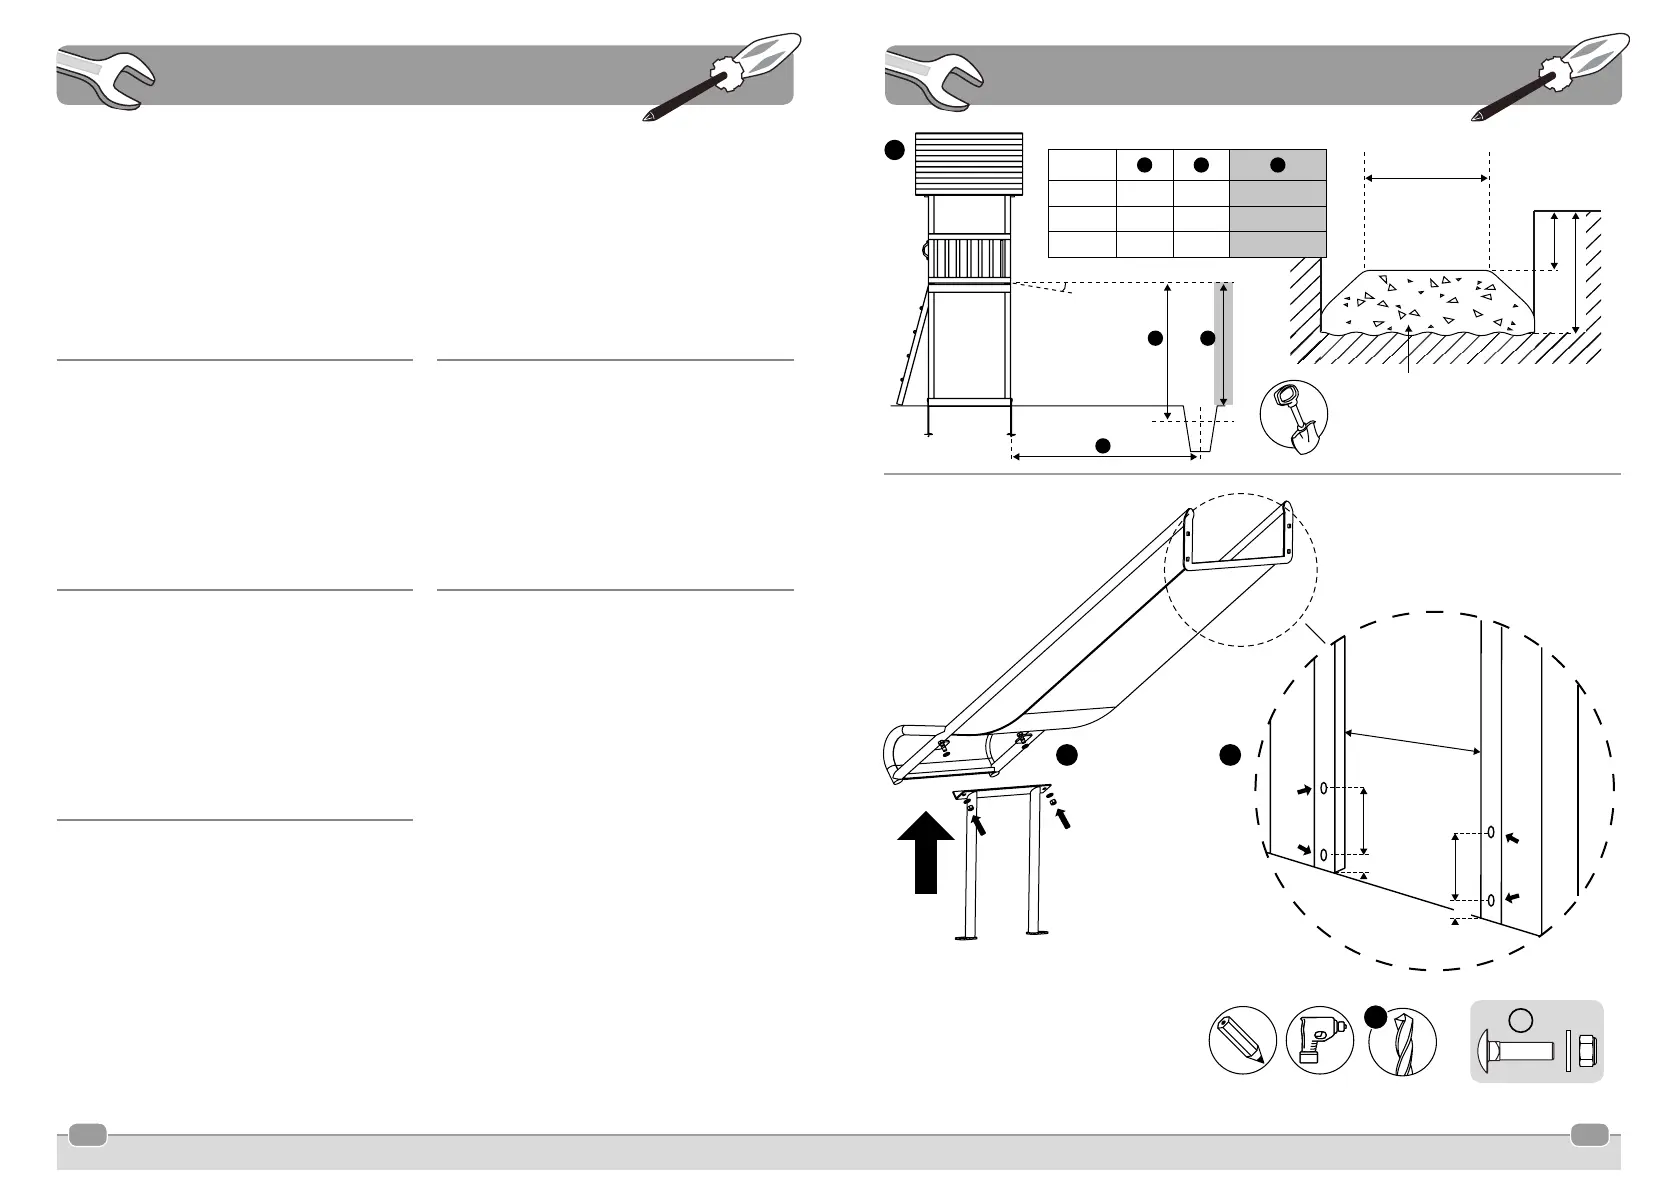
ASSEMBLY STEPS
1. Dig a hole with a depth of approximately 40 cm
and with a width of minimum 46 cm. Pour the
concrete as shown on the image.
2. Fix the ground xation to the slide with the
hexagonal head cap screws.
3. Hold the slide in the desired position and mark the
holes. Drill the 4 holes. Fix the slide with the
carriage bolts DIN603 M12.
4. Fix the feet of the slide to the concrete
with wedge anchors M12. Pay attention on the
measurements in the drawing to install the slide.
MONTAGESTAPPEN
1. Graaf een put van ongeveer 40 cm diep en
minimum 46 cm breed. Giet het beton zoals
aangegeven op de tekening.
2. Zet de grondverankering vast aan de glijbaan met
behulp van de zeskantbouten.
3. Hou de glijbaan in de gewenste positie en markeer
de gaten. Boor de 4 gaten. Zet de glijbaan vast
met de slotbouten DIN603 M12.
4. Maak de voeten van de glijbaan vast met M12
slagankers. Let hierbij op de afmetingen op de
tekening.
ÉTAPPES DE MONTAGE
1. Creusez un trou d’environ 40 cm de profondeur et
minimum 46 cm de largeur. Versez le béton comme
indiqué sur le dessin.
2. Fixez la xation au sol au toboggan par moyen des
boulons à tête hexagonale.
3. Tenez la glissière dans la position désirée et
marquez les trous. Forez les 4 trous. Fixez le
toboggan par moyen des boulons à collet carré
DIN603 M12.
4. Fixez les pieds du toboggan avec M12 goujons
expansibles. Notez les dimensions sur le dessin.
MONTAGESCHRITTE
1. Graben Sie ein Loch von ungefähr 40 cm Tiefe und
46 cm Durchmesser. Giessen Sie den Beton wie auf
die Zeichnung gezeigt.
2. Befestigen Sie die Bodenverankerung an der
Rutsche mit Hilfe von Sechskantschrauben.
3. Stellen Sie die Rutsche an die gewünschte Position
und markieren Sie die Löcher. Bohren Sie die
4 Löcher. Schrauben Sie die Rutsche mit
Schloßschrauben DIN603 M12.
4. Fixieren Sie die Rutsche am Boden mit M12
Kielanker. Achten Sie dabei auf die Abmessungen
in der Zeichnung.
PASOS DE MONTAJE
1. Cave un agujero con una profundidad aproximada
de 40 cm y con una anchura mínima de 46 cm.
Vierta el hormigón como se muestra en la imagen.
2. Fije il sistema de jación al tobogán con los pernos
hexagonales.
3. Mantenga el tobogán en la posición deseada
y marque los agujeros. Perfore las 4 aberturas.
Fije el tobogán con los pernos cerradura DIN603 M12.
4. Fije los pies del tobogán en el hormigón con
anclajes de cuña M12. Preste atención a las
mediciones del dibujo para instalar el tobogán.
PASSI PER IL MONTAGGIO
1. Scavare un foro con una profondità di 40 cm e una
larghezza minima di 46 cm. Versare il cemento
come illustrato nell’immagine.
2. Fissare l‘ancoraggio al suolo allo scivolo con la
chiave esagonale per bullone.
3. Posizionare lo scivolo nella posizione desiderata e
segnare I buchi. Ricavare I 4 buchi. Fissare lo
scivolo con bullone di carello DIN603 M12.
4. Fissare i piedi dello scivolo in ancoraggi del cuneo
di cemento M12. Prestare attenzione alle misure
del disegno per installare lo scivolo.
MONTAŻ KROK PO KROKU
1. Wykopać otwór o głębokości około 40 cm i szeroko-
ści min 46 cm. Wylać beton, jak pokazano na
rysunku.
2. Przytwierdź element mocujący do gruntu do
zjeżdżalni za pomocą wkrętów z łbem sześciokąt-
nym.
3. Przytrzymaj zjeżdżalnię w odpowiedniej pozycji i
zaznacz otwory. Wywierć 4 otwory. Przymocuj
zjeżdżalnię za pomocą śruby zamkowej
DIN603 M12.
4. Przykręcić nóżki ślizgu do kotwy typu Wedge M12.
Aby zainstalować zjeżdżalnię, należy zwrócić
uwagę na wymiary przedstawione na rysunku.
2 3
concrete
beton
béton
Beton
concreto
cemento
beton
1
b c
a
a b c
452.010. 1408 1250 1000 - 900
452.012. 1586 1500 1250 - 1050
452.015. 1930 1750 1500 - 1300
max. 468
90
90
16
16
13
MAX 5°
 Loading...