3
Check point after installation
Make sure Bolt and Nut are fully
tightened and Cotter Pin is
inserted and bent for safety reason.
Make sure Ceiling Fan is securely fi xed
on Hanger Base and
Ceiling Fan not slanting after installation.
Kiểm tra sau khi lắp ðặt
Phải đảm bảo tất cả các Bu Lông,
Đ
ai
Ố
c đều được siết chặt, lắp Chốt An
và bẻ cong để đảm bảo an toàn.
Phải đảm bảo Quạt Trần được cố định
chắc chắn vào giá đỡ và Quạt
Trần không bị nghiêng sau khi lắp đặt.
The Safety Wire is looped to the Hanger Base and securely fixed
to the Carl Bolt Plug
I
Dây An Toàn được gài vào Giá Đỡ và
vặn chặt vào Tắc Kê
I
.
Toàn vào
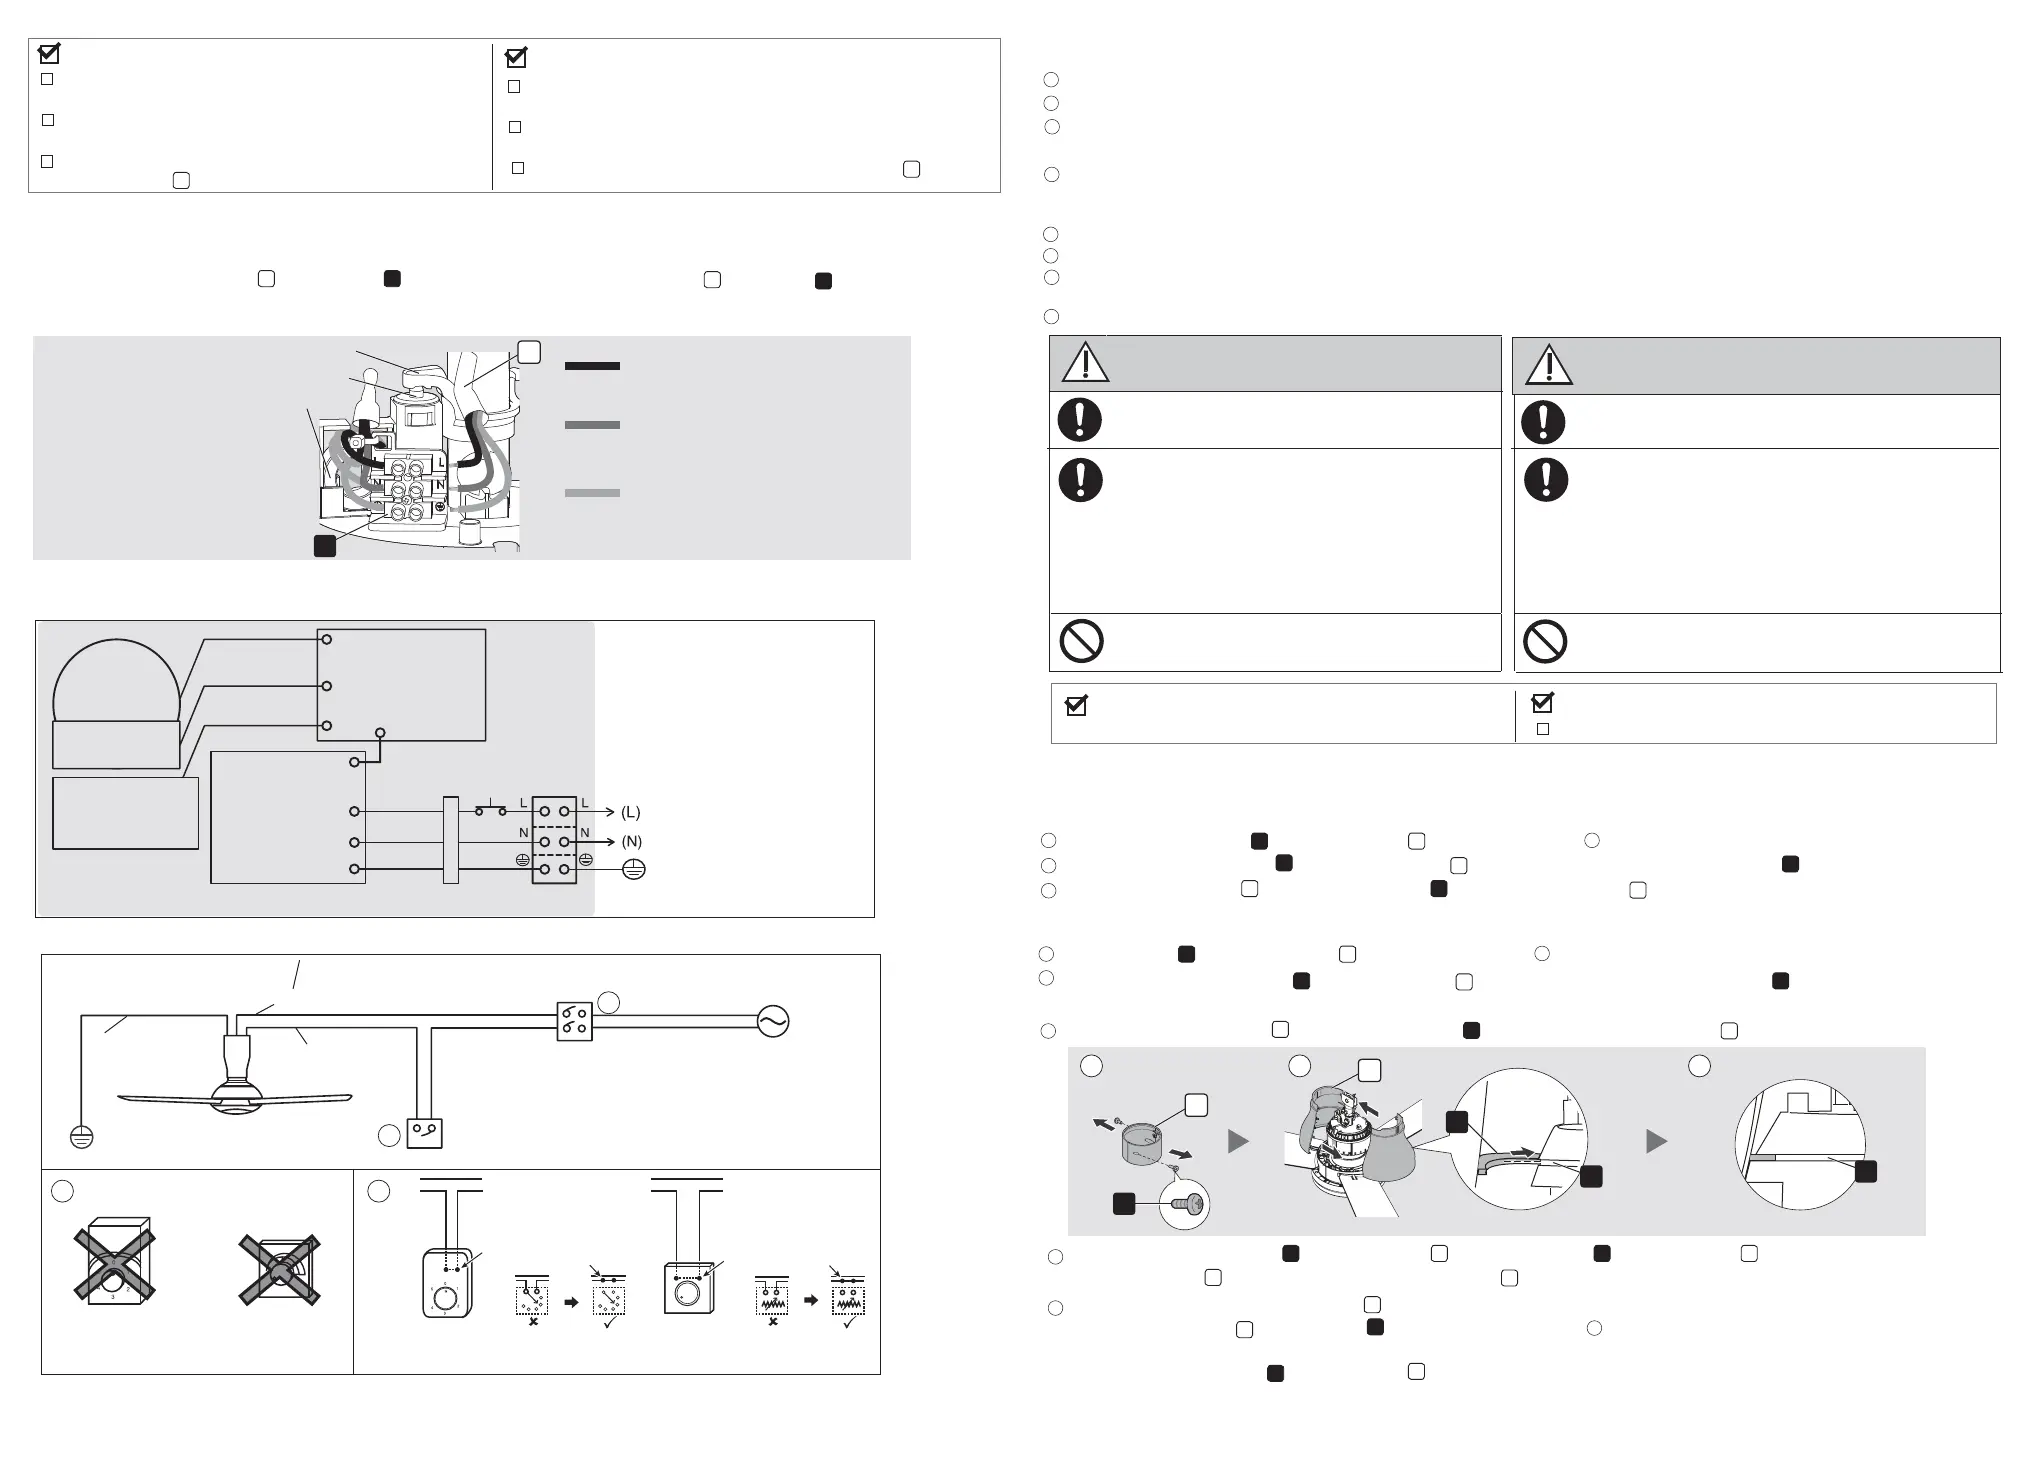
Connect the house’s supply wire
f
to the terminal
i
according to the diagram shown.
• Recommended wire stripping length is
7 ~ 8 mm.
■
Wiring instruction
■
Hướng dẫn nối dây
N
ối dây nguồn điện của nhà
f
vào đầu nối
i
theo sơ đồ hướng dẫn.
• Nên tuốt vỏ dây từ 7 ~ 8 mm.
Switch Lever / Gờ Công Tắc
Safety Switch /
/ Công Tắc An Toàn
Ferrite Core /
/ Lõi Từ
Live (Brown) /
Dây nóng (Nâu)
Neutral (Blue) /
Trung tính (Xanh dương)
Earth (Green•Yellow) /
Nối đất (Xanh lá•Vàng)
f
i
Wiring diagram /
Sơ đồ nối dây
DC Motor /
Động Cơ DC
Ceiling Fan / / Quạt Trần
Main Circuit PCB Assy /
Bo Mạch Chính
Terminal /
Trạm Nối
Safety Switch /
Công Tắc An Toàn
LED Circuit PCB Assy /
Bo Mạch LED
Power Circuit PCB Assy /
Bo Mạch Nguồn
Ferrite Core /
Lõi Từ
Hall PCB Assy /
Bo Mạch
Brown (Live) / Nâu (Dây nóng)
Source / Nguồn Điện
Blue (Neutral)
Xanh dương (Trung tính)
Green•Yellow (Earth) /
Xanh lá•Vàng (Nối đất )
Connect to the power supply according
to the wiring instruction below. Nối với nguồn điện theo hướng dẫn nối
dây dướ đây:i
Connecting to the power supply
/ Kết nối nguồn điện
Power supply /
Nguồn điện
Connect directly
/ Nối trực tiếp
Dimmer switch /
Chiết áp
Dimmer switch /
Chiết áp
Power supply /
Nguồn điện
Connect directly /
/ Nối trực tiếp
Regulator /
Hộp số
Regulator /
Hộp số
3 4
Ceiling Fan / Quạt Trần
Wall Switch (OFF / ON) /
Công Tắc Tường (TẮT / BẬT)
Rated voltage is mentioned
on product. /
Điện áp định mức có ghi
trên sản phẩm.
Blue (Neutral) / Xanh dương (Trung tính)
Brown (Live) /
Nâu (Dây nóng)
Green•Yellow (Earth) /
Xanh lá•Vàng (Nối đất)
Earth
/ Nối đất
Double poles single throw switch (Breaker Switch) /
Công tắc hai cực (Công Tắc Ngắt)
Only direct connection to wall switch is allowed.
Please refer to fi gure below.
Chỉ được phép nối trực tiếp với công tắc trên tường.
Xem hình minh họa phía dưới.
2
1
■
Attention:
■
Chú ý:
1
It is recommended to user to install OFF/ ON switch on the wall for the Ceiling Fan,
replacing existing regulator or new regulator
point.
2
This product should be installed with a double poles single throw switch (breaker switch) with a minimum of 3 mm contact
gap in the fi xed installation circuit.
3
Do not use regulator or dimmer switch for
this model.
(It can damage the Ceiling Fan)
• If your Remote Control missing or misplaced, the Ceiling Fan can be switched on pre set speed 5.
4
Should there be a regulator or dimmer switch, disconnect it and reconnect the wiring as above.
1
Nên lắp thêm công tắc OFF/ON trên
tường cho Quạt Trần, thay thế hộp số
hiện có hoặc hộp số không thích hợp.
2
Sản phầm này cần được lắp kèm với công tắc hai cực (công tắc ngắt) với
khoảng cách tiếp xúc tối thiểu trong mạch
được lắp cố định là 3 mm.
3
Không sử dụng hộp số hay chiết áp.
(Có thể làm hỏng Quạt Trần.)
• Nếu hỏng hoặc thất lạc bộ Điều Khiển Từ Xa, có thể bật Quạt Trần với tốc độ đặt trước là 5.
4
Nếu có hộp số hoặc chiết áp, tháo nó ra
trước và kết nối lại dây như hình vẽ trên.
Check point after installation
The wiring is connected properly to
the power supply.
Kiểm tra sau khi lắp ðặt
Dây được nối chắc chắn với nguồn
điện.
WARNING
Electrical wiring must be done by a qualifi ed individual.
Can cause fi re, electrical shock, injury or Ceiling Fan to drop.
This product is not provided with a cord and plug or with other
means for connection to the supply.
When connecting or changing
the power cord or lead wire, it
must be performed by a qualified
person in order to avoid a hazard.
Please use 227IEC53(RVV) or thickness of tube 1 mm or above.
(If there are other requirements
such as the diameter of lead
wire, please use according to the
regulation of the country).
Can cause fi re, electrical shock.
Do not bypass and short circuit the Safety Switch.
CẢNH BÁO
Việc đi dây điện phải do người có chuyên môn tiến hành.
Có thể gây cháy, điện giật, làm
Quạt Trần rơi
hoặc
gây chấn thương.
Sản phẩm này không được bán kèm cùng với dây dẫn và ổ cắm
hoặc các phương tiện kết nối khác từ nguồn điện.
Khi nối hoặc thay đổi dây nguồn
hoặc dây dẫn, phải được người
có chuyên môn tiến hành để
tránh rủi ro. Sử dụng loại ống
227IEC53(RVV)
hoặc
ống có độ dày trên 1 mm. (Các yêu cầu khác
như đường kính của dây
dẫn tuân theo các quy định của nước
sở t
ại).
Có thể gây cháy, điện giật
.
Không được rẽ mạch hoặc làm đoản mạch Công tắc An Toàn.
Có thể gây cháy, điện giật, làm Quạt trần rơi
hoặc
gây chấn thương.
Can cause fi re, electrical shock, injury or Ceiling Fan to drop.
1
Tháo ốc vít (2 ốc
)
i
khỏi Nắp Chụp
Trên
A
và thực hiện với Bước 4 -
4
.
2
Ngắm thẳng và đặt Vòng Cố Định
j
của Nắp Chụp Dưới
B
(2 chiếc) vào
khe Cố Định Nắp Chụp Dưới
k
. Móc
vào cho đến khi nó được cố định hoàn toàn.
3
Phải đảm bảo Nắp Chụp Dưới
B
được đặt đúng vào khe
k
trước khi cố định Nắp Chụp Trên
A
.
4
■
Installing the Canopy
■
Lắp đặt Nắp Chụp
1
Remove the screw
(2 pieces)
i
from Upper Canopy
A
and keep it for Step 4 -
4
.
2
Align and insert the Fixing Rib
j
of the Lower Canopy
B
(2 pieces) into the Lower Canopy Fixing slot
k
. Clip it until it is fully fi xed.
3
Make sure Lower Canopy
B
sit properly on the slot
k
before fi x
Upper Canopy
A
.
4
Align and insert the Fixing Rib
l
of Upper Canopy
A
into the Fixing Slot
m
of Lower Canopy
B
.
Clip it until it is fully fi xed.
Ensure Upper Canopy
A
(2 pieces) is sit on top of Lower Canopy
B
.
5
Check the gap between the Upper Canopy
A
and ceiling is approximately 5 mm or more.
Tighten the Upper Canopy
A
with the screw
i
which is removed in Step
4 -
1
.
■
Attention:
• Do not assemble the Fixing Rib
i
of
Upper Canopy
A
in opposite direction.
• Can cause abnormal noise.
7
8
A
i
21
B
k
j
3
k
 Loading...