This document is an owner's manual for a portable kerosene heater, specifically the Kero-World Model KW-12. It provides comprehensive instructions for assembly, operation, maintenance, and safe storage of the device. The manual emphasizes safety precautions and proper fuel usage to ensure efficient and safe operation.
Function Description
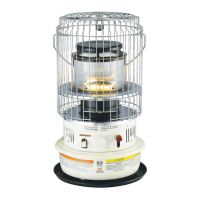
The Kero-World Model KW-12 is a portable kerosene heater designed to provide heat through convection. It operates by burning 1-K kerosene, generating heat that is then distributed into the surrounding area. The heater features an integral fuel tank and an automatic ignition system for user convenience. A wick mechanism draws kerosene from the tank to the burner, where it is ignited. The flame height, and thus the heat output, is controlled by adjusting the wick. A key safety feature is the automatic shut-off device, which extinguishes the flame if the heater is jarred or tipped over. The heater is intended for use in well-ventilated areas to prevent indoor air pollution.
Usage Features
The heater is designed for straightforward use, with several features aimed at user convenience and safety.
- Fueling: The manual stresses the importance of using only water-clear 1-K kerosene and advises filling the fuel tank outdoors to avoid flammable vapors in living spaces. A siphon pump is provided for easy and clean fuel transfer. Users are cautioned not to overfill the tank and to allow the wick to soak for at least 60 minutes before the first ignition or after the tank has been completely empty, to prevent poor burning and wick damage.
- Automatic Ignition System: The KW-12 includes an automatic ignition system powered by two "C" cell batteries. To ignite, the wick adjuster knob is turned clockwise to raise the wick to its maximum height, and then the ignition lever is pushed to bring the glowing igniter into contact with the wick. Once the wick is lit, the lever is released, and the burn chamber automatically lowers.
- Manual Ignition (Match): In case of battery failure or issues with the automatic igniter, the heater can be lit with a match. This involves raising the wick, lifting the burn chamber, and touching a lighted match to the wick's top edge.
- Flame Adjustment: After ignition, the flame height needs to be adjusted using the wick adjuster knob. The ideal flame height is approximately 1/2 inch above the center flame spreader disk, with even distribution around the glass cylinder. Regular monitoring and adjustment of the flame are recommended every 30 minutes as room and heater temperatures change. The manual explicitly states that the heater does not have a temperature adjustment; output is either on or off, and lowering the wick too much can lead to improper combustion and odors.
- Extinguishing the Heater: To turn off the heater, the manual shut-off knob is pushed down while holding the wick adjuster knob. Slowly releasing the grip on the wick adjuster knob allows the spring action to gradually lower the wick and extinguish the flame. Users must visually confirm that no flames are present after 10-15 seconds. A 10-minute cooling-off period is required before reigniting to prevent strong odors or flare-ups.
- Automatic Safety Shut-Off Device: This critical safety feature automatically extinguishes the flame if the heater is jarred or tipped. It works by retracting a latch from the wick control shaft ratchet, allowing a torsion spring to drop the wick to its fully lowered position. The manual advises weekly testing of this device during the heating season and after any wick removal or replacement.
Maintenance Features
Regular maintenance is crucial for the heater's performance, safety, and longevity.
- Wick Maintenance / Dry Burn: To prevent soot production, low heat output, and performance issues, wick maintenance is required. Carbon and tar can accumulate on the wick, making it hard to light, adjust, or extinguish. The manual recommends performing a "dry burn" within the first seven days of use, every two tankfuls of fuel, or weekly during the heating season. A dry burn involves burning the heater until the fuel runs out and the wick burns completely, then allowing it to cool and brushing off any ash or carbon from the wick. If the wick remains hard, small pliers can be used to break up stubborn carbon deposits.
- Wick Assembly Check: The manual advises checking the wick assembly at least once a month. Tar deposits can accumulate on the wick guide, preventing the burner assembly from seating properly and leading to poor combustion, smoke, or odor. Instructions are provided for disassembling the grill, removing the burner chamber, and scraping off tar deposits from the wick guide using a flat-edge screwdriver, followed by vacuuming.
- Wick Replacement: If cleaning does not improve performance, the wick needs replacement. The manual provides detailed, step-by-step instructions for replacing the wick, including removing the cabinet, fuel tank screws, and the wick adjuster knob, then disassembling the wick holder to install a new wick. It emphasizes using only genuine replacement wicks to avoid damage and potential fire hazards. After replacement, the wick height must be checked (5/16" above the collar), and the safety shut-off mechanism tested.
- Ignition System Checks: If the automatic ignition system fails, users are instructed to check and replace the two "C" cell batteries and inspect the igniter plug for broken or bent filaments. Instructions for replacing the igniter plug are also provided.
- Long-Term Storage: For off-season storage, the manual outlines a procedure to ensure the heater remains in good condition. This includes draining and rinsing the fuel tank with a small amount of kerosene (never water), performing a dry burn until the wick burns out completely, removing batteries, and thoroughly cleaning the wick adjuster, wick guide, and burner of any carbon, tar, or soot. The heater should be reassembled with the wick in the fully lowered position and stored in its original box in a well-ventilated area.