5 6
5. Keep the throttle stick on the lowest position and push the right stick to bottom right
(see Picture 3). The drone LED light flashes quickly and the drone is calibrating. Later
the LED light keeps bright, which indicates successful calibration.
Picture 3
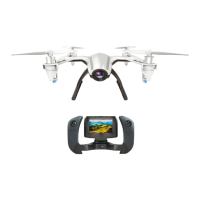
Pairing operation of camera and transmitter
Operation Instruction of Camera
Press “UP” button
for 6 seconds
VIEW
REC
SNAP
UP
DOWN
1. Press “UP” button for about 6 seconds till the pairing menu appears.
3. Insert the TF card to the slot at the rear part of the drone body.
Insert the card to the slot
Insert the card to the slot Diagram
4. Connect the battery with the battery port in the drone, then close the battery box. And
the LED light starts to flash. Put the drone on the horizontal position to calibrate the
gyro. The transmitter issues sound of “di do di”about three seconds later, which
indicates successful code pairing and the LED light keeps bright.
Power on
2. Press “PAIR” button and a 8 seconds countdown appears on the screen and then
enters pairing search. The video menu will appear after successful pairing. Meanwhile,
the transmitter will remember its paired camera automatically. Next time you need not
to pair again. If you want to pair the transmitter with other camera. Restart the
transmitter and repeat step 1 and step 2.
Notice:
Do not touch the throttle stick while pairing the camera and the transmitter to
avoid inadvertently starting the drone.
Press “PAIR” Button
PAIR
EXIT
Operation of Video Recording
Tip: The screen will show a “FULL” icon if the card is full storage and no more video can
be stored in the card.
After successful pairing, the screen will enter video menu and show a green SD card icon
at the top, which indicates the SD card had inserted to the camera (or the SD card icon
will appear in red and flash if the card fail to insert to the camera). To record video, press
the “REC” button on the side of the transmitter screen to start recording. At the same
time, the “REC” icon will flash to show that video is being recorded. Press the “REC”
button again to stop recording and the video will store in the SD card.
2. Video Button
3. “REC” starts to flash
1. Green SD Card Icon
VIEW
REC
SD
REC
SNAP
UP
DOWN
 Loading...