EasyManua.ls Logo

KETELESE K800 - User Manual

KETELESE K800
23 pages
Print Icon
To Next Page IconTo Next Page
Loading...
E-BIKE
USER
MANUAL
ATTENTION
Please read this manual carefully before using the lankeleisi elec-
tric bicycle. If you do not understand this information, or if you do
not cover the issues covered in this manual, please contact the
dealer.
www.keteles.us
Question and Answer IconNeed help?

Do you have a question about the KETELESE K800 and is the answer not in the manual?

Summary

KETELES E-Bike User Manual Overview

Important User Attention Notice

Read this manual carefully before use; contact dealer for clarification.

Battery Charging and Range Optimization

Initial Battery Charging Procedure

Fully charge batteries immediately upon receipt and after each use.

Factors Affecting E-Bike Range

Pedaling, terrain, weather, and maintenance influence the electric bicycle's range.

Essential E-Bike Riding Safety

Helmet Use for Rider Safety

Always wear a properly fitted helmet when riding your bicycle.

General Riding Safety Guidelines

Avoid riding at night, in wet conditions, and ensure adult supervision for children.

E-Bike Unboxing and Preparation

Unboxing the E-Bike Carton

Steps for opening the carton and removing the e-bike and accessories.

Removing Protective Packaging

Remove EPE pearl cotton and other packing materials before assembly.

Handlebar and Stem Assembly

Correct Stem and Fork Orientation

Turn stem forward, ensuring fork brace faces forward.

Removing Stem Mounting Bolts

Remove the four bolts to detach the stem from the fork.

Seat Post and Saddle Installation

Attaching and Securing the Handlebars

Fit stem and handlebars together, then tighten the four bolts securely.

Completing Handlebar Installation

Tighten remaining bolts on the other side for a secure handlebar assembly.

Seat Post Clamp Adjustment

Overview of the seat post clamp mechanism for height adjustment.

Front Wheel Installation Guide

Inserting and Locking the Seat Post

Open lever, insert seat post into tube, and lock clamp lever tightly.

Preparing for Front Wheel Mounting

Turn bike upside down and identify fork/brake caliper spacers.

Removing Unnecessary Fork Spacer

Remove the fork spacer as it is not part of the bike.

Pedal Installation Instructions

Mounting the Front Wheel

Place front wheel on fork, aligning motor axle with fork grooves.

Securing the Front Wheel Assembly

Place washers correctly and tighten nuts on both sides of the front wheel.

Connecting Front Motor Cable

Connect the inline connectors of the front motor cable for proper function.

Installing the Left Pedal Correctly

Fix the left pedal by turning the spanner counter-clockwise.

Installing the Right Pedal Correctly

Fix the right pedal by turning the spanner clockwise.

Fender and Rear Rack Installation

Attaching Front Fender and Headlight

Fix the headlight and front fender to the fork brace.

Mounting Rear Fender and Rack

Fix the rear fender and rear rack to the e-bike frame.

Battery Installation and Bike Completion

Finalizing Fender and Rack Attachment

Tighten the lower bolts on both sides to secure fenders and rear rack.

Inserting and Locking the Battery

Push the battery downward into its compartment and lock it securely.

Identifying Battery Controls

Locate the charging port and the battery ON-OFF switch for operation.

E-Bike Display and Control Operation

Turning On the E-Bike Display

Press the power button for 3 seconds after turning on the battery.

Motor Activation and Speed Adjustment

Use the red switch for motor control and +/- for speed grade.

Understanding the LCD Display Features

Familiarize yourself with the multifunctional color LCD display interface.

Troubleshooting E-Bike Error Codes

Interpreting Display Error Code Meanings

Understand common error codes, their meanings, and potential causes for troubleshooting.

Power Assist Modes and Temperature Effects

Power Assist System (PAS) Modes

Guide to matching PAS grades with gear shifts for optimal riding efficiency.

Temperature Impact on Battery Performance

Learn how ambient temperature affects battery capacity and driving range.

E-Bike Maintenance and Usage Tips

Battery Maintenance Best Practices

Tips for charging and storing batteries in varying temperature conditions.

Riding Tips for Different Conditions

Advice on handling slopes, water, and braking for longevity.

Overview

This document is a user manual for the KETELES K800 E-Bike, an all-terrain electric fat bike. It provides instructions for assembly, usage, and maintenance, along with important safety warnings and troubleshooting information.

Function Description:

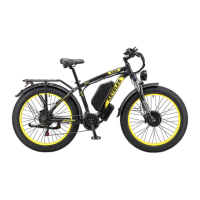
The KETELES K800 is an electric bicycle designed for all-terrain use, featuring fat tires for enhanced stability and traction. It operates with a hybrid electric system, meaning it can be ridden using human pedal power, electric motor assistance, or a combination of both. The bike is equipped with a display that shows various riding parameters and can report error codes for troubleshooting. It offers multiple power assist (PAS) grades, allowing riders to choose the level of motor assistance based on terrain, desired effort, and speed.

Important Technical Specifications:

  • Battery Type: Li-Ion (Lithium Ion) batteries.
  • Charging Time: 4-6 hours (for Li-Ion batteries).
  • Frame: Aluminum (K800 ALUMINIUM 6061 HARD).
  • Tires: Fat tires, likely 26x4.0 inches based on visual inspection, with CHAOYANG branding.
  • Gears: Variable gears, with recommendations for 7-6 high-speed gears for power-saving on slight slopes and good roads, and 4-7 gears for large slope conditions.
  • Display: Multifunctional color LCD display showing speed (KM/H), PAS grade, trip distance (TRIP), odometer (ODO), maximum speed (MAX), and average speed (AVG).
  • Motor: Front hub motor (implied by front motor cable connection during assembly).
  • Brakes: Disc brakes (visible in assembly images).
  • Suspension: Front fork suspension (visible in assembly images).
  • Weight: G.W. (Gross Weight) and N.W. (Net Weight) are listed on the carton, but specific values are not legible.
  • Dimensions: Carton dimensions are 410x180x130MM.

Usage Features:

  • Power Assist Modes (PAS Grades):
    • PAS 0 (100% Labour power, 0% Motor power): Cycling for exercise.
    • PAS 1~PAS 2 (70%~80% Labour power, 20%~30% Motor power): Slight power assist for easier exercise.
    • PAS 3 (50% Labour power, 50% Motor power): Use power assist to ride faster and farther.
    • PAS 4~PAS 5 (20%~30% Labour power, 70%~80% Motor power): Fast cycling, labor saving.
  • Starting the E-Bike: Turn on the battery first, then press the designated button for 3 seconds to turn on the display. The red switch can turn the motor on or off.
  • Speed Grade Adjustment: Use the "+" or "-" buttons on the display to change the speed grade (PAS level).
  • Maximizing Range:
    • Rider Input: More pedaling extends distance.
    • Continuous Riding: Continuous riding is better than frequent stopping and starting.
    • Elevation Gain: Flatter roads yield greater distance.
    • Weather: Cold weather adversely affects battery capacity.
    • Wind: Tailwinds increase distance, headwinds decrease it.
    • Terrain: Smoother terrain (roadways vs. fireroads) extends distance.
    • Rider Weight: Lighter riders result in less battery drain and further distance.
    • Tire Pressure: Properly inflated tires reduce rolling resistance and make pedaling easier.
  • Error Code Display: The LCD display can show error codes (E001-E006 for YL-01/YL-02, E021-E025, E030 for YL-05/KDS/YL-J) to help diagnose issues such as controller failure, communication failure, Hall sensor failure, throttle failure, brake lever failure, motor phase loss, and abnormal current.

Maintenance Features:

  • Battery Charging:
    • Always fully charge batteries immediately upon receipt and after each use.
    • In winter (low temperatures), charge batteries indoors and extend charging time by two hours after full charge.
    • In summer (high temperatures), avoid sun exposure and charging at high temperatures. Do not charge immediately after use in high temperatures, and do not overcharge (charge for an additional one or two hours after the red indicator turns green).
  • Bicycle Maintenance: A properly maintained bicycle yields the greatest range.
  • Road Conditions: E-bikes are not ideal for bad or steep road conditions. For uphill, loading, or riding against the wind, combine motor drive with human pedaling to prolong battery and motor life.
  • Environmental Exposure: Avoid prolonged exposure to sun and rain. While the e-bike has good waterproof performance, be mindful of wading height in water puddles (not higher than the motor) to prevent water inflow damage. Do not use a high-pressure water gun for cleaning to avoid damage to electronic parts.
  • Braking: Frequent braking leads to frequent start-ups, causing large current discharge and power cut-off, which impacts battery life. Drive at a proper speed and avoid frequent braking.
  • Battery Storage: Batteries stored in cold areas (below 50°F / 10°C) will show reduced range. Batteries not kept in optimum condition will also show reduced range and run time.

Safety Warnings:

  • Always wear a properly fitted helmet when riding.
  • Do not ride at night.
  • Be aware that a significant percentage of bicycle-related deaths occur after dark.
  • Avoid riding in wet conditions.
  • A large percentage of injuries happen to children under 15; ride only with adult supervision.
  • Ensure the helmet covers your forehead to prevent serious injury in case of a fall.
  • Consult a bicycle specialist if unsure about assembly, repair, or maintenance.

KETELESE K800 Specifications

General IconGeneral
BrandKETELESE
ModelK800
CategoryScooter
LanguageEnglish