EasyManua.ls Logo

Keter KNA050 User Manual

Keter KNA050
12 pages
To Next Page IconTo Next Page
Page #1 background imageLoading...
Page #1 background image
265L | 70 US GAL
ASSEMBLY INSTRUCTIONS INSTRUCTIONS DE MONTAGE MONTAGEANLEITUNG MONTAGEVOORSCHRIFT
INSTRUCCIONES DE MONTAJE ISTRUZIONI DI MONTAGGIO INSTRUÇÕES DE MONTAGEM
ΟΔΗΓΙΕΣ ΣΥΝΑΡΜΟΛΟΓΗΣΗΣ
EN
ITES PT GR
NLFR GE
A-2236-1 / 572276
350kg
771 lb
35kg
71 lb
IMPORTANT: Please contact Customer Service if you have any problems or discover any missing parts.
IMPORTANT: Veuillez contacter notre Service Clientèle pour tout problème ou pièce manquante.
WICHTIG: Bitte wenden Sie sich an unseren Kundenservice, falls Sie irgendwelche Probleme haben oder
feststellen, daß Teile fehlen.
IMPORTANTE: rvase contactar con nuestro Servicio al Cliente por cualquier problema, o pieza que pudiera faltar.
IMPORTANTE: Si prega di contattare il Servizio Clienti per eventuali necessità.
BELANGRIJK: Neemt u in geval van problemen of missende onderdelen a.u.b. contact op met de klantenservice.
IMPORTANTE: favor entrar em contato com o Serviço ao Cliente se houver problemas ou se faltar peças.
ΣΗΜΑΝΤΙΚΟ: παρακαλώ επικοινωνήστε με την Εξυπηρέτηση Πελατών αν αντιμετωπίσετε κάποιο πρόβλημα ή αν λείπει
μέρος από την συσκευασία.
EN
IT
ES
PT
GR
NL
FR
GE
WWW.KETER.COM
USA & Canada:
1-(888)-374-4262
UK: Tel: 0121-5060008,
Fax: 0121-4220808
Other European Countries:
Tel: +31-1612-28301,
Fax: +31-1612-28322
Question and Answer IconNeed help?

Do you have a question about the Keter KNA050 and is the answer not in the manual?

Keter KNA050 Specifications

General IconGeneral
BrandKeter
ModelKNA050
CategoryIndoor Furnishing
LanguageEnglish

Summary

General Safety and Preparation

Handling Metal Edges

Handle components with metal edges carefully and always wear work gloves.

Parts Check Before Assembly

Verify all parts and components for damage or missing items before starting construction.

Assembly Step 1

Attach FN to MN with Screws

Connect part FN to MN using SCW11 screws for initial frame assembly.

Assembly Step 2

Attach BL1 to FN

Secure part BL1 to the FN component using SCW11 screws.

Assembly Step 3

Attach BN to MN

Fasten part BN to the MN component using SCW11 screws.

Assembly Step 4

Connect BN and BK

Join part BN with part BK using the 'CLICK' mechanism.

Assembly Step 5

Install BG Parts with LS-2 and RS-1

Attach BG-1, BG-2, BG-3, BG-4 parts to LS-2 and RS-1 components.

Assembly Step 6

Combine BN and BK with RS-1

Assemble the BN+BK structure onto the RS-1 base.

Assembly Step 7

Attach FN Panel

Insert and secure the FN panel into the assembled structure.

Assembly Step 8

Attach BP Panel

Attach the BP panel to the side of the assembled unit.

Assembly Step 9

Install LS-2 Top

Position and click the LS-2 top part into place.

Assembly Step 10

Secure Top with SCW12

Use SCW12 screws to fasten the top assembly securely.

Assembly Step 11

Install P-1 and P-2 Lids

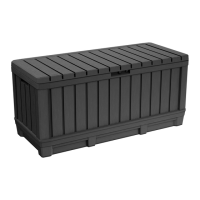
Attach the P-1 and P-2 lid components using the click mechanism.

Assembly Step 12

Attach BM Component

Install the BM component, ensuring correct orientation.

Assembly Step 13

Install BKC Component

Attach the BKC component using the click mechanism.

Assembly Step 14

Secure with SCW11

Fasten components securely using SCW11 screws.

Assembly Step 15

Attach BL2 and SCW12

Secure the BL2 component using SCW12 screws.

Assembly Step 16

Install BC Component

Insert and secure the BC component using the click mechanism.

Locking Recommendation

Importance of Locking

It is strongly recommended to lock your box for security.

Warranty Information

Limited 2-Year Warranty

Details of the manufacturer's limited 2-year warranty for product defects.

Care and Safety Instructions

Fire Safety

Do not use water to extinguish burning polypropylene; follow specific safety guidelines.

Assembly and Tool Use

Assemble all parts per instructions, wear safety goggles with power tools.

Cleaning and Storage

Avoid abrasive cleaners; do not store hot items or flammable substances.

Usage Restrictions

Not designed for carrying items; do not stand on lid; keep children away.

Related product manuals