F7 Rename: This is used to re-name the file selected or simply identified using the keyboard keys and the CURSOR +/- push buttons. The
following remain enabled:
F5 Escape: This cancels the procedure.
F10 Exec: This confirms the procedure.
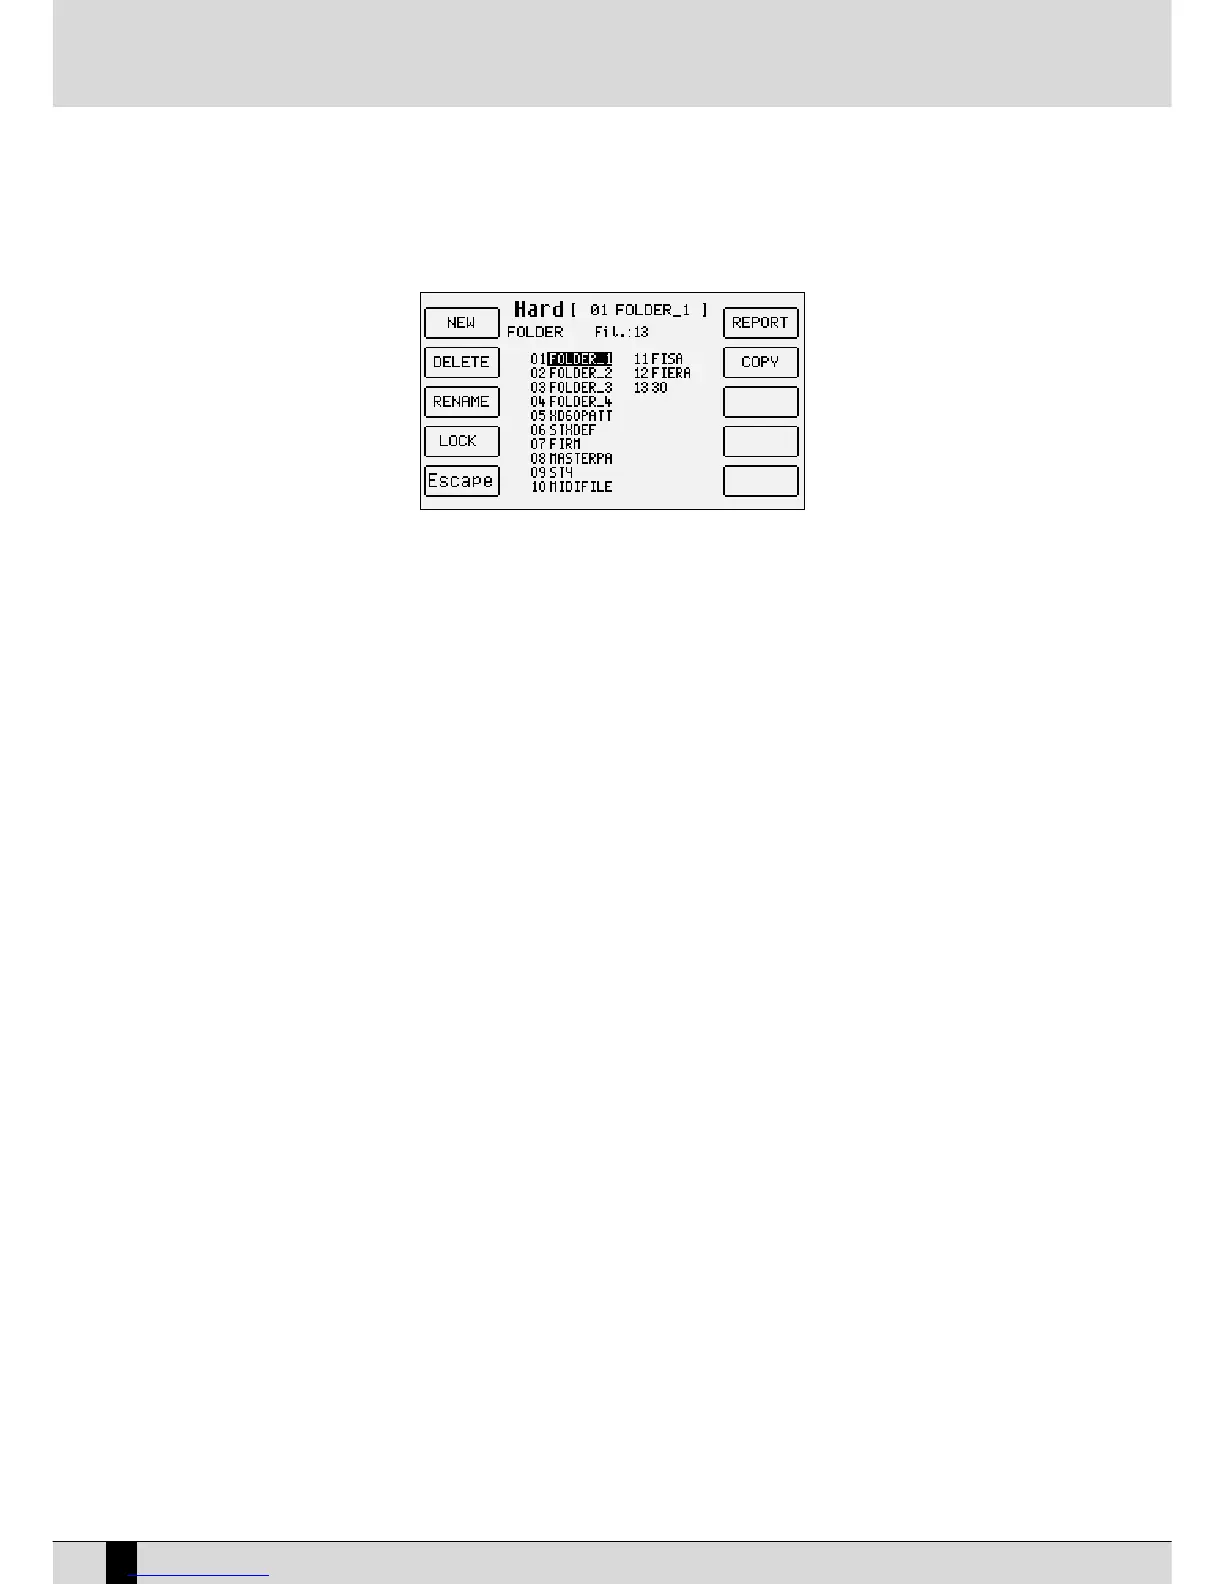
F8 Folder:
This is used to manage and organise the single Folders, selected by entering the relative number using the numeric keypad
(STYLES push buttons), calling up a page with the following options:
F1 New: This is used to create a new Folder that will be identified with the number following the last Folder created and
is used to enter the name using the keyboard keys and the CURSOR +/- push buttons. Once the name has been entered,
confirm the procedure using F10 Exec, or cancel it using F5 Escape.
F2 Delete: This is used to cancel the Folder selected using the VALUE +/- push buttons or by typing in the number and
all the files within it. When you confirm the cancelling procedure a warning message will appear with the F5 Escape or
F10 Exec options. If you confirm using F10 Exec. A second message appears requesting further confirmation to cancel
with F10 Exec, or to cancel the procedure using F5 Escape.
F3 Rename: This is used to re-name a Folder, selected using the VALUE +/- push buttons or by typing in the number,
writing the name using the keyboard keys and the CURSOR +/- push buttons. Confirm the procedure using F10 Exec or
cancel it using F5 Escape.
F4 Lock: This protects the Folder from being Deleted or Re-named. To enable the lock function select the Folder using
the VALUE +/- push buttons or type in its number and then press F4 Lock. The symbol • will appear next to the Folder.
A number of Folders can be locked. To disable the lock function, find the folder protected and then press F4 Lock again.
The degree of protection can be increased using a password to be programmed according to the instructions given at
the end of this chapter.
F5 Escape: This is used to return to the previous page of the Disk menu.
F6 Report: This creates a TXT file on Floppy Disk that shows the whole contents of the Folder currently selected, split-up per extension and
in alphabetical order. The file can be read both from Mac and PC and can prove quite useful to have a list of files when there
are many files stored.
F7 Copy: This is used to copy the file, selected using the VALUE +/-, CURSOR +/- and F10 Select push buttons from the Folder currently
selected and a Folder at choice within the Hard Disk. The following options are possible:
F5 Escape: This is used to return to the previous page of the Disk menu.
F8 Target Folder: This displays the list of Folders in the middle of the display amongst which you can choose that
desired using the VALUE +/- push buttons.
F10 Exec: This confirms that the file selected is to be copied in the chosen Folder using F8 Target Folder.
The complete procedure entails the following steps:
●
Select the Folder in which the files to be copied are stored.
●
Press F7 Copy.
●
Select one or a number of files to be copied using the VALUE +/-, CURSOR +/- and F10 Select push buttons.
●
Press F8 Target Folder and find the destination Folder using the VALUE +/- push buttons from the list that
appears.
●
Confirm the procedure using F10 Exec, or cancel it using F5 Escape.
●
Press F10 Exec and a new page appears in which the file being copied can be re-named using the keyboard
keys and the CURSOR +/- push buttons. The options possible are the following:
F5 Escape: This cancels the procedure and returns to the Disk menu.
F8 Skip: This skips the copying procedure of the current file.
F9 Copy All: This copies all the files without re-naming them.
F10 Execute: This confirms that the single file is to be copied.
XD9-XD3
88
DISK