Do you have a question about the KETRON XD3 and is the answer not in the manual?
Connect a MIDI accordion to the XD3 via MIDI In 2, setting channels for Right, Left, and Bass.
Connect a MIDI keyboard or Master keyboard to XD3, recommending deactivation of Accordion mode.
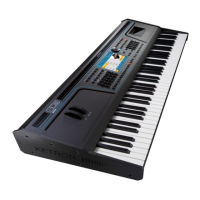
Details the various audio and MIDI input/output ports located on the rear panel of the XD9.
Describes the headphone jack connection available on the front panel.
Explains the push buttons used to control the general volume for different sections.
Describes how these buttons navigate pages or control Tempo value.
Explains their use in parameter selection and global transposition.
Details how these buttons modify parameter values or balance volumes.
Used to store edits and modifications, saving them to disk.
Returns to the main display page or controls the SPLIT function.
Displays the current style's name, number, and allows volume adjustment.
Shows the selected sound for the Right lead section and its volume control.
Indicates a second sound layered with the main Right lead section.
Shows the split note and transposition settings, adjustable via control panel.
Displays the Arranger's current Tempo and beat indicator.
Graphically displays volume settings for Drums, Bass, Chord, and Right sections.
Explains the ten push buttons used for directly selecting Style groups from the control panel.
Details the two rows of six buttons used for selecting Voices by family.
When lit, displays and allows selection of eight Program locations.
Enables the second Voice assigned to the main lead voice.
Allows calling up User Voices using the Voice push buttons.
Stores and allows quick recall of the most frequently used Voices.
Memorizes all XD9 settings for instant retrieval, including file calls.
Accesses settings for the Right section, effects, and Second Voice editing.
Provides access to management functions for floppy and hard disks.
Enables playback of Midi files, chains, and display of lyrics.
Allows selection of Styles loaded in RAM from floppy disk or hard disk.
Describes the row of buttons dedicated to real-time Arranger control.
Starts the automatic accompaniment when a chord is played to the left of the split point.
Interrupts Arranger performance with a short note or chord.
Plays Fill-Ins to enhance rhythm or change style variations.
Adds a Break beat at the end of which the Arranger restarts.
Controls tempo by tapping or adjusts tempo during playback.
Starts the automatic accompaniment or acts as a Stop button.
Sustains played notes to keep accompaniment active without holding keys.
Decreases the Tempo value of the Arranger or Sequencer.
Increases the Tempo value of the Arranger or Sequencer.
Enables Intros or Endings, or controls Remix functions in Song Play.
Explains the conventions used in the manual for buttons, functions, and parameters.
Describes how to access parameter menus using F1-F10 function buttons.
Details the function of the F1-F10 buttons which adapt their function to the display.
Explains various methods for entering data for parameters and text.
Explains how to play Midi files (.MID, .KAR) and display lyrics.
Step-by-step guide to loading and playing Midi files from a floppy disk.
Step-by-step guide to loading and playing Midi files from the hard disk.
Details the procedure for converting .KAR files for playback.
Explains real-time commands to modify song reproduction parameters.
Allows transposition of Midifiles and keyboard voices, with intelligent options.
Describes the process of creating and recording a Midi file using the XD9.
Explains the Arranger's function, styles, parts, and control elements.
Details how to select Styles using the ten STYLES push buttons and PAGE +/-.
Covers main Arranger controls like Split Point, Start, Stop, Intros, Fills, and Tempo.
Explains how to load Styles from floppy or hard disk into RAM.
Details how to select and use Voices from the control panel and edit them.
Guides on connecting and using microphones with the Vocalizer and effects.
Explains microphone connection, gain adjustment, and Vocalizer activation.
Details connecting a MIDI accordion and configuring its parameters via the Utility menu.
Explains how to manage Block Registrations, saving and recalling them.
Details managing Single Registrations, including loading and saving to disk.
Describes how registrations can automate loading of .TXT and .MID files.
Explains how to enable/disable parameter control within registrations.
Details how to select voices using the VOICES and USER VOICE buttons.
Explains how to create a sound layer using a second voice.
Details the components and parameters used for voice programming.
Explains Amplitude (ADSR) and Filter parameters for voice editing.
Covers access to Reverb, Chorus, and multi-effects for voices.
Explains how the Modulation Wheel controls various voice parameters.
Details LFO and Velocity parameters for voice editing.
Explains the procedure for permanently saving edited User Voices.
Describes how to save the entire User Voice bank to disk.
Details the use and function of the optional Flash RAM card.
Explains how to combine up to four voices for versatile sound creation.
Guides on editing individual programs, accessing their parameters.
Details the parameters displayed on the Program edit pages.
Displays and allows changing the voice used for a selected part.
Controls the Reverb amount for each voice within a program.
Enables and selects multi-effects algorithms for individual voices.
Displays and allows changing the voice used for a selected part.
Sets the lower and higher keyboard limits for voice playback.
Enables velocity switching for voices based on key dynamics.
Enables or disables Sustain, Portamento, and Expression for voices.
Chooses polyphony response modes for interesting voice combinations.
Step-by-step instructions for saving a program to the instrument's RAM.
Guides on saving a program as a file to a disk.
Explains how to load a program file from disk into memory.
Details how to program and modify organ sounds using the drawbars.
Explains how to play Drum Sets manually and select them.
Introduces Live Drum Sets, their features and differences from standard sets.
Covers controlling volume, reverb, and pan for percussion instruments.
Guides on editing and creating custom Drum Sets, including parameter settings.
Details the function of panel buttons for controlling the Arranger.
Starts accompaniment when a chord is played to the left of the split point.
Interrupts accompaniment with a short note or chord.
Uses for Style variations as short harmonic intervals or Intros.
Adds a complete stoppage bar to the Arranger playback.
Controls tempo by tapping or adjusts tempo during playback.
Manages count-in, restart, and pause functions for Arranger and Sequencer.
Starts accompaniment or stops it, acting as a toggle.
Sustains played notes to keep accompaniment active without holding keys.
Decreases the Tempo value of the Arranger or Sequencer.
Increases the Tempo value of the Arranger or Sequencer.
Enables Intros or Endings, or controls Remix functions in Song Play.
Enables Arranger to play Intro bars and continue arrangement.
Allows selection of Arrange parts or fills based on Arranger state.
Excludes Arranger parts, enabling manual playing of bass and drum tracks.
Refers bass track notes to the fundamental chord tonality note.
Refers bass evolution's lowest note to the lowest chord note.
Locks Drum Set changes independently from Arrangement.
Locks Bass track changes independently from Arrangement.
Locks Chord track changes independently from Arrangement.
Activates the Interactive Arrange function for dynamic accompaniment.
Activates the keyboard Split function.
Accesses the Pattern editing menu for Style modification.
Controls retriggering and harmonic behavior of accompaniment tracks.
Defines harmonic behavior of accompaniment tracks (Close or Parallel).
Controls track volume based on keyboard velocity.
Enables or disables the Dynamic Arranger function.
Mutes Chord accompaniment during solo playing.
Mutes the brass section of the automatic accompaniment.
Activates Interactive Arrange for brass during Intros.
Activates Interactive Arrange for brass during Endings.
Activates Interactive Arrange function for Chord 2 track.
Enables or deactivates the Interactive Arrange function.
Controls the Fade In/Out effect for Arranger sections.
Manages effects for Right section voices and microphone input.
Enables or disables the Chorus effect on the Right section.
Applies the Wha-Wha effect, controllable via Volume pedal or Mod. Wheel.
Enables the Delay effect on the Right section.
Applies Overdrive effect, simulating jazz/rock organs.
Enables the Distortion effect on the Right section.
Activates Portamento, Legato, or Mono mode for the Right timbre.
Harmonizes the lead voice according to the chord played.
Defines the octave for timbres assigned to the Right section.
Dedicates the complete keyboard to Right section sounds and chord acknowledgement.
Activates Sustain function in Pianist mode for freezing chords.
Selects between AUTO and Standard modes for the Pianist function.
Activates the Vocalizer effect on the microphone input.
Controls Rotor speed via Modulation Wheel or Sustain pedal.
Activates or deactivates Sustain on the Second Voice.
Defines the split point for the Second Voice.
Selects a different reaction curve for the Right voice based on velocity.
Allows selection and editing of a new voice for the Second Voice.
Prevents changing the Second Voice timbre by calling up a preset.
Activates Manual Bass and Pianist mode, with chord acknowledgement.
Keeps Drum Remix selected in Song Play when other files are called up.
Modifies bass frequency response for increased bass.
Sets the frequency for Bass Boost equalization.
Sustains notes played with Lower 1 even after releasing the key.
Sustains notes played with Lower 2 even after releasing the key.
Mutes Lower sounds when Arranger is stopped.
Mutes the Lower voice.
Sets how Lower 1 and 2 voices sound when HOLD is active and Arranger is stopped.
Controls sustain time and polyphony/monophony of the bass sound.
Increases or decreases lower frequencies for bass boost.
Transposes the bass timbre by two octaves.
Enables the use of the optional pedal board for Arranger control.
Allows pedal board to play bass timbre independently from Arranger.
Activates chord acknowledgement mode on the pedalboard.
Locks the Bass voice to remain the same even when changing styles.
Explains how to modify sounds assigned to tracks in Arrange View.
Covers saving modified Style parameters into a Custom Style.
Steps to save modified parameters as a Custom Style in Flash RAM.
Explains how to save all Custom Styles as a single file to disk.
Procedure to reload original Custom Styles into the instrument.
Details how to use a MIDI pedal to control chords and tonality.
Explains how bass dynamics are controlled via the pedal's Normal/Fixed function.
Details the functions available on the first page of the Pattern Edit menu.
Allows recording and playback of individual tracks within a Part.
Explains how to assign voices from USER VOICE and Drum Sets to Arranger tracks.
Lists and describes parameters for recording and editing pattern parts.
Selects the Part to be recorded or reproduced.
Enables reproduction of only the selected track.
Sets the tonality (Major, Minor, Seventh) for the recorded Part.
Enables the Stick sound metronome for tempo counting.
Saves modifications permanently in memory.
Quantizes notes to a temporal grid.
Quantizes notes after recording.
Switches between recording and playback of a Part.
Modifies velocity values of selected notes or tracks.
Cancels contents of a track or specific drum notes.
Allows modification of overall parameters for the whole Pattern.
Sets the default tempo or modifies it using SLOW/FAST.
Establishes the musical division and allows modification.
Plays a Crash cymbal automatically at the end of fills, breaks, and intros.
Establishes the Crash volume related to Autocrash.
Returns to the main Edit Pattern menu.
Selects the bass string type (4 or 5 strings) affecting lowest note.
Guides on recording a single pattern part, selecting track, tonality, and voice.
Cancels the whole contents of a single Part.
Copies existing Patterns or Parts to the current Pattern being edited.
Modifies the order of Patterns within the Pattern bank.
Deletes Patterns from the Flash RAM bank.
Saves Patterns as single files (.PAT) to the selected disk.
Records Patterns directly from external Computer or Sequencer via MIDI.
Deletes the complete Pattern and Flash RAM banks.
Stores the status of the 1 Touch function for power-on.
Stores the status of the 4 switch mode for power-on.
Stores the Accordion mode setting for power-on.
Deletes the operation and returns to the main display page.
Saves the Power On Set Up to disk.
Restores initial parameter conditions set by Ketron.
Saves the current settings in the Flash RAM memory.
Groups parameters related to MIDI settings for power-on configuration.
Step-by-step guide to loading and playing Midi files from a floppy disk.
Explains the process of loading Midi files from the hard disk.
Details the conversion of .KAR files to .MID format for compatibility.
Explains how to use keyboard sounds while a Midi file is playing.
Describes methods for quickly searching and loading Midi files by title.
Details the functions available on the Song Play page for controlling Midi files.
Accesses pages for modifying parameters of a single Midi file track.
Displays beat count or accesses Effects page for Midi files.
Manages transposition options for Midifiles, keyboard, or both.
Transposes the entire Midi file by semitones, excluding drum track.
Displays the list of Midi files stored in the current folder or disk.
Information on creating and managing chains of Midi files.
Indicates the next Midi file to be played back or loaded.
Enables or disables the reproduction of the lead track.
Displays lyrics from Midi files with lyric events.
Controls the optional video interface for displaying messages and lyrics.
Enables the Remix function for the drums track of a Midi file.
Explains how to modify and save parameters for individual tracks of a Midi file.
Allows selection of voices from Voice, User Voice, and Flash banks for each track.
Allows selection of modulation effects like Chorus, Distorsor, and Delay.
Modifies the volume of the entire track.
Modifies the Reverb entity applied to the track.
Modifies the entity of the chosen modulation effect.
Modifies the arrangement of the timbre on the stereo panorama.
Calls up a page to mute MIDI events like Modulation or other parameters.
Changes the transposition of the selected track by +/- 24 semitones.
Switches between transmission (TX) and reception (RX) MIDI channels.
Modifies the track's operational mode (Voice, Drumset, Vocalize).
Enables or disables track playback (cuts out the track).
Displays each parameter's value for all sixteen Parts.
Explains how to display and modify parameters for all sixteen GM parts.
Explains how to save modified parameters within a Midi file.
Lists parameters that can be saved within a Midi file setup.
Guides on creating and saving song chains of up to 32 Midi files.
Explains how to switch between MIDI files and Styles seamlessly during live performance.
Activates Remix function to modify song rhythm using Style drum tracks.
Groups percussion sounds for customization via Muting and other controls.
Mutes all tracks except drums and bass during Song Play.
Allows entering custom messages to be displayed on the video output.
Explains how to change background and text colors for the video display.
Details options for screen layout, including Full Screen and 1/2 Screen modes.
Explains how to convert and use .KAR Midi files.
Describes how to use .TXT files for displaying song lyrics.
Explains using .TXT files for displaying lyrics while the Arranger is active.
Describes automating .TXT file loading alongside Midi files in Song Play.
Details synchronizing text page changes with a Midi file playback.
Details the microphone parameters accessible via the Micro Edit menu.
Specifies the volume of the microphone on input Mic 1.
Specifies the volume of the microphone on input Mic 2.
Selects the stereo position for the microphone on input Mic 1.
Selects the stereo position for the microphone on input Mic 2.
Balances microphone signals with the XD9's sound generator.
Sets a delay for the two microphone signals, controlling intensity.
Sets reverb for each microphone input.
Transposes notes sung on Mic 1, affecting voice distortion.
Applies effects to the microphone input or sets Dry On Stop mode.
Enables or disables the microphone inputs to avoid disturbing noises.
Guides on connecting a microphone and activating the Vocalizer.
Explains the five different harmonisation modes for the Vocalizer.
Details the parameters available on the Vocalizer page for editing.
Defines the quantity of audio signal from Mic 1 used with the Vocalizer.
Controls the quantity of Vocalizer processed signal on the audio output.
Modifies the harmonisation mode and selects available algorithms.
Transposes added voices by +/- two octaves, with automatic option.
Stores recognized notes for Vocalizer when changing chords in Keyboard Harmony.
Modifies effects settings like Vibrato, Limiter, and vocal sound.
Controls vocal formants and equalizer bands for direct and vocalized voices.
Assigns different algorithms to Arranger controls for voice harmonization.
Tunes the third voice generated by Vocalizer in unison with the singer.
Switches Vocalizer status between Active, Internal, None, or Inactive.
Provides descriptions of algorithms for Automatic Chord 1, Automatic Chord 2, Fixed Interval, Vocal Effects.
Harmonizes voice based on chord and sung note, with various algorithms.
Harmonizes voice using all three voices, based on chord recognition.
Adds voices at fixed intervals, acting as a Pitch Shifter.
Offers twelve algorithms for modifying voice in amusing and unexpected ways.
Explains how to store modified Vocal Set parameters in the twelve available memories.
Details how to save the entire group of twelve Vocal Sets as one file to disk.
Guides on loading the complete group of twelve Vocal Sets back from disk.
Explains how to load a desired Vocal Set automatically upon turning on the XD9.
Discusses associating Vocal Sets with registrations to reduce setup time.
Sets the Reverb amount for the whole keyboard and tone generator.
Specifies Reverb quantity for the Right part of the keyboard.
Allows selection of Reverb algorithms like Room, Studio, Hall.
Calls up the menu to modify effects for the microphone input.
Calls up the menu to choose and program Vocal Sets.
Locks effect type to avoid changes when switching styles.
Selects Chorus algorithms and allows editing via F10 Edit.
Selects Delay algorithms and allows editing via F10 Edit.
Selects Distortion algorithms and allows editing via F10 Edit.
Accesses the menu for programming algorithm parameters.
Explains the process of editing effect parameters.
Resets algorithm parameters to their original values.
Returns to the Effects menu.
Indicates the current algorithm selected for modification.
Specifies the destination memory for the modified algorithm.
Confirms and saves modified parameters to the selected memory.
Details parameters for Chorus algorithms: Level, Delay, Feedback, Rate, Depth.
Details parameters for Delay algorithms: Volume, Filter, Feedback.
Details parameters for Distortion algorithms: Level, Tone, Resonance.
Explains how to manage Block Registrations, saving and recalling them.
Step-by-step instructions for saving a new Register in a Block Registration.
Guides on saving all 198 onboard registers as a single .REG file to disk.
Details managing Single Registrations, including loading and saving to disk.
Describes how registrations can automate loading of .TXT and .MID files.
Explains how to enable/disable parameter control within registrations.
Disables control of Drum Mixer parameters.
Disables control of Octave, Portamento, Harmony, Pianist, Vocalizer parameters.
Disables control of Accordion, Modulation, Tune, Vibrato parameters.
Disables control of Reverb, Chorus, Delay, Distortion, and Mic parameters.
Disables control of Jump Intro, Fill, Bass, Split, and Interactive parameters.
Disables control of Program Change, Volume, Reverb, Effect, Pan Pot.
Disables control of Lower Hold, Bass Sustain, Pedal Board parameters.
Disables control of Bass Lock, Step Tempo, Sync Time, Chord Mode.
Inhibits control of push buttons for 2nd Voice, 1 Touch, Key Start, Key Stop.
Saves settings made in Flash RAM, persistent after power off.
Resets the original control status of all parameters.
Disables REG. push button after selecting registration for Style selection.
Selects a parameter and modifies its enabling status.
Details parameters for Accordion and Modulation Wheel controls.
Calls up parameters dedicated to the use of a MIDI accordion.
Manages the Modulation Wheel, controlling LFOs for pitch, filter, and amplitude.
Controls LFO modulation on pitch for cyclic vibrato.
Controls LFO modulation on filter cut-off.
Controls LFO modulation on amplitude for cyclic tremolo.
Directly controls filter cut-off, affecting harmonic richness.
Returns to the initial page of the Utility menu.
Controls the Wha-Wha effect, typical of electric guitars.
Transfers Modulation Wheel parameters to the optional Volume pedal.
Sets the velocity of the LFOs used with the Modulation Wheel.
Sets the modulation depth obtained using the Modulation Wheel.
Controls tuning parameters, including fine tuning and vibrato.
Establishes the fine tuning of the whole sound generator in Hertz.
Disables vibrato on timbres that use it.
Controls the Portamento velocity.
Allows choosing between Portamento, Legato, and Mono.
Returns to the initial page of the Utility menu.
Establishes the excursion semitones of the Pitch Bend Wheel.
Assigns LFO vibrato control to the Pitch Bend Wheel.
Assigns filter cut-off control to the Pitch Bend Wheel.
Assigns timbre amplitude control to the Pitch Bend Wheel.
Calls up a page showing functions assigned to pedal switches.
Details parameters for Vocal Channel, Arabic Scale, and Footswitch.
Locks the MIDI channel selected for Vocalizer control.
Allows creation of tunings suitable for various countries using the Arabic scale.
Establishes if Arabic scale intervals apply to Arranger and Lower parts.
Returns to the initial page of the Utility menu.
Assigns Arabic scale to pedal switches or notes played via pedal.
Resets the standard tuning.
Details connecting a MIDI accordion to the XD9 via MIDI Out to MIDI In 2.
Explains enabling Accordion mode and accessing its parameters via Utility menu.
Selects between International and Belgique chord acknowledgement systems.
Selects the velocity curve for notes played manually with the Accordion.
Selects the velocity curve for notes played with the right hand.
Uses two percussion sounds with bass voices and two with chords.
Excludes chord acknowledgement, allowing manual bass and chord playing.
Modifies the Sustain length for the manual bass.
Includes bass note in chord acknowledgement for varied bass.
Modifies the octave of the manual bass voice.
Modifies the octave for Lower 1 and Lower 2 voices.
Enables or disables the use of parameters for the MIDI Accordion.
Explains saving MIDI accordion settings via Power On Set-up for automatic recall.
Details MIDI channels attribution for keyboard sections in MIDI reception.
Provides quick connection tips, including MIDI channel matching.
Explains using the XD9 as a General MIDI module via Midi file or MIDI In 1 input.
Guides on modifying parameters for a single GM part.
Allows selection of voices from Voice and User Voices for each track.
Allows selection of modulation effects like Chorus, Distorsor, and Delay.
Modifies the volume of the whole track.
Modifies the reverb of the complete part.
Modifies the entity of the chosen modulation effect.
Modifies the arrangement of the timbre on the stereo panorama.
Calls up a page to mute MIDI events like Modulation or other parameters.
Changes the transposition of the selected track by +/- 24 semitones.
Switches between transmission (TX) and reception (RX) MIDI channels.
Modifies the track's operational mode (Voice, Drumset, Vocalize).
Enables or disables track playback (cuts out the track).
Displays each parameter's value for all sixteen Parts.
Explains how to display and modify parameters for all sixteen GM parts.
Details MIDI parameters for each section of the XD9.
Explains how to save and manage MIDI settings using Set-ups.
Details parameters for Channel Transmit, Receive, Transpose, and Filter.
Associates a MIDI transmitting channel on MIDI OUT to each section.
Associates a MIDI receiving channel on MIDI In 2 to each section.
Sets transposition semitones for notes transmitted on MIDI Out.
Sets transposition semitones for notes received on MIDI In 2.
Enables or disables transmission of MIDI messages like Pitch Bend.
Filters MIDI messages received on MIDI In 2.
Establishes whether Program Change messages are transmitted to MIDI Out.
Handles Program Changes received on MIDI In 2.
Manages MIDI Clock synchronization with external units.
Accesses settings dedicated to MIDI ports.
Explains how to call up Programs, One Touch, and Registrations via MIDI.
Explains the functionality of hard disk management: creating folders, copying, renaming.
Provides general rules for accessing and managing hard disk and floppy disk functions.
Details how to navigate and select files within a folder.
Covers functions for hard disk management: showing folder contents, selecting files.
Displays the whole contents of the Folder in use.
Loads a selected file into memory.
Calls up a page to choose the type of file to be saved on disk.
Copies files from floppy to hard disk and vice versa.
Explains the procedure for copying files from floppy disk to hard disk.
Explains the procedure for copying files from hard disk to floppy disk.
Selects the file type to be displayed within the current Folder.
Cancels one or a number of files selected using F10 Select.
Renames a selected file or folder.
Manages and organizes single folders, including creation and deletion.
Returns to the previous page of the Disk menu.
Creates a TXT file listing folder contents, sorted by extension.
Copies selected files from the current folder to a chosen destination folder.
Controls parameters like Tempo, Transposition, Midi file chains, Hard Disk.
Displays Hard Disk capacity, space, folder count, and file count.
Modifies the Tempo of a Midi file stored in the current Folder.
Defines transposition value for Midi files, applying to file or globally.
Formats the Hard Disk, requiring protection function to be disabled first.
Returns to the previous page of the Disk menu.
Locks the Format function to prevent accidental formatting.
Creates chains of Midi files (up to 32) for sequential playback.
Selects Midi files to be added to a chain.
Calls up functions for controlling the Hard Disk: Surface Control, ScanDisk, Repair.
Covers functions for Floppy Disk management: Dir, Load, Save, Copy, File Choice.
Displays all the files stored in the Floppy Disk.
Loads a selected file into RAM.
Calls up the page to select the type of memory to be saved on Floppy.
Copies files from Floppy Disk, allowing renaming and skipping.
Filters files displayed by extension type.
Cancels one or a number of files selected using F10 Select.
Renames a selected file using the VALUE +/- push buttons.
Controls Tempo, Transposition, Midi file chains, and disk operations.
Displays free space and file count on Floppy Disk.
Modifies the Tempo of a Midi file stored in the Folder.
Defines transposition value for Midi files, applying globally or to file only.
Formats the Floppy Disk, requiring protection function to be disabled first.
Returns to the previous page of the Disk menu.
Locks the Format function to prevent accidental formatting.
Creates chains of Midi files for sequential playback.
Selects Midi files to be added to a chain.
Controls Tempo, Transposition, Midi file chains, and disk operations.
Explains how to set and modify passwords for protected folders.
Guides on organizing and managing hard disk contents via PC or Mac.
Explains the conversion of .KAR Midifiles to .MID format.
Provides detailed technical specifications for the XD9-XD3 keyboard.
Lists preset programs organized by bank and channel.
Categorized list of available presets across different instrument types.
Lists General MIDI voices available, organized by bank and program change.
Lists available Drum Sets, including standard and user-defined sets.
Lists available Live Drum sets, categorized by rhythm and style.
Details MIDI banks and program change assignments for various functions.
Provides a comprehensive list of Styles categorized by genre.
Details MIDI implementation charts for notes, controls, and system exclusive data.
Lists MIDI control messages for Vocalizer parameters.
Details System Exclusive data for Ketron XD9-XD3 control.
Lists system exclusive messages for Vocalizer parameters.
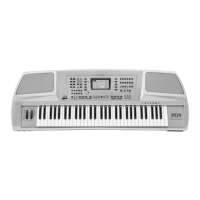
| Brand | KETRON |
|---|---|
| Model | XD3 |
| Category | Electronic Keyboard |
| Language | English |