EasyManua.ls Logo

Keurig K-2500 - User Manual

Keurig K-2500
21 pages
Print Icon
To Next Page IconTo Next Page
Loading...
Use & Care Guide
Get the Most From Your
New Keurig® Brewer
Click Anywhere to Begin
K-2500
Brewer
Question and Answer IconNeed help?

Do you have a question about the Keurig K-2500 and is the answer not in the manual?

Summary

Important Safeguards

General Safety Precautions

Lists essential safety guidelines for operating the appliance, covering handling, immersion, supervision, and unplugging.

Additional Safeguards

Provides specific warnings regarding plastic bags, hot water pressure, used pods, and needle safety.

Water Hookup

Plumbing Instructions

Step-by-step guide for connecting the brewer to a water supply using an external filter.

Installing the Reservoir

Instructions for attaching and securing the optional Water Reservoir Kit to the brewer.

Before You Brew

Plumbed vs. Reservoir Setup

Initial steps for powering on and confirming water supply for both plumbed and reservoir configurations.

Brewer Care

General Cleaning and Care

Routine cleaning advice for exterior, reservoir, and drip tray.

Descaling

Descaling Procedure Overview

Explains why and when to descale, listing necessary items and initial steps.

Adding Descaling Solution and Rinsing

Detailed steps for adding solution, soaking, and performing cleansing brews to remove scale.

Troubleshooting

Brewer Does Not Have Power

Steps to resolve issues where the brewer is not turning on or displaying any activity.

Brewer Will Not Brew (First Time)

Troubleshooting for the initial brew cycle, including priming and temperature.

Warranty

Overview

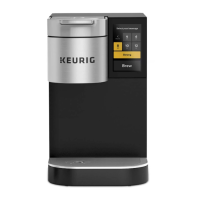
The Keurig K-2500™ Commercial Brewer is a single-serve coffee machine designed for commercial use, offering convenience and efficiency in brewing various beverages. It can be connected to an existing water supply (plumbed) or used with an optional K-2500™ Water Reservoir Kit (sold separately), providing flexibility for different setups.

Function Description:

The primary function of the Keurig K-2500™ is to brew single-serve coffee and other hot beverages using K-Cup® pods. It features a touch screen interface for selecting brew options and managing settings. The brewer is designed to handle local water pressures from 40 psig up to 125 psig for plumbed installations. It includes an internal hot water tank that heats water for brewing. The machine is equipped with a puncture mechanism that pierces the K-Cup® pod, allowing hot water to flow through and extract the beverage.

Usage Features:

  • Touch Screen Interface: The brewer operates via a touch screen, making it easy to navigate menus and select brewing options.
  • Brew Size Selection: Users can choose from multiple brew sizes: 4, 6, 8, 10, and 12 oz. These options can be customized, allowing managers to disable up to four cup sizes and set a default.
  • Strong Brew Option: For a bolder taste, the "Strong" button can be selected before or after choosing a brew size, increasing the strength of the coffee.
  • Plumbed or Reservoir Water Source: The K-2500™ can be directly connected to a water line for continuous supply, or it can be used with a refillable water reservoir, offering versatility in installation.
  • Brewing Iced Beverages: The brewer supports brewing over ice. Users are instructed to fill a 16-oz cup with ice, place a K-Cup® pod, and select a 6 oz or 8 oz "Strong" brew.
  • High Altitude Brewing Mode: For locations over 5,000 feet, a High Altitude Brewing Mode can be enabled through the Technician menu to ensure optimal brewing performance.
  • Travel Mug Friendly: The drip tray is removable to accommodate taller travel mugs.
  • Screensaver Customization: The touch screen allows for personalized screensavers. Users can upload custom images (JPEG, under 300KB) via a USB flash drive to create a slide show. Settings for screensaver start time and image duration are also adjustable.
  • Language Selection: The default language can be set to English, Spanish, or French. For single brews, the language can be temporarily changed from the idle screen.
  • Units of Measurement: Volume measurements can be displayed in milliliters (ml) or ounces (oz).
  • Brew History: The brewer tracks the total number of brews performed and the number of brews for each size. This data cannot be reset.
  • Passcode Protection: The brewer offers an option to enable or disable passcode protection for menu access.

Maintenance Features:

  • Regular Cleaning Schedule: A recommended maintenance schedule is provided, including daily, weekly, and quarterly tasks.
  • Brewer Exterior Cleaning: The exterior should be cleaned periodically with a damp paper towel and a non-vinegar glass cleaner. Immersion in water or other liquids is prohibited.
  • Water Reservoir & Lid Cleaning: The water reservoir and its lid should be cleaned periodically with a damp, soapy, non-abrasive cloth, then rinsed thoroughly. It's important not to dry the inside with a cloth to avoid lint, and the lid should not be put in the dishwasher.
  • Drip Tray Cleaning: The drip tray, which can hold up to 10 ounces of overflow, should be emptied and cleaned occasionally with a damp, soapy, lint-free, non-abrasive cloth. It is not dishwasher safe.
  • K-Cup® Pod Holder Cleaning: The pod holder can be removed by pulling it forward and lifting it up. The funnel within the pod holder can be twisted off for cleaning.
  • Entrance Needle Cleaning: The entrance needle, located on the underside of the lid, can be cleaned by inserting a straightened paper clip into the hole to loosen coffee grounds. Two cleansing brews should be run afterward without a K-Cup® pod.
  • Exit Needle Cleaning: The exit needle, located at the inside bottom of the K-Cup® pod holder, can be cleaned by removing the pod holder assembly and funnel, then inserting a straightened paper clip into the needle hole.
  • Puncture Mechanism (PM) Base Cleaning: The PM base plate can be removed by pulling it down from the center hole. It should be washed with soap and water, wiped clean, and then snapped back into place.
  • Sanitizing: Weekly sanitizing is recommended using URNEX®+ Complete Café™ Equipment Sanitizer. This involves mixing the solution with water and running multiple brew cycles.
  • Descaling: Regular descaling (every three months, or two months for areas with hard water) is crucial to remove calcium deposits and maintain brewer performance. The process involves using Keurig® Descaling Solution, soaking the brew path, and then performing multiple cleansing brews. Specific instructions are provided for both plumbed and reservoir brewers.
  • Storage: Before storing or transporting, the internal water tank should be emptied. The brewer should be stored upright in a frost-free environment to prevent damage from freezing water. After storage, it's recommended to rinse the internal tank and run three cleansing brews.
  • Water Source Transition: When switching between a plumbed water source and a reservoir, the internal water tanks must be fully drained. A specific screw needs to be replaced when transitioning from reservoir to plumbed.
  • Troubleshooting Guidance: The manual provides solutions for common issues such as no power, failure to brew, partial cups, and grounds in coffee. It also directs users to online videos and customer service for further assistance.
  • Non-User-Serviceable: Beyond the recommended cleaning and maintenance, the brewer is not user-serviceable, and users are advised to contact a Keurig® Authorized Distributor for service.

Keurig K-2500 Specifications

General IconGeneral
Touch Screen InterfaceYes
Plumbed Water Line CompatibleYes
Strength ControlYes
Voltage120V
ModelK-2500
ProgrammableYes
Auto OffYes
Compatible PodsK-Cup Pods
ColorBlack/Silver
Brew Sizes6, 8, 10 oz
Product TypeCoffee Maker

Related product manuals