Do you have a question about the Keurig K-Mini and is the answer not in the manual?
Connect the brewer to a power source and turn it on.
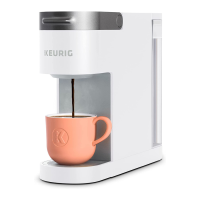
Add water to the reservoir and place a mug on the drip tray.
Prepare the brewer by lifting and lowering the handle without a pod.
Perform the initial cleansing brew cycle.
Add water to the reservoir and place a mug on the drip tray for brewing.
Place a K-Cup pod and close the handle.
Press the brew button and wait for the beverage.
Brewer turns off automatically after 90 seconds of inactivity for energy savings.
Convenient storage for the power cord to keep countertops tidy.
Remove drip tray to accommodate taller travel mugs.
Cleaning the outside of the Keurig brewer with a damp, lint-free cloth.
Cleaning the water reservoir and its lid periodically.
Removing and cleaning the drip tray to prevent overflow.
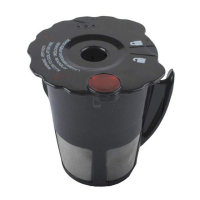
Removing and cleaning the K-Cup pod holder.
Cleaning the exit needle to remove coffee grounds using a paper clip.
Removing and washing the funnel for a fresh beverage experience.
Cleaning the entrance needle on the lid underside with a paper clip.
Step-by-step guide for descaling the brewer using Keurig Descaling Solution.
First step of descaling: rinse with solution and fresh water.
Second step of descaling: soak internal tank with solution for 30 minutes.
Third step of descaling: rinse with fresh water multiple times.
Solutions for coffee grounds in the beverage, involving needle cleaning.
Steps to take when the brewer does not dispense liquid.
How to fix issues with partial cup brewing, including descaling.
Troubleshooting power issues or unexpected shutoffs.
Recommendation to use bottled or filtered water for better beverage taste.
Details of the one-year limited warranty for the brewer.
Exclusions from the limited warranty coverage.
Further limitations and disclaimers of warranties.
Instructions on how to get warranty service for the brewer.
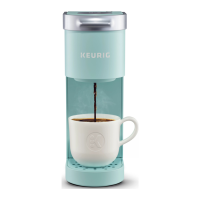
| Brew Sizes | 6-12 oz |
|---|---|
| Water Reservoir | Single Cup Reservoir |
| Weight | 4.6 lbs |
| Power | 1470W |
| Cord Length | 30 inches |
| Compatibility | K-Cup Pods |
| Product Type | Single Serve Coffee Maker |
| Model | K-Mini |
| Energy Saving Mode | Yes |
| Auto Off | Yes, after 90 seconds |
| Dimensions | 4.5 x 12.1 x 11.3 inches |