Ref : KT054536
DIGITAL WEATHER STATION
PACKAGING CONTENT
• 1 weather station (1 indoor unit + 1 outdoor unit)
• 1 charging cable
WARNINGS & SAFETY INSTRUCTIONS
You have just acquired a product from Keytime and we thank you for it. We hope that it will bring you complete satisfaction.
Guarantee
The products are guaranteed not to fail due to manufacturing defects.
This warranty does not cover defects due to misuse or normal wear and tear.
SRDi - 85430 La Boissière des Landes FRANCE
2023/08V01/MKG
SRDi declares that the product “ Digital weather station” complies with directives 2014/30/
EU, 2014/35/EU & 2011/65/EU.
The full EU declaration of conformity is available by scanning the QR Code :
• 1 user manual
WIRELESS SENSOR TEMPERATURE ALERT
OVERVIEW
GENERAL SETTING
1. After powering up, while in default displaying interface, hold “SET/DIM” button for 2 sec. to enter time setting interface.
2. Press “UP” or “DOWN” button to adjust the setting and press “SET/DIM” button to confirm each setting.
3. The setting sequence is shown as follow: 12/24HR, Zone, Hour, Minute, Date and Month position, Year, Month, Date, Languages, Weather
icon (current weather condition).
RF FUNCTION
After inserting the batteries for both console and wireless sensor, the product starts sync progress automatically. If sync successfully, the temp/
humidity data will be shown on console.
Press “CHANNEL/ DOWN” button to toggle between channel 1,2,3 and automatic rotation (channel 1, 2 and 3).
Before inserting the batteries to wireless sensor, switch the channel to your prefered channel (1, 2 and 3).
If the signal is lost between the wireless sensor and the console, to re-synchronize, while in normal mode, press and hold “CHANNEL/ DOWN”
button for 3 sec. to enter signal receiving mode, the sensor search icon will be flashing.
RCC FUNCTION
After the main device is powered on, it will prioritize receiving the RF signal and then proceed to receive the RCC signal. Pressing and holding
the “UP“ button will initiate the reception of the RCC signal. While receiving the signal, pressing the “UP“ button again will stop the RCC
signal reception.
Read the safety instructions carefully and use this article only as described in this manual to avoid any risk of damage or injury.
This product is not a toy. If swallowed, batteries can cause fatal poisoning. Therefore, keep your weather station, packaging and
batteries out of the reach of children.
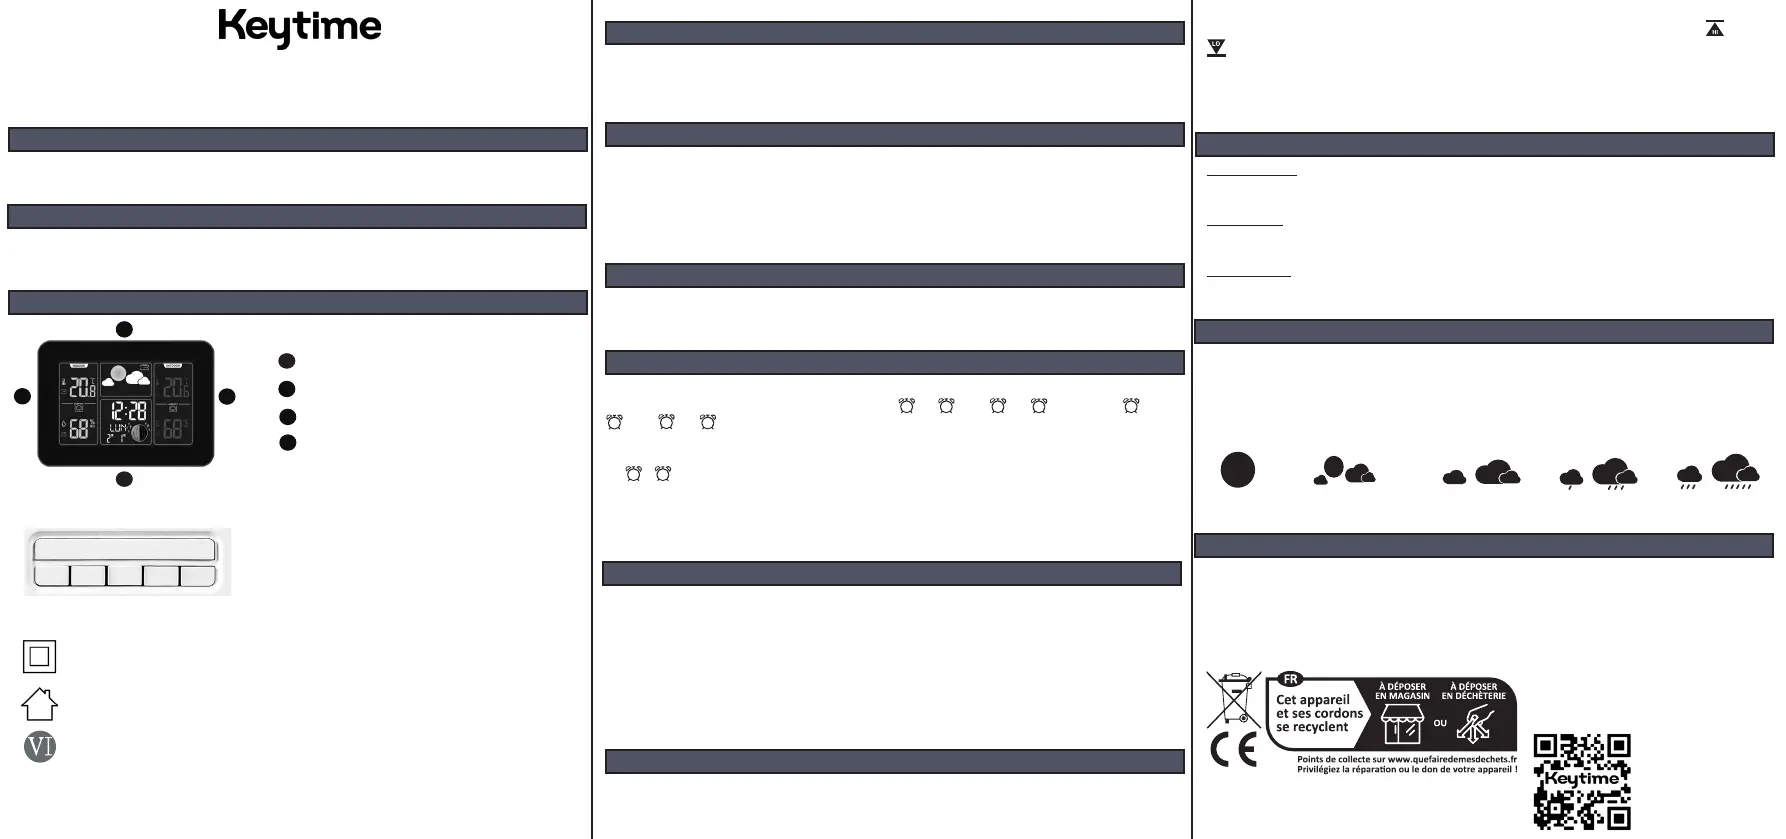
Time, day and date display
Indoor temperature and humidity display
1
1
1
2
2
3
3
2
3
3
Weather forecast
4
4
Outdoor temperature and humidity display
Set / Dim
Alarm
Up
Channel
Down
Alert
Max
Min
Double-insulated equipment. This symbol means that this appliance has reinforced insulation with no accessible metal parts.
The plugs of class 2 equipment do not have earth pins.
This symbol means that this device is for indoor use only.
This product meets the highest energy efficiency standards.
DAILY ALARM SETTING
1. Hold “ALARM” button for 2 seconds to enter ALARM time setting. Press “UP” or “DOWN” button to adjust the setting and press “ALARM”
button to confirm each setting. The setting sequence is shown as follow: hour, minute, date, Snooze duration, hours,
minute, date, Snoooze duration.
2. Alarm date: M-F : from Monday to Friday, S-S : from Saturday to Sunday, M-F+S-S : every day.
3. While in default displaying interface, press “ALARM” button to show alarm time, then press “SET/DIM” to switch alarm ON or OFF. If it is
ON, or icons would be shown on the screen.
4. Alarm ringing lasts for 2 minutes.
5. When the alarm is ringing, tap the “SNOOZE/LIGHT” area on the top of the product to activate the SNOOZE function, the alarm will repeat
every setting snooze time (default is 5 minutes), or press any other buttons to turn off the alarm.
6. Snooze time: can be set from OFF~30 minutes.
2
TEMPERATURE AND HUMIDITY
1. Indoor temperature detecting range: 0°C ~ 60°C. If the data detected is out of range, it shows LL.L or HH.H instead.
2. Wireless sensor temperature detecting range: -40°C ~ 60°C. If the data detected is out of range, it shows LL.L or HH.H instead.
3. Indoor humidity detecting range: 10% - 99%. If the data detected is out of range, it shows 10% or 99% instead.
4. Wireless sensor humidity detecting range: 10% - 99%. If the data detected is out of range, it shows 10% or 99% instead.
5. Detecting period: temperature and humidity, every 30 seconds.
6. Press “UP“ button to toggle between °C and °F
7. Max/Min Temperature/ Humidity Recording: in normal display, press the “MAX/MIN” button to show maximum/minimum data of
indoor/outdoor temperature, humidity.
Press and hold “MAX/IN” button for 2 sec. to delete the data recorded.
2. Press and hold “ALARM” button 2 sec. to enter temperature alert setting, press “UP” or “DOWN” button to set the upper and lower
temperature limits, and press “ALERT” button to confirm settings. The temperature alert setting range is -40°C ~ 60°C.
3. If the temperature detected by the wireless sensor is out of the temperature range set, the alert starts ringing. The alert rings 5 sec. every
minute and won’t stop until the temperature detected is within the range set.
4. While the alert is on, press any button to shut the ringing off, and the alert icon keeps flashing.
5. Or, press “ALERT” button to switch the temperature alert function off.
TEMPERATURE, HUMIDITY AND AIR PRESSURE TREND INDICATOR
1. Temperature trend:
- if the temperature changes beyond 1°C within 1 hour, the temperature trend symbol shows up or down.
- if the temperature changes less than 1°C within 1 hour, the temperature trend symbol shows parallel.
2. Humidity trend :
- if the humidity changes beyond 3% within 1 hour, the temperature trend symbol shows up or down.
- if the humidity changes less than 3% within 1 hour, the humidity trend symbol shows parallel.
3. Air Pressure trend:
- if the air pressure changes beyond 2 HPA within 1 hour, the air pressure trend symbol shows up or down.
- if the air pressure changes less than 2 HPA within 1 hour, the air pressure trend symbol shows parallel.
¹ ¹ ¹
¹
2
2
2
¹
2
1. While in default displaying interface, press “ALERT” to switch wireless sensor temperature alert ON or OFF. If it is ON, temperature alert icon
would be shown above the temperature data.
WEATHER FORECAST
The five weather icons are : Sunny, Partly Cloudy, Cloudy, Rainy, Stormy.
The forecast icon is based on the rate of change of barometric pressure.
In general, if the rate of change of pressure increases, the weather is generally improving. If the rate of change of pressure decreases, the
weather is generally degrading.
The reason the current conditions do not match the forecast icon is because the forecast is a prediction 24-48 hours in advance.
POWER SUPPLY AND BACKLIGHT
1. The weather station is designed for using AC/DC power supply as main power source.
2. Battery power supply is for temporary use and backup purpose only.
3. When base station is powered by AC/DC adaptor, the backlight is able to be continuously on. Press “SET/DIM” button to adjust the
dimmer brightness between 100%, 75%, 50%, 25% and 0%.
4. When base station is powered by 2 x AAA batteries, press “SNOOZE/LIGHT” button and backlight will last for 15s.
Directive 2012 / 19 / EU
Proper disposal of this product
Electronic waste should not be disposed of with household
waste. Please recycle it with our
approved recycling facility and
check with your local authority for
recycling advice.
Sunny
Partly cloudy Cloudy Rainy
Stormy
 Loading...