CAUTION – RISK OF SHOCK –
Disconnect Power at the main circuit breaker panel or main
fusebox before starting and during the installation.
This xture is intended for installation in accordance with the
National Electric Code (NEC) and Local code specications.
Failure to adhere to these codes and instructions may result in
serious injury and/or property damage and will void the warranty.
INSTRUCTIONS PERTAINING TO A RISK OF FIRE,
OR INJURY TO PERSONS
IMPORTANT SAFETY INSTRUCTIONS
Lighted lamp is HOT!
WARNING — To reduce the risk of FIRE OR INJURY TO PERSONS.
1) Turno/unplugandallowtocoolbeforereplacinglamp.
2) LampgetsHOTquickly!Contactonlyswitch/plugwhen
turningon.
3) Donottouchhotlensorcowl.
4) Donotremaininlightifskinfeelswarm.(Lightisintense,itmay
cause“sunburn”.)
5) Donotlookdirectlyatlightedlamp.
6) Keeplampawayfrommaterialsthatmayburn.
7) Useonlywithwattageandlampmarkedonxture.
8) Donottouchtheinnerglassenvelopeofthelampatanytime.
Useasoftcloth.Oilfromskinmaydamagelamp.
9) Donotoperatethexturewithadamagedormissinglens.
FOR USE WITH LANDSCAPE LIGHTING SYSTEMS ONLY.
1) Thedeviceisacceptedasacomponentofalandscapelighting
systemwherethesuitabilityoftheCSAorULlabeled
combinationshallbedeterminedbyCSA,ULrespectivelyor
thelocalinspectionauthoritieshavingjurisdiction.
2) Fixtureshallbeconnectedtoanextralowvoltagetransformer
approvedforusewithlandscapelightingsystems.
3) Theunitlowvoltagecableshall:
a)beprotectedbyroutingincloseproximitytotheluminaire
ortting,ornexttoabuildingstructuresuchasahouseor
deck;
b)notbeburiedexceptforamaximum6inches(15.2cm)in
ordertoconnecttothemainlowvoltagecable;and
c)havethelengthcutosothatitisconnectedtoa
connectorwithin6inches(15.2cm)fromabuilding
structure,aluminaire,ortting.
CAUTION
WHEN INSTALLING KICHLER LANDSCAPE LIGHTING (LINE VOLTAGE OR LOW
VOLTAGE), CARE SHOULD BE TAKEN TO KEEP CLEAR OF POTENTIALLY
COMBUSTIBLE MATERIALS.
WHEN MAINTAINING THE FIXTURES, BE SURE TO REMOVE LEAVES, PINE
NEEDLES, GRASS CLIPPINGS, MULCH, OR ANY DEBRIS THAT HAS ACCUMU-
LATED ON THE LIGHT BULB, LENS, OR BODY OF THE FIXTURE.
ASSEMBLY AND INSTALLATION
1) TURN OFF POWER.
2) Determinedesiredlocationformountingxture.Atdesired
location,hammerstakeintoground.Toavoiddamageto
stake,placeaboardontopofstakewhilehammeringoruse
arubbermallet.Ifgroundishardandstakeisdicultto
install,makeacrosscutingroundusingaatshovel.
3) Clearawayareaingroundatwirewayopeninginstake.
4) Routexturecablethroughwirewayopeningandscrew
stemintostake.Careshouldbetakentoensurewireisnot
twisted.Ifassemblydoesnotlookstraight,adjustby
pushingorpullingonstakeonly.
5) Installlamp(notprovided)intosocketinsidexture.NOTE:
Usecautionwheninstalling.Useasoftclothtohandlelamp;
DONOTtouchglassenvelopewithbarehands.Ifthis
happens,cleanlampwithdenaturedalcoholandalintfree
cloth.
6) For15480only-Removehexnutfromtopshadeand
assemblewithbottomshade.Reinstallhexnut.
7) Installgasketandglasshoodoverbulbontopofstem.
8) Screwharpontostemtosecureglass.(DONOTover
tighten.)
9) Threadshadeassemblyontoharp.
10) Makewireconnectionsusinganapprovedwiringconnectors
(notsupplied.)followinginstructionsprovidedbymanufacturer.
REV28-JUL-2020 IS-15480-CB
OUTDOOR USE ONLY
DOM ETRE INSTALLE A L’EXTERIEUR
INSTRUCTIONS
For Assembling and Installing Fixtures in Canada
Pour L’assemblage et L’installation Au Canada
For warranty information please visit: kichler.com/warranty
Pour de plus amples informations sur la garantie, cliquez sur le lien ci-dessous : kichler.com/warranty
SEE OTHER SIDE FOR CANADIAN FRENCH TRANS-
LATIONS.
VOIR L’AUTRE CÔTÉ POUR LES CANADIENS TRA-
DUCTIONS EN FRANÇAIS.
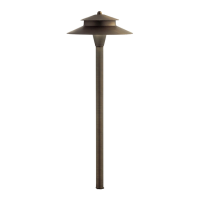
TOPSHADE
CACHESUPÉRIEUR
BOTTOMSHADE
CACHEINFÉRIEUR
NUT
ECROUHEXAGONAL
HARP
HARPE
GLASSHOOD
CAPOTENVERRE
GASKET
JOINT
LAMP
(NOTINCLUDED)
AMPOULE
(NONFOURNIE)
STEM
TIGE
STAKE
PIQUET
We’re here to help 866-558-5706
Hrs: M-F 9am to 5pm EST