9
7. Securing the child
Semi-universal: If you want to use the car seat with the k-fix
mounting, make sure it is secured in the vehicle as described in
Section 6!
Universal: If you want to use the child safety car seat without the
k-fix mounting, the k-fix connectors must be retracted into the seat (E)!
Position your kiddy on the vehicle seat as described in Section 5.1 - 5.3.
Check to see whether the seat cushions (F) and headrests (B) are adjusted
to the size or body weight of your child (Section 4).
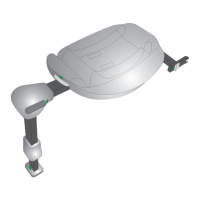
The kiddy phoenixfix pro 2 is secured with the three-point vehicle restraint
using the belt guide on the impact shield (Q) (Fig. 19).
Place your child in the seat and ensure that the child’s buttocks press against
the backrest (C).
Push the impact shield (O) into the impact shield guides (G) on the seat
section (Fig. 20).
Slide the impact shield (O) back so that it rests right on your child's tummy.
Then pull your vehicle’s three-point restraint out far enough so that it goes
around your kiddy and can be directly fastened in your vehicle's own
seatbelt lock (Fig. 21).
Make sure that the seatbelt tongue locks securely in place with a noticeable
“click”.
If your original kiddy impact shield (O) comes with toy figurines, these should
be placed over the impact shield (O) for easier belt fastening (Fig. 22).
Next, feed the lap belt through the red impact shield belt guides (Q) of the
impact shield.
ENG