EasyManua.ls Logo

KidKraft Bianca City Life Dollhouse User Manual

KidKraft Bianca City Life Dollhouse
25 pages
To Next Page IconTo Next Page
Page #1 background imageLoading...
Page #1 background image
EUROPEAN REGIONS
parts.KidKraft.eu
USA/CANADA
parts.KidKraft.com
AUSTRALIA
parts.KidKraft.au
MISSING SOMETHING?
¿TE FALTA ALGO? / BESOIN DE PIÈCES DE RECHANGE ? / FEHLT ETWAS? / ONTBREEKT ER IETS?
Welcome to the KidKraft family
We do our very best to ensure accuracy in every order, but occasionally we miss something. That’s why
our warranty covers every single part of your new product for 90 days after purchase. If you are missing
parts or find any damage, it’s easy to order replacements at parts.KidKraft.com in the US and
parts.kidkraft.eu in Europe. You can also review your warranty, download assembly instructions and more
by visiting KidKraft.com.
Bienvenido a la Familia Kidkraft
Hacemos nuestro mejor esfuerzo para asegurar la precisión en cada orden, pero a veces se nos olvida
algo. Por este motivo, nuestra garantía cubre cada parte de su nuevo producto por los próximos 90 días
después de su compra. Si a le falta alguna parte o si consigue algún daño en el producto, es muy
sencillo solicitar un remplazo en parts.KidKraft.com en los Estados Unidos y en parts.kidkraft.eu en
Europa. También puede revisar su garantía, descargar instrucciones de ensamblaje y mucho más
visitando KidKraft.com.
Bienvenue dans famille Kidkraft
Nous faisons de notre mieux pour assurer l'exactitude dans chaque commande, mais parfois nous
manquons quelque chose. C'est pourquoi notre garantie couvre chaque partie de votre nouveau
produit pendant 90 jours après l'achat. S’il vous manque des pièces ou si vous, c’est facile de
commander des pièces de rechange chez parts.KidKraft.com aux États-Unis et parts.kidkraft.eu en
Europe. Vous pouvez également consulter votre garantie, télécharger les instructions d'assemblage et
plus encore en visitant KidKraft.com.
Willkommen zu KidKraft Family
Wir geben unser Bestes, bei jeder Bestellung sicherzustellen, dass höchste Sorgfalt geboten wird, aber
vereinzelt kann es vorkommen, dass wir etwas übersehen. Aus diesem Grund deckt unsere Garantie jedes
einzelne Teil Ihres neuen Produkts für die Dauer von 90 Tagen nach Erwerb ab. Sie können ganz einfach
Ersatzteile bei parts.KidKraft.com in den USA und parts.KidKraft.eu in Europa bestellen, sollten Teile fehlen
oder Beschädigungen vorliegen. Besuchen Sie KidKraft.com, um unter anderem die Garantie einzusehen
und Aufbauanleitungen herunterzuladen.
Welkom bij de Kidkraft-familie
Wij doen ons best om erg nauwkeurig te zijn bij elke bestelling, maar af en toe kunnen we wat missen.
Daarom dekt onze garantie elk onderdeel van uw nieuwe product gedurende 90 dagen na aanschaf.
Als er onderdelen ontbreken of als u schade opmerkt, kunnen vervangende onderdelen eenvoudig
worden besteld op parts.KidKraft.com in de VS en parts.kidkraft.eu in Europa. U kunt tevens uw garantie
bekijken, montage-instructies en meer downloaden door KidKraft.com te raadplegen.
Batch Code
Código De Lote
Code de lot
Chargennummer
Partij-code:
Question and Answer IconNeed help?

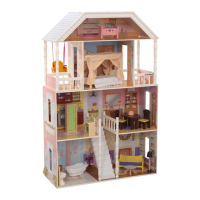
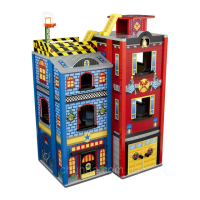
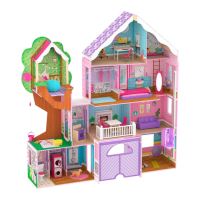
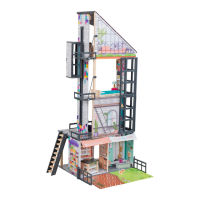
Do you have a question about the KidKraft Bianca City Life Dollhouse and is the answer not in the manual?

KidKraft Bianca City Life Dollhouse Specifications

General IconGeneral
Recommended Age3 years and up
Number of Rooms4
Furniture IncludedYes
Assembly RequiredYes
MaterialWood, MDF, Plastic
FeaturesElevator, Balcony
Doll SizeFits dolls up to 12 inches

Summary

KidKraft Product Introduction and Warranty

Warranty and Replacement Parts Policy

Details KidKraft's 90-day warranty for missing or damaged parts and how to order replacements.

Parts Identification

Complete Parts and Hardware List

Lists all numbered parts and hardware components required for assembly.

Assembly Instructions

Steps 1-2: Initial Panel and Bracket Assembly

Attaching key initial components like part 4900-GD and 5093-7457.

Steps 3-6: Component Installation

Installing parts 5090-WT, 4234-GD, and 5049-SL components.

Steps 7-10: Panel Connections and Internal Parts

Continuing assembly with parts like 5023-WT and connecting main panels.

Steps 11-12: Structural Assembly Progress

Progressing structural assembly with parts 7 and screws A.

Steps 13-14: Component Attachment

Attaching parts 2, 8, and 4 to the main structure.

Steps 15-16: Inserting Internal Components

Inserting parts 9 and 1 into the assembly.

Steps 17-18: Securing Internal Structure

Using screws A and C to secure internal components like part 10 and 11.

Steps 19-21: Attaching Shelves and Panels

Installing shelves (12) and vertical panels (13) using screws A and C.

Steps 22-25: Attaching Side Panels and Doors

Installing side panels (14, 15), part 16, and doors (5047-MNRV).

Steps 26-28: Securing Components

Using screws and components like 5049-SL to secure the structure.

Steps 29-32: Adding Exterior Features

Installing parts 17, 18, 19, 20, 21 using screws D.

Steps 33-36: Attaching Roof and Supports

Attaching roof elements (22, 23) and supports using screws D, G, and F.

Steps 37-39: Securing Support Brackets

Attaching and securing support brackets using screws D.

Steps 40-41: Attaching Vertical Supports and Base

Installing vertical supports (3) and base (5050-MNRV) using screws G.

Steps 42-43: Installing Drawer Slides

Attaching drawer slide components (5050-MNRV, 5053-MNRV) to the structure.

Steps 44-45: Attaching Hinges and Side Panels

Attaching hinge components (B, I) and side panels (5092L/R-MNRV) using screws G.

Steps 46-47: Installing Side Frames

Installing side frames (5092L/R-MNRV) and main component (5052-MNRV) using screws E and B.

Steps 48-49: Securing Main Components

Securing the main component (5052-MNRV) using screws B.

Steps 50-51: Finalizing Top Section and Accessories

Attaching final parts (5052-MNRV) and accessories like 26, 27.

Steps 52-55: Specialty Parts and Finishing

Installing component 25, attaching 4367-GD, 5024-GD, and final parts 4297-MNRV.

Steps 56-61: Completing Assembly

Finalizing the structure with parts 5094, 3721-WT, 5051-320, and 4642-7678.

Component Specific Assembly

Ceiling Fan (4367-GD) Battery Installation

Instructions for inserting LR44/AG13 batteries into the ceiling fan component.

Toilet (712-233) Battery Installation

Instructions for inserting LR44/AG13 batteries into the toilet component.

Related product manuals