Do you have a question about the KIDSMILL BRENT and is the answer not in the manual?
Always read the manual thoroughly before starting assembly to ensure correct procedure.
Sort all parts neatly and verify that everything is present before assembly.
Ensure sufficient space for assembly and work close to the final location of the furniture.
Use packaging as a protective layer on the floor to prevent damage during assembly.
Lay sides on a clean, flat surface for effective support when attaching components like drawer guides.
Insert dowels into the end-grain side first and tap them gently into pre-drilled holes.
If necessary, place the furniture on its side for assembly, ensuring all parts remain well supported.
Clean the furniture with a damp cloth, avoiding harsh cleaning agents to preserve the finish and ensure child safety.
List of all components with their respective item numbers, quantities, and physical dimensions for identification.
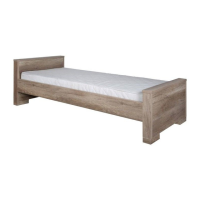
Connect the side panels using the provided dowels and fixtures as shown in the diagram.
Attach the base supports to the side panels, ensuring correct orientation and alignment for stability.
Securely attach the headboard and footboard components to the assembled frame using dowels.
Install the bed slats or base supports, ensuring they are evenly spaced and firmly seated.
Insert the safety rail or final stabilizing elements into their designated positions.
Final check of all connections and ensure the bed is stable and securely assembled.
Information on how to fill out the warranty form for damaged or missing parts and contact details for claims.
| Brand | KIDSMILL |
|---|---|
| Model | BRENT |
| Category | Indoor Furnishing |
| Language | English |