11
The real design of the product may dier from the pictures presented.
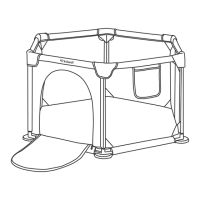
DESCRIPTION OF FANKO PLAYPENS - all models
• portable playpen suitable for children
up to 6 years of age
• entrance with a zipper so that older
children can enter and exit the
playpen on their own
• easy assembly
• non-slip silicone feet preventing
the playpen from moving (applies
to models: KOMOFAN01A2 and
KOMOFAN01A3)
• can be used both
• indoor and outdoor
• transport bag (cover) included
INCLUDED PARTS (model KOMOFAN01A1 - see Fig. 1)
590 mm-long metal frame tubes - 18
pcs. (Fig. 1.1)
Top angle connectors - 6 pcs. (Fig.
1.2)
3
4
5
1
2
Lower angle connectors - 6 pcs. (Fig.
1.3)
Playpen upholstery
Transport bag - cover
INCLUDED PARTS (model KOMOFAN01A2 - see Fig. 2)
INCLUDED PARTS (model KOMOFAN01A3 - see Fig. 3)
590 mm long metal frame tubes - 16
pcs. (Fig. 2.1)
880 mm-long metal frame tubes - 8
pcs. (Fig. 2.2)
Straight connectors - 8 pcs. (Fig. 2.3)
970 mm long metal frame tubes - 8
pcs. (Fig. 3.1)
870 mm-long metal frame tubes - 8
pcs. (Fig. 3.2)
Straight connectors - 8 pcs. (Fig. 3.3)
615 mm-long metal frame tubes - 8
4
5
6
7
5
6
7
8
1
2
3
1
2
3
4
Top angle connectors - 4 pcs. (Fig. 2.4)
Bottom angle connectors with silicone
feet - 4 pcs. (Fig. 2.5)
Playpen upholstery
Transport bag - cover
pcs. (Fig. 3.2)
Top angle connectors - 4 pcs. (Fig. 3.4)
Bottom angle connectors with silicone
feet - 4 pcs. (Fig. 3.5)
Playpen upholstery
Transport bag - cover
PLAYPEN ASSEMBLY - model KOMOFAN01A1
1
1. Start assembling the playpen with the base. All playpen tubes are of the same length.
Insert 6 metal tubes into the lower sleeves of playpen upholstery. Then connect them
with lower angle connectors (Fig. 1.4).
2. Attach 6 vertical tubes to the assembled base. Pull them through the vertical upholstery
sleeves and press them into the base angle connectors. Put upper angular fasteners
 Loading...