12
PLAYPEN ASSEMBLY - model KOMOFAN01A2
2
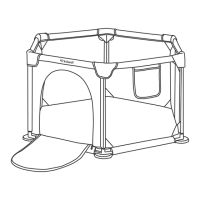
1. Start assembling the playpen with the base. Insert eight 880 mm and 590 mm-long
metal tubes into the lower sleeves of playpen upholstery. Then connect them with
lower angle connectors equipped with silicone feet (Fig. 2.6). Note that the playpen
design is rectangular - this is why the lengths of tubes dier.
2. Attach 8 vertical tubes of the same length of 590 mm to the assembled base. Pull
the tubes through the vertical upholstery sleeves with foam casing and press them
into the base angle connectors and straight connectors. Put the upper angle and
straight connectors on the upper ends of tubes (Fig. 2.7). This will form the side walls
prepared for attaching the upper crossbars.
3. Put eight 880 mm and 590 mm-long tubes in upholstery sleeves with foam casing and
press their ends into angle and straight connectors (Fig.2.8).
4. Fasten the connector covers with Velcro (Fig. 2.9).
NOTE: The eectiveness of non-slip silicone feet depends on the surface on which the
playpen will be set. They will work excellent on at, smooth and clean surfaces.
PLAYPEN ASSEMBLY - model KOMOFAN01A3
3
1. Start assembling the playpen with the base. Insert eight 970 mm and 870 mm-long
metal tubes into the lower sleeves of playpen upholstery. Then connect them with
lower angle connectors equipped with silicone feet (Fig. 3.7). Note that the playpen
design is rectangular - this is why there are two dierent lengths of tubes.
2. Attach 8 vertical tubes of the same length of 615 mm to the assembled base. Pull
the tubes through the vertical upholstery sleeves with foam casing and press them
into the base angle connectors and straight connectors. Put the upper angle and
straight connectors on the upper ends of tubes (Fig. 3.8). This will form the side walls
prepared for attaching the upper crossbars.
3. Put eight 970 mm and 870 mm-long tubes in upholstery sleeves with foam casing and
press their ends into angle and straight connectors (Fig. 3.9).
4. Fasten the connector covers with Velcro (Fig. 3.10).
NOTE: The eectiveness of non-slip silicone feet depends on the surface on which the
playpen will be set. They will work excellent on at, smooth and clean surfaces.
on the upper ends of tubes. This will form the side walls prepared for attaching the
upper crossbars (Fig. 1.5).
3. Place the remaining 6 tubes in upholstery sleeves and press their ends into the angle
connectors (Fig. 1.6).
4. Fasten the connector covers with Velcro (Fig. 1.7).
ENVIRONMENT
For the sake of the environment, after discontinuing the use of the product, please
dispose of it to an appropriate waste facility in accordance with the local law.
4
 Loading...