Do you have a question about the Kindermann Famulus reflex M and is the answer not in the manual?
Metal halide lamp reaches high temperatures and operates under high pressure. High voltage present. Keep off.
Detailed steps for safely removing the old lamp and inserting the new one, avoiding touching the bulb.
Procedure to reset the lamp life indicator by pressing the reset button.
Specifications for projector model No. 6090, including lamp type, lens, power, and dimensions.
Do not dispose of the product with normal household garbage to protect the environment.
Always quote the reference and serial number when ordering spare parts.
Placing the projector on a surface, engaging the arm, and connecting power.
Compare local voltage with the label before plugging in the projector.
Lamp reaches full brightness in 1 minute; avoid switching off cold lamps prematurely.
Adjust picture height and sharpness using the lens mirror and projection lens.
Protective glass gets hot, fan cools unit, avoid direct light exposure.
Steps to safely prepare the projector for transport, including cooling and folding.
Press the edges of the Fresnel lens onto the frame if colour fringes appear.
Fuse type T 6.3 AH; replace if lamp and fan fail.
LED signals flash patterns indicating lamp status and replacement need.
This document describes the Kindermann Famulus reflex M overhead projector, model number 6090.
The Famulus reflex M is an overhead projector designed for projecting transparencies. It utilizes a metal halide lamp to achieve high light output, making it suitable for various projection environments. The projector supports DIN A4 transparencies in both vertical and horizontal formats, projecting them onto a working surface. It features an automatic focusing device for upward projection, ensuring a sharp image. The device is equipped with an overheating protection system that automatically switches off the lamp if it gets too hot, and a quick fuse change mechanism for easy maintenance.
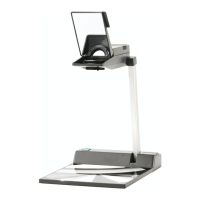
Setup and Initial Use: To set up the projector, place it on a horizontal, solid surface. Lift the projection arm (8) until it engages, then swivel the projection head (9) forward into a horizontal position. Open the lens mirror (10) completely. Connect the power cable (14) to the socket (1) on the projector and plug it in. Ensure the voltage on the label (2) matches the local voltage. The lens mirror (10) should remain open while the projector is in operation due to high temperatures at its focal point.
Projection: Switch on the projector using the main switch (3). The metal halide lamp will reach full brightness in about 1 minute. After starting a cold projector, do not switch off the lamp for at least 5 minutes. A hot lamp, however, can be switched off and on at any time. Adjust picture height with the lens mirror (10). Sharpness is adjusted by moving the pin at the projection lens (11). The automatic focusing device provides a razor-sharp image for upward projection. For optimal image quality, transparencies should be removed from their covers and laid flat on the working surface.
Safety and Warnings: The metal halide lamp operates under high pressure and reaches high temperatures; some parts inside the lamp house are under high voltage. Do not touch the protective glass (12) in front of the lamp during operation as it gets very hot. Do not look directly into the projection light due to its high light output. Ensure ventilation grilles on the projection head and body are unobstructed during operation to prevent overheating.
Transport: To prepare for transport, switch off the projector via the on/off switch (3) and disconnect it from the mains. Protect the working surface with the foam layer. Close the lens mirror (10), grip the projection head (9) at its bottom, and swivel it back until it engages. Gently press the projection column (8) backward while simultaneously pressing the release button (7) to fold the projection column and head forward.
Troubleshooting Colour Fringes: If colour fringes appear on the projected image, it may be due to the Fresnel lens (6) not being properly positioned. Press down the edges of the lens onto the frame using a cloth, not bare fingers.
Lamp Change: The metal halide lamp (HTI 300 W/DX, No. 6093) has an average life of 750 hours. Do not use any other type of lamp. Before changing the lamp, switch off the projector, disconnect it from the mains, and allow it to cool for 20 minutes. Once cool, the lamp is no longer under pressure and is harmless. To change the lamp, turn out the safety screw (13) at the projection head (9). Press the release button (13a) and remove the top (fig. 3 + 4). Take out the defective lamp. Handle the new lamp only by its metal parts, removing any existing nuts first. Carefully insert the new lamp into the metal sockets until it engages, ensuring it fits into the grooves and the metal seal points sidewards to the fan (fig. 5). Avoid touching the bulb with bare fingers; if touched, clean it with a soft cloth and alcohol. Replace the top of the projection head by inserting the front hooks into the slots of the bottom, then closing until the catch engages. Fix the safety screw (13). After changing the lamp, switch on the projector and press the reset button (5) for 3 seconds until the LED flashes to reset the lamp life indicator to "0". Defective lamps should be disposed of according to local regulations, not with household garbage.
LED for Lamp Change Indicator: The LED for lamp change (4) indicates the lamp's status:
Fuse Change: The fuse (T 6.3 AH) is defective if both the lamp and fan fail. To check or change the fuse, pull out the fuse holder at socket (1). The active fuse is inside, and the spare fuse is outside.
Cleaning: If the protective glass (12) is dirty, remove dust with a damp cloth. First unplug the projector, let it cool down, then remove the glass after loosening the 3 holding screws. The fan will continue to run for 1-3 seconds after switching off the projector.
Disposal of the Product: If the dust bin symbol on the label is crossed out, the product should not be disposed of with normal household garbage. This is to prevent harm to the environment and human health.
When ordering spare parts, always quote the reference number and serial number of your projector.
| Brand | Kindermann |
|---|---|
| Model | Famulus reflex M |
| Category | Projector |
| Language | English |